
BryteFlow Ingest - Real-time data integration
BryteFlow Ingest is a real-time data replication software replicating data from various sources to destinations. It is a high-performance software that facilitates real-time change data capture from sources with zero load on the source systems. BryteFlow Ingest captures the changes and transfers them to the target system. It automates the creation of either an exact copy or a time series copy of the data source in the target. BryteFlow Ingest performs an initial full load from source and then incrementally merges changes to the destination of choice, the entire process being fully automated.
BryteFlow Ingest works with its companion softwares which are part of BryteFlow Product suite.
- BryteFlow Blend for real-time data extraction and data preparation
- BryteFlow TruData for real-time data reconciliation
- BryteFlow Ingest XL for large table extraction
Supported Database Sources
BryteFlow Ingest supports the following database sources:
- MS SQL Server
- Oracle
- MySQL
- PostgreSQL
- MariaDB
- Salesforce
- SAP S/4 HANA
- SAP ECC
- SAP HANA
- API integration with files on Amazon S3
- Any Files on Amazon S3
Supported Destinations
The supported destinations are as follows:
- S3
- Redshift
- Snowflake
- Athena
- Apache Kafka
- ADLS Gen2
- Azure Synapse SQL
- Microsoft SQL Server
- Azure SQL DB
- Oracle
- PostgreSQL
- Google Bigquery
- Databricks
Looking for a different destination?
BryteFlow does custom source/destination on customer request, please contact us directly at info@bryteflow.com.
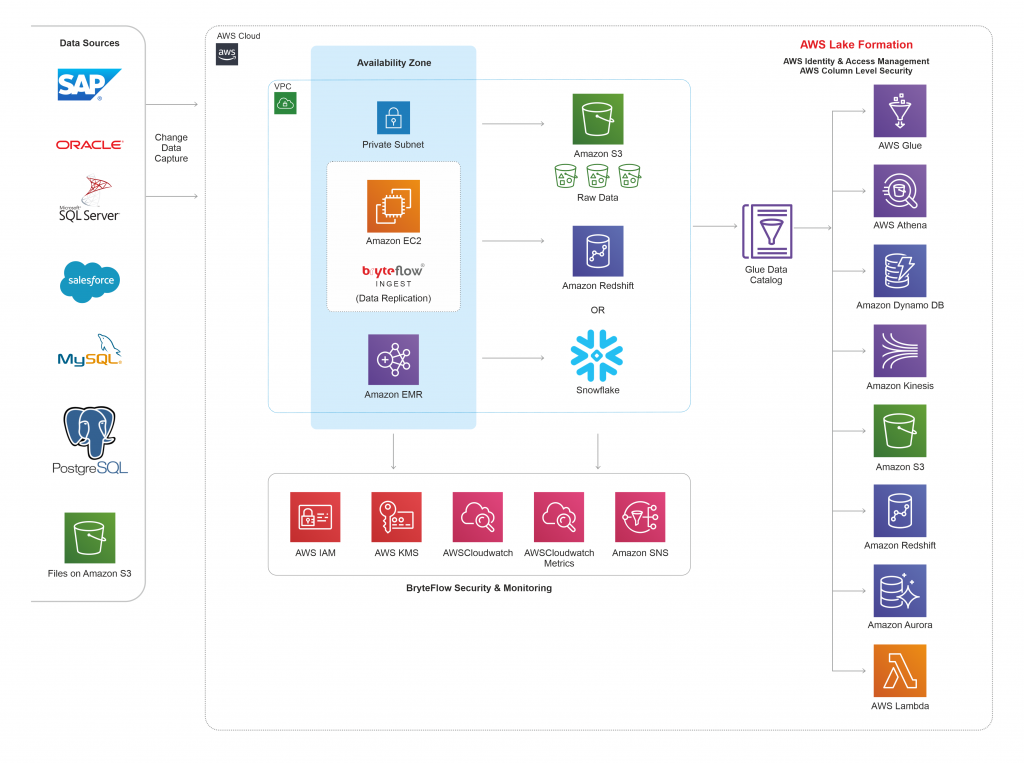
BryteFlow Ingest Architecture
BryteFlow Ingest can replicate data from any database, any API and any flat file to Amazon S3, Redshift, Snowflake, Databricks, PostgreSQL, Google Bigquery , Apache Kafka etc. through a simple point and click interface. It is an entirely self-service and automated data replication tool.
BryteFlow offers various deployment strategies to its Customers, mentioned below:
- Standard deployment on AWS Environment
- High Availability deployment in an AWS Environment
- Hybrid deployment– using On-premises and Cloud infrastructure
BryteFlow Ingest uses log-based Change Data Capture for data replication. Below is the Technical Architecture Diagram, showcasing the same for a standard setup in AWS Environment.
Below is the architecture diagram for BryteFlow Ingest in a standard deployment. Its is the reference architecture for any of the setup instructions that is provided in this user guide. For more details on setting up any optional components please contact BryteFlow support.
Estimated Deployment time : 1 hour (~Approx)
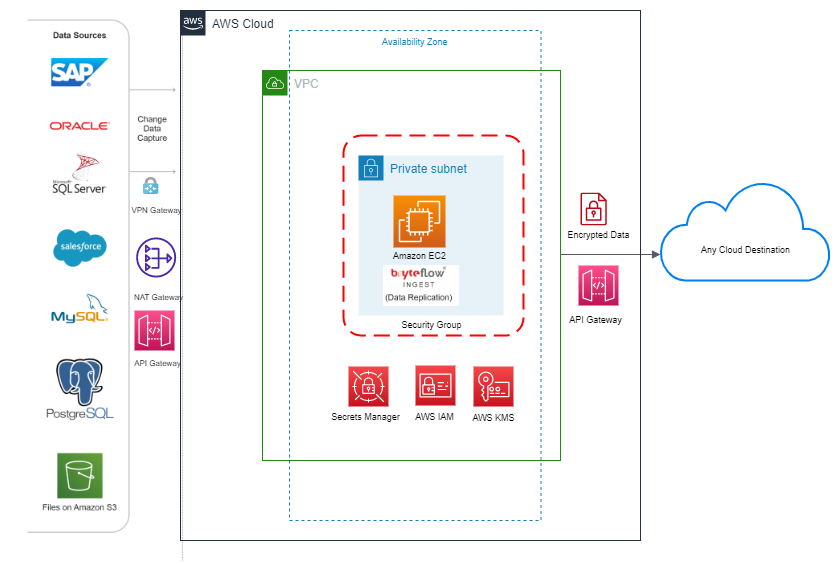
Below is the BryteFlow Ingest architecture showcasing integration with various AWS services which are optional, in a standard deployment.
The above architecture diagram describes a Standard deployment type showcasing the below features:
- AWS services running along with BryteFlow Ingest
- BryteFlow Architecture recommended for a VPC in AWS.
- Data Flow between source, AWS and destination with security and monitoring feature used.
- Security which includes IAM is in separate group and is interfaced with BryteFlow Ingest
- All supported destinations and AWS services are listed to which BryteFlow integrates
High Availability Architecture
Estimated Deployment time : 1 day (~Approx)
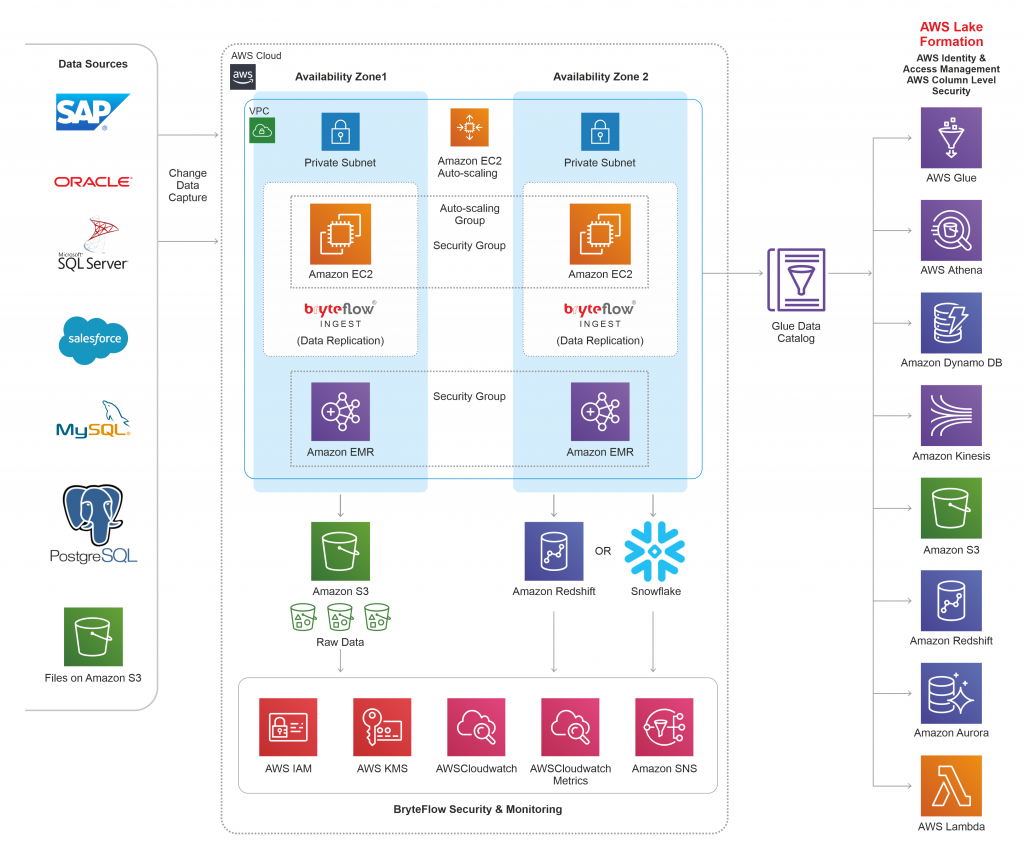
The high availability architecture explains the way BryteFlow is deployed in a multi-AZ setup. In case of any instance or AZ failures it can be auto scaled in another AZ, without incurring any data loss.
Hybrid Architecture
Estimated Deployment time : 4 hours (~Approx)
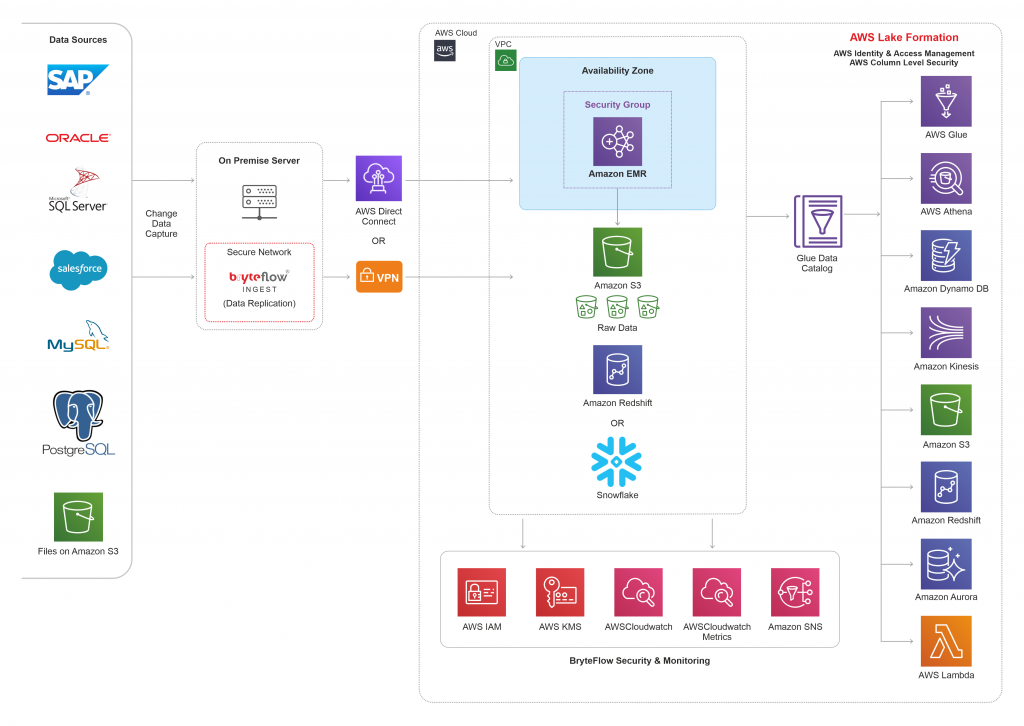
BryteFlow also offers a hybrid deployment model to its Customers, which is mix of services on-premises and in the AWS Cloud. BryteFlow Ingest can be easily setup on a Windows server which is in an on-premises environment. Whereas, all the destination end-points reside on AWS Cloud, making it a hybrid model. Its recommended to follow secure connectivity between on-premises and AWS services which can be achieved by using VPN connection or AWS Direct Connect, refer to the blog which talks about choices for hybrid cloud connectivity.
Prerequisite
Prerequisites of using Amazon Machine Image (AMI) from AWS Marketplace
Using the AMI sourced from the AWS Marketplace requires:
- Selection of BryteFlow Ingest volume
- Selection of EC2 instance type
- Ensure connectivity between the server/EC2 hosting the BryteFlow Ingest software and
- the source
- Amazon S3
- Amazon EMR
- Amazon Redshift (if needed as a destination)
- Snowflake (if needed as a destination)
- Amazon Athena (if needed as a destination)
- DynamoDB (if high availability option is required)
The steps to create AWS services are mentioned in detail under the section ‘ Environment Preparation‘.
Follow below steps prior to launching BryteFlow in AWS via AMI or Custom install on an EC2:
- Create a policy giving relevant name for EC2 i.e. “BryteFlowEc2Policy”. Refer AWS guide on creating policies.
- Use the policy json provided in the below section “AWS Identity and Access Management (IAM) for BryteFlow“
- Create an IAM role “BryteFlowEc2Role”. Refer AWS guide for step-by-step instruction on creating roles .
- Attach the policy “BryteFlowEc2Policy” to the role.
- Similarly, create a Lambda policy which is required for disk checks and attach the Lambda policy json provided in below section “Recovery from faults“.
Available options with AMI are volume based, recommended options for EC2 and EMR for each of these volumes.
| Total Data Volume | EC2 Recommended | EMR Recommended |
| < 100 GB | t2.small | 1 x m4.xlarge master node 2 x c5.xlarge task nodes |
| 100GB – 300GB | t2.medium | 1 x m4.xlarge master node 2 x c5.xlarge task nodes |
| 300GB – 1TB | t2.large | 1 x m4.xlarge master node 2 x c5.xlarge task nodes |
| > 1TB | Seek expert advice from support@bryteflow.com | Seek expert advice from support@bryteflow.com |
NOTE: Evaluate the EMR configuration depending on the latency required.
These should be considered a starting point, if you have any questions please seek expert advice from support@bryteflow.com
System Requirement when not using Amazon Machine Image (AMI)
- Port 8081 should be open on the server hosting the BryteFlow Ingest software
- Google Chrome browser is required as the internet browser on the server hosting BryteFlow Ingest software
- Java version 8 or higher is required
- If using MS SQL Server as a source, please download and install the BCP utility
- Ensure connectivity between the server hosting the BryteFlow Ingest software and the source, Amazon S3, Amazon EMR, Amazon Redshift and DynamoDB (if high availability option is required)
Recommended Hardware configuration
The following describes the hardware configuration for a Windows server, assuming that there are a few sources and target combinations (3 medium ideally). It also depends on how intensively the data is being replicated from these sources, so this is a guide, but will need extra resources depending on the amount of data being replicated. The amount of disk space will also be dependent on the amount of data being replicated.
Processor: 4 core
Memory: 16GB
Disk requirements: Depend on the data being extracted, but a minimum of 300GB
Network performance: High
Prerequisites for software on the server
The following softwares are required to be installed on the server:
- The server should have 64-bit Open jdk 1.8
https://corretto.aws/downloads/latest/amazon-corretto-8-x64-windows-jre.msi
- Google Chrome
- For Oracle database as a destination ONLY:
- Please install Oracle client corresponding to the version of Oracle at destination database.
- For SQL Server sources and SQL Server destinations ONLY: Install bcp – Microsoft Utility and below drivers:
- VC++ 2017 64 bit
https://support.microsoft.com/en-in/help/2977003/the-latest- supported-visual-c-downloads - ODBC drivers 17 64 bit
https://www.microsoft.com/en-us/download/details.aspx?id= 56567 - SQL CMD version 15 64 bit
https://docs.microsoft.com/en-us/sql/tools/sqlcmd-utility? view=sql-server-ver15
Required Skills
BryteFlow is a very robust application which makes data replication to cloud very easy and smooth. It can deal with huge data volumes with ease and the process is all automated. The setup done in 3 easy steps. It doesn’t need highly technical resources, basic knowledge of the below is recommended yo deploy the software:
- AWS Cloud Fundamentals
- For RDMS endpoints, basic database skills includes writing and executing database queries.
- Able to use Microsoft windows system
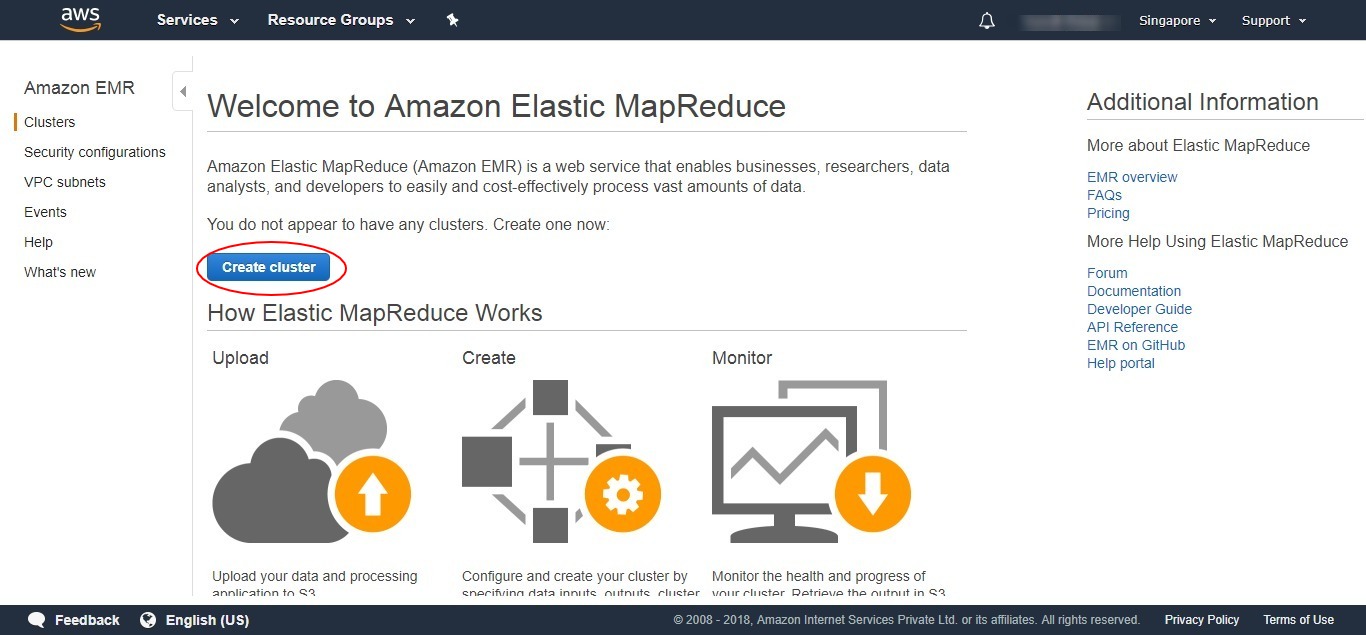
Launch BryteFlow Enterprise Edition from AWS Marketplace
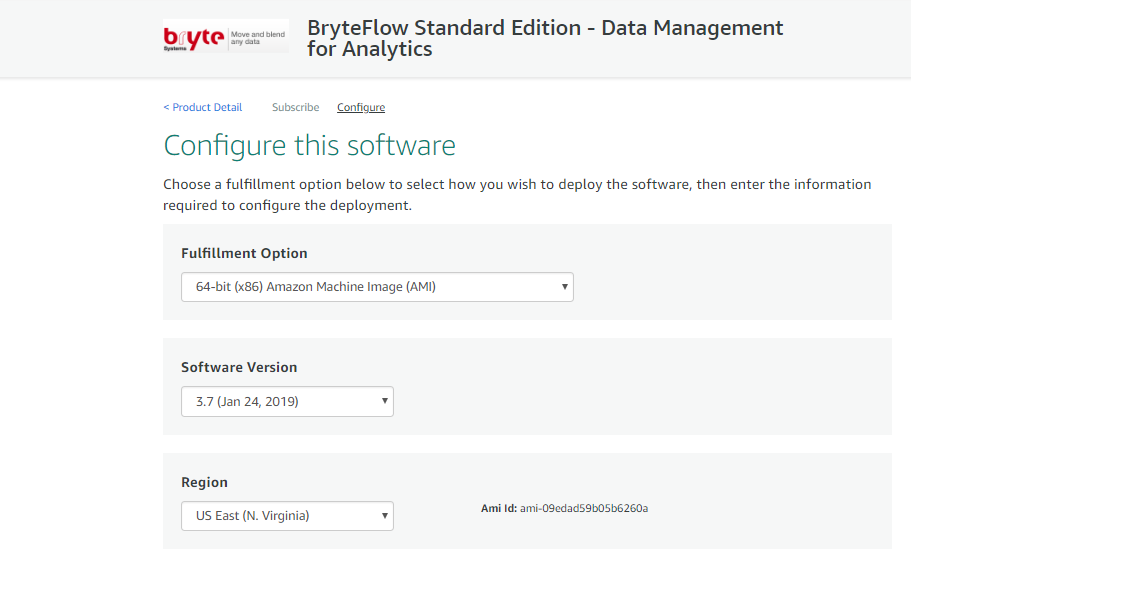
Steps to launch BryteFlow from AWS Marketplace: Enterprise Edition
- Please ensure to complete the ‘Environment Preparation‘ section before proceeding to launch BryteFlow from an AMI.
- Go to the product URL https://aws.amazon.com/marketplace/pp/B079PWMJ4B
- Click ‘Continue to Subscribe’
- Click ‘Continue to Configuration’. This brings up the default ‘Fulfillment Option’ with the latest software version.
- Choose the AWS Region you would like to go for or else go by the default AWS Region that is already present in the drop-down.
Supported AWS Regions:
BryteFlow Ingest is validated and supported in below AWS Regions, however it can be launched in all AWS regions.
- us-east-1
- us-east-2
- us-west-2
- ap-southeast-2
BryteFlow is available in ALL AWS Regions.
Please contact BryteFlow Support for any needed support.

- Click ‘Continue to Launch’
- Choose Action ‘Launch from Website’
- Select your EC2 instance type based on your data volume, recommendations available in the product detail page
- Choose your VPC from the dropdown or go by the default
- Please select the ‘Private Subnet’ under ‘Subnet Settings’. If none exists, its recommended to create one. Please follow detail AWS User Guide for Creating a Subnet.
- Update the ‘Security Group Settings’ or create one based on BryteFlow recommended steps as below:
- Assign a name for the security group, for eg: BryteFlowIngest
- Enter a description of your choice
- Add inbound rule(s) to RDP the EC2 with the Custom IP address

- Add outbound rule(s) to allow the EC2 instance access the source db. DB ports will vary based on the source database , please add rules to allow the instance access to specific source database ports.
- For more details, refer to BryteFlow recommendation on Network ACLs for your VPC in the below section ‘Recommended Network ACL Rules‘
- Provide the Key Pair Settings by choosing an EC2 key pair of your own or ‘Create a key pair in EC2‘
- Click ‘Launch’ to launch the EC2 instance.
- The endpoint will be an EC2 instance running BryteFlow Ingest (as a windows service) on port 8081
Additional information regarding launching an EC2 instance can be found here
Any trouble launching or connecting to the EC2 instance, please refer to the troubleshooting guides below:
- https://docs.aws.amazon.com/AWSEC2/latest/WindowsGuide/troubleshooting-windows-instances.html#rdp-issues
- https://docs.aws.amazon.com/AWSEC2/latest/WindowsGuide/get-set-up-for-amazon-ec2.html#create-a-base-security-group
** Please note that BryteFlow Blend is a companion product to BryteFlow Ingest. In order to make the most of enterprise capabilities, first setup BryteFlow Ingest completely. Thereafter, no configuration is required in BryteFlow Blend, its all ready to go. Start with the transformations directly off AWS S3.
Once connected to the EC2 instance:
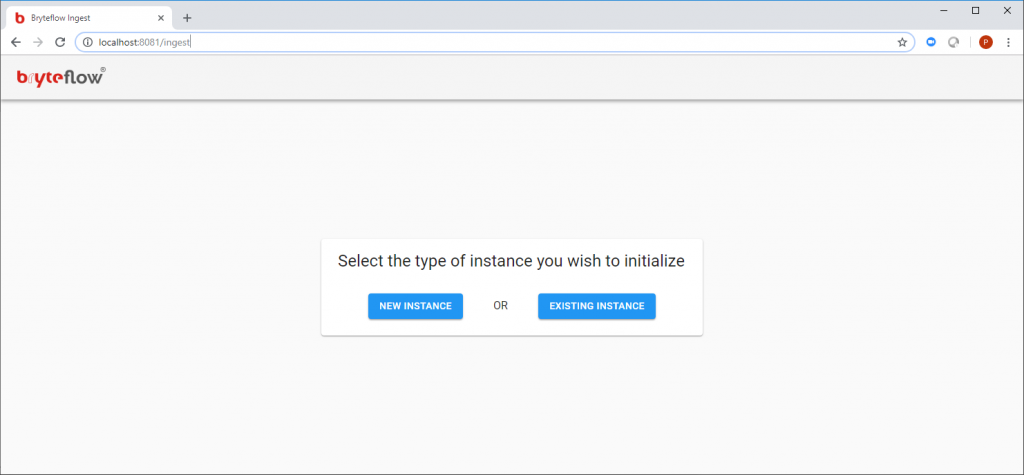
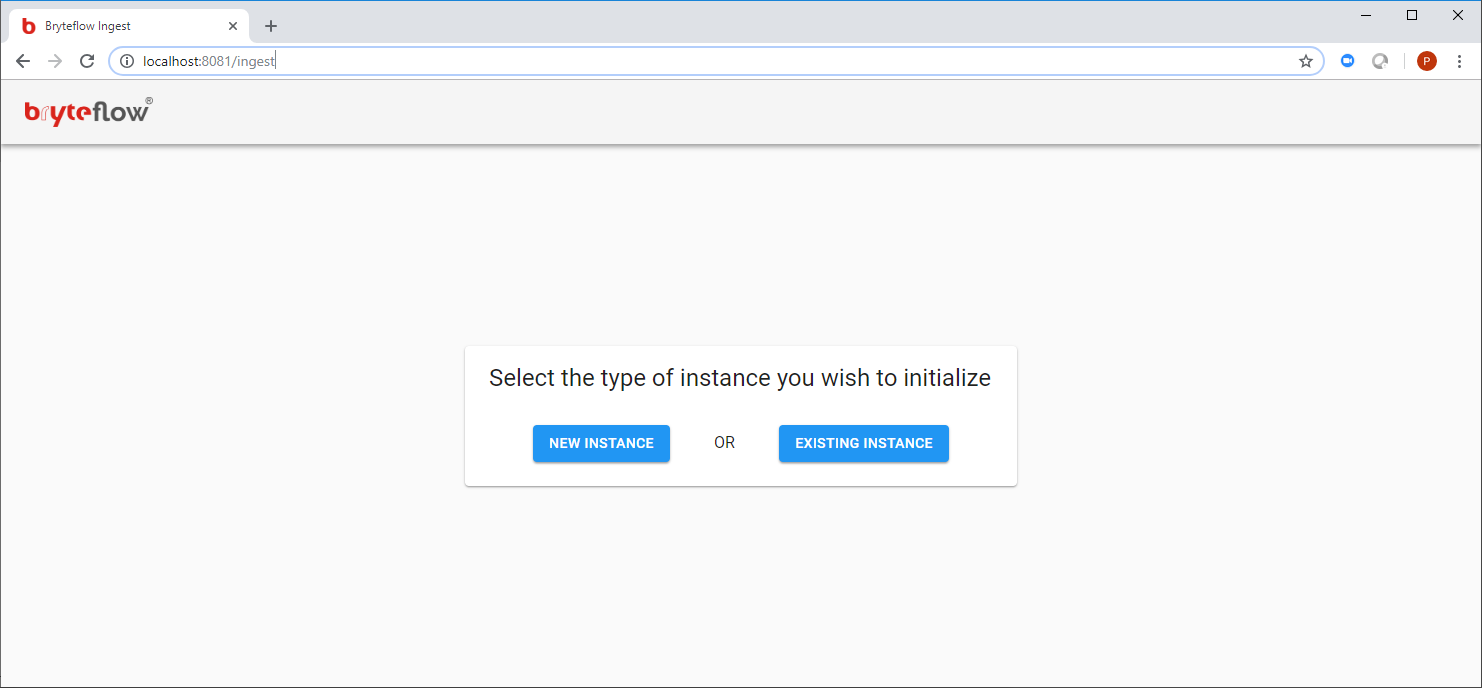
- Launch BryteFlow Ingest from the google chrome browser using bookmark ‘BryteFlow Ingest’
- Or type
localhost:8081into the Chrome browser to open the BryteFlow Ingest web console - This will bring up a page requesting either a ‘New Instance’ or an ‘Existing Instance’
- Click on the ‘New Instance’ button and do the setup for your environment (refer to the section regarding Configuration Of BryteFlow Ingest in this document for further details)
- ‘Existing Instance’ should only be clicked when recovering an instance of BryteFlow Ingest (refer to the Recovery section of this document for further details)
- Once Ingest is all setup and is replicating to the desired destination successfully
- Launch BryteFlow Blend from the Google chrome browser using bookmark ‘BryteFlow Blend’
- Or type
localhost:8082into the Google chrome browser to open the BryteFlow Blend web console - BryteFlow Blend is tied up to BryteFlow Ingest and no AWS Location configuration is required.
- This makes users ready to start their data transformations of S3.
- For details on Blend setup and Usage refer to the BryteFlow Blend User Guide: https://docs.bryteflow.com/Bryteflow-Blend-User-Guide/
Launch BryteFlow Ingest from AWS Marketplace : Standard Edition
Steps to launch BryteFlow Ingest from AWS Marketplace: Standard Edition
- Please ensure to complete the ‘Environment Preparation‘ section before proceeding to launch BryteFlow from an AMI.
- Go to the product URL https://aws.amazon.com/marketplace/pp/B01MRLEJTK
- Click ‘Continue to Subscribe’
- Click ‘Continue to Configuration’. This brings up the default ‘Fulfillment Option’ with the latest software version.
- Choose the AWS Region you would like to go for or else go by the default AWS Region that is already present in the dropdown.
BryteFlow is available in ALL AWS Regions.
- Click ‘Continue to Launch’
- Choose Action ‘Launch from Website’
- Select your EC2 instance type based on your data volume, recommendations available in the product detail page
- Choose your VPC from the dropdown
- Please select the ‘Private Subnet’ under ‘Subnet Settings’. If none exists, its recommended to create one. Please follow detail AWS User Guide for Creating a Subnet.
- Update the ‘Security Group Settings’ or create one based on BryteFlow recommended steps as below:
- Assign a name for the security group, for eg: BryteFlowIngest
- Enter a description of your choice
- Add inbound rule(s) to RDP the EC2 with the Custom IP address

- Add outbound rule(s) to allow the EC2 instance access the source db. DB ports will vary based on the source database , please add rules to allow the instance access to specific source database ports.
- For more details, refer to BryteFlow recommendation on Network ACLs for your VPC in the below section ‘Recommended Network ACL Rules‘
- Provide the Key Pair Settings by choosing an EC2 key pair of your own or ‘Create a key pair in EC2‘
- Click ‘Launch’ to launch the EC2 instance.
- The endpoint will be an EC2 instance running BryteFlow Ingest (as a windows service) on port 8081
Additional information regarding launching an EC2 instance can be found here
Any trouble launching or connecting to the EC2 instance, please refer to the troubleshooting guides below:
- https://docs.aws.amazon.com/AWSEC2/latest/WindowsGuide/troubleshooting-windows-instances.html#rdp-issues
- https://docs.aws.amazon.com/AWSEC2/latest/WindowsGuide/get-set-up-for-amazon-ec2.html#create-a-base-security-group
Once connected to the EC2 instance:
- Launch BryteFlow Ingest from the google chrome browser using bookmark ‘BryteFlow Ingest’
- Or type
localhost:8081into the Chrome browser to open the BryteFlow Ingest web console - This will bring up a page requesting either a ‘New Instance’ or an ‘Existing Instance’
- Click on the ‘New Instance’ button (refer to the section regarding Configuration Of BryteFlow Ingest in this document for further details)
- ‘Existing Instance’ should only be clicked when recovering an instance of BryteFlow Ingest (refer to the Recovery section of this document for further details)
Launch BryteFlow SAP Data Lake Builder from AWS Marketplace
Steps to launch BryteFlow from AWS Marketplace: SAP Data Lake Builder
- Please ensure to complete the ‘Environment Preparation‘ section before proceeding to launch BryteFlow from an AMI.
- Go to the product URL
- Click ‘Continue to Subscribe’
- Click ‘Continue to Configuration’. This brings up the default ‘Fulfillment Option’ with the latest software version.
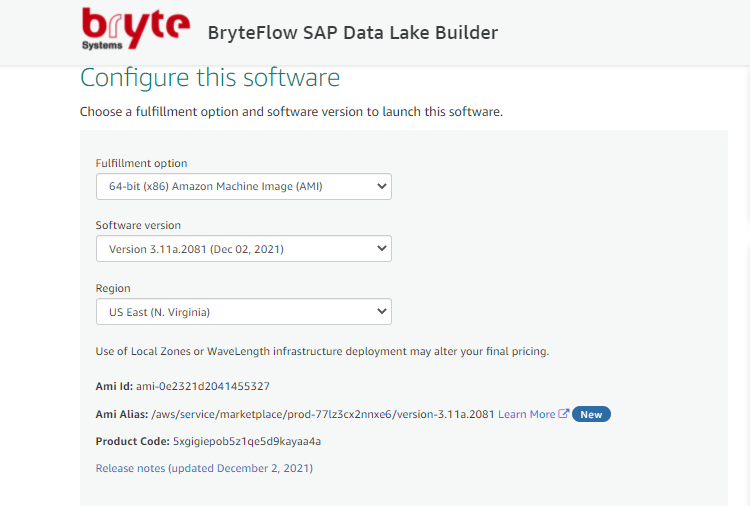 Choose the AWS Region you would like to go for or else go by the default AWS Region that is already present in the drop-down.
-
- Click ‘Continue to Launch’
- Choose Action ‘Launch from Website’
- Select your EC2 instance type based on your data volume, recommendations available in the product detail page
- Choose your VPC from the dropdown
- Please select the ‘Private Subnet’ under ‘Subnet Settings’. If none exists, its recommended to create one. Please follow detail AWS User Guide for Creating a Subnet.
- Update the ‘Security Group Settings’ or create one based on BryteFlow recommended steps as below:
- Assign a name for the security group, for eg: BryteFlowIngest
- Enter a description of your choice
- Add inbound rule(s) to RDP the EC2 with the Custom IP address
- Add outbound rule(s) to allow the EC2 instance access the source db. DB ports will vary based on the source database , please add rules to allow the instance access to specific source database ports.
- For more details, refer to BryteFlow recommendation on Network ACLs for your VPC in the below section ‘Recommended Network ACL Rules‘
- Provide the Key Pair Settings by choosing an EC2 key pair of your own or ‘Create a key pair in EC2‘
- Click ‘Launch’ to launch the EC2 instance.
- The endpoint will be an EC2 instance running BryteFlow Ingest (as a windows service) on port 8081
Additional information regarding launching an EC2 instance can be found here
Any trouble launching or connecting to the EC2 instance, please refer to the troubleshooting guides below:
- https://docs.aws.amazon.com/AWSEC2/latest/WindowsGuide/troubleshooting-windows-instances.html#rdp-issues
- https://docs.aws.amazon.com/AWSEC2/latest/WindowsGuide/get-set-up-for-amazon-ec2.html#create-a-base-security-group
Once connected to the EC2 instance:
- Launch BryteFlow Ingest from the google chrome browser using bookmark ‘BryteFlow Ingest’
- Or type
localhost:8081into the Chrome browser to open the BryteFlow Ingest web console - This will bring up a page requesting either a ‘New Instance’ or an ‘Existing Instance’
- Click on the ‘New Instance’ button (refer to the section regarding Configuration Of BryteFlow Ingest in this document for further details)
- ‘Existing Instance’ should only be clicked when recovering an instance of BryteFlow Ingest (refer to the Recovery section of this document for further details)
AWS Identity and Access Management (IAM) for BryteFlow
AWS IAM roles are used to delegate access to the AWS resources. With IAM roles, you can establish trust relationships between your trusting account and other AWS trusted accounts. The trusting account owns the resource to be accessed and the trusted account contains the users who need access to the resource.
BryteFlow’s Recommendations:
- Create an IAM User for eg. ‘BryteFlow_User’. Please DO NOT use root user account to setup the application. Refer AWS guide on how to create an IAM User.
- Create an IAM role for eg. ‘BryteFlow_EC2Role’. Refer to the AWS guide on creating IAM role.
- Create an IAM Policy for eg. ‘BryteFlow_policy’ and assign custom policies provided below to the EC2 Role, for details on creating policy click here.
- Instead of defining permissions for individual BryteFlow IAM users, it’s usually more convenient to create groups that relate to job functions (administrators, developers, accounting, etc.). Next, define the relevant permissions for each group. Finally, assign IAM users to those groups. All the users in an IAM group inherit the permissions assigned to the group. That way, you can make changes for everyone in a group in just one place.
- Grant Least privilege – Its recommended to grant only minimal required permissions to the IAM role. BryteFlow User requires the basic permissions on S3, CloudWatch, Dynamodb and Redshift (if needed).
- BryteFlow needs access to S3 , EC2 , EMR, SNS and Redshift (if needed as a destination) with the below listed minimum privileges.
-
-
- Sample policy that is required for ‘BryteFlow’ EC2 Role is shared below:
{
"Version": "2012-10-17",
"Statement": [
{
"Sid": "1",
"Action": [
"s3:DeleteObject",
"s3:GetObject",
"s3:ListBucket",
"s3:PutObject"
],
"Effect": "Allow",
"Resource": "arn:aws:s3:::"
},
{
"Sid": "2",
"Action": [
"ec2:AcceptVpcEndpointConnections",
"ec2:AcceptVpcPeeringConnection",
"ec2:AssociateIamInstanceProfile",
"ec2:CreateTags",
"ec2:DescribeTags",
"ec2:RebootInstances"
],
"Effect": "Allow",
"Resource": "arn:aws:ec2:"
},
{
"Sid": "3",
"Action": [
"elasticmapreduce:AddJobFlowSteps",
"elasticmapreduce:DescribeStep",
"elasticmapreduce:ListSteps",
"elasticmapreduce:RunJobFlow",
"elasticmapreduce:ListCluster",
"elasticmapreduce:DescribeCluster"
],
"Effect": "Allow",
"Resource": "arn:aws:elasticmapreduce:: : / "
},
{
"Sid": "4",
"Action": [
"sns:Publish"
],
"Effect": "Allow",
"Resource": "arn:aws:sns:: : "
},
{
"Sid": "5",
"Action": [
"redshift:ExecuteQuery",
"redshift:FetchResults",
"redshift:ListTables"
],
"Effect": "Allow",
"Resource": "arn:aws:redshift:: :cluster:mycluster*"
},
{
"Sid": "VisualEditor0",
"Effect": "Allow",
"Action": [
"dynamodb:CreateTable",
"dynamodb:PutItem",
"dynamodb:Update*",
"dynamodb:Get*",
"dynamodb:Scan"
],
"Resource": "arn:aws:dynamodb:: :table/BryteflowTable"
},
{
"Sid": "6",
"Effect": "Allow",
"Action": [
"secretsmanager:GetSecretValue",
"secretsmanager:DescribeSecret",
"secretsmanager:PutSecretValue",
"secretsmanager:UpdateSecret"
],
"Resource": "arn:aws:secretsmanager:*::secret:*"
},
{
"Sid": "7",
"Effect": "Allow",
"Action": "secretsmanager:ListSecrets",
"Resource": "*"
}
]
}
- Sample policy that is required for ‘BryteFlow’ EC2 Role is shared below:
-
-
- The resources used in the policy are as follows:
- bucket_name : Data Lake bucket name, its the destination S3 bucket where the User wants the replicated data to be written to.
- ec2_instance_id : its the instance id of the EC2 launched via AMI or the existing EC2 where BryteFlow is setup.
- region : its the region in which the EMR cluster is created.
- account/account_id : its the ‘BryteFlow’ user account/account_id created for BryteFlow Ingest.
- resourceType : its the EMR resource type which should be ‘Cluster’
- resource_id : is the EMR Cluster id for BryteFlow
- sns_name : is the SNS topic name used by BryteFlow
- relative-id : is the Redshift cluster identifier used in BryteFlow
- Please NOTE: Redshift and SNS policies are optional. If Redshift is not a preferred destination for ingestion or SNS alerts are not required, while implementing please ignore the respective policy section.
- For more details on setting up IAM roles and policies refer to AWS documentation : https://docs.aws.amazon.com/IAM/latest/UserGuide/getting-set-up.html
Defining Roles for BryteFlow
Below are the various roles and permissions needed for launching and managing BryteFlow application.
| Role | Type | Permissions/Policies | Purpose |
| EC2Admin | AWS Custom Role for EC2 | List-DescribeInstanceStatus Directory Service List,Write-DescribeDirectories,CreateComputer Systems Manager List,Read,Write ListAssociations, ListInstanceAssociations, DescribeAssociation, DescribeDocument, GetDeployablePatchSnapshotForInstance, GetDocument, GetManifest, GetParameters, PutComplianceItems, PutInventory, UpdateAssociationStatus, UpdateInstanceAssociationStatus, UpdateInstanceInformation |
Create and Manage EC2 instance |
| DBAdmin | AWS Custom Role | cloudwatch:DeleteAlarms, cloudwatch:Describe*, cloudwatch:DisableAlarmActions, cloudwatch:EnableAlarmActions, cloudwatch:Get*, cloudwatch:List*, cloudwatch:PutMetricAlarm, datapipeline:ActivatePipeline, datapipeline:CreatePipeline, datapipeline:DeletePipeline, datapipeline:DescribeObjects, datapipeline:DescribePipelines, datapipeline:GetPipelineDefinition, datapipeline:ListPipelines, datapipeline:PutPipelineDefinition, datapipeline:QueryObjects, dynamodb:CreateTable, dynamodb:BatchGetItem, dynamodb:BatchWriteItem, dynamodb:ConditionCheckItem, dynamodb:PutItem, dynamodb:DescribeTable, dynamodb:DeleteItem, dynamodb:GetItem, dynamodb:Scan, dynamodb:Query, dynamodb:UpdateItem, ec2:DescribeAccountAttributes, ec2:DescribeAddresses, ec2:DescribeAvailabilityZones, ec2:DescribeInternetGateways, ec2:DescribeSecurityGroups, ec2:DescribeSubnets, ec2:DescribeVpcs, iam:ListRoles, iam:GetRole, kms:ListKeys, lambda:CreateEventSourceMapping, lambda:CreateFunction, lambda:DeleteEventSourceMapping, lambda:DeleteFunction, lambda:GetFunctionConfiguration, lambda:ListEventSourceMappings, lambda:ListFunctions, logs:DescribeLogGroups, logs:DescribeLogStreams, logs:FilterLogEvents, logs:GetLogEvents, logs:Create*, logs:PutLogEvents, logs:PutMetricFilter, rds:*, redshift:CreateCluster, redshift:DeleteCluster, redshift:ModifyCluster, redshift:RebootCluster, s3:CreateBucket, sns:CreateTopic, sns:DeleteTopic, sns:Get*, sns:List*, sns:SetTopicAttributes, sns:Subscribe, sns:Unsubscribe |
Manage DB access and priviledges |
| NetworkAdmin | Custom Role | autoscaling:Describe*, cloudfront:ListDistributions, cloudwatch:DeleteAlarms, cloudwatch:DescribeAlarms, cloudwatch:GetMetricStatistics, cloudwatch:PutMetricAlarm, directconnect:*, ec2:AcceptVpcEndpointConnections, ec2:AllocateAddress, ec2:AssignIpv6Addresses, ec2:AssignPrivateIpAddresses, ec2:AssociateAddress, ec2:AssociateDhcpOptions, ec2:AssociateRouteTable, ec2:AssociateSubnetCidrBlock, ec2:AssociateVpcCidrBlock, ec2:AttachInternetGateway, ec2:AttachNetworkInterface, ec2:AttachVpnGateway, ec2:CreateCarrierGateway, ec2:CreateCustomerGateway, ec2:CreateDefaultSubnet, ec2:CreateDefaultVpc, ec2:CreateDhcpOptions, ec2:CreateEgressOnlyInternetGateway, ec2:CreateFlowLogs, ec2:CreateInternetGateway, ec2:CreateNatGateway, ec2:CreateNetworkAcl, ec2:CreateNetworkAclEntry, ec2:CreateNetworkInterface, ec2:CreateNetworkInterfacePermission, ec2:CreatePlacementGroup, ec2:CreateRoute, ec2:CreateRouteTable, ec2:CreateSecurityGroup, ec2:CreateSubnet, ec2:CreateTags, ec2:CreateVpc, ec2:CreateVpcEndpoint, ec2:CreateVpcEndpointConnectionNotification, ec2:CreateVpcEndpointServiceConfiguration, ec2:CreateVpnConnection, ec2:CreateVpnConnectionRoute, ec2:CreateVpnGateway, ec2:DeleteCarrierGateway, ec2:DeleteEgressOnlyInternetGateway, ec2:DeleteFlowLogs, ec2:DeleteNatGateway, ec2:DeleteNetworkInterface, ec2:DeleteNetworkInterfacePermission, ec2:DeletePlacementGroup, ec2:DeleteSubnet, ec2:DeleteTags, ec2:DeleteVpc, ec2:DeleteVpcEndpointConnectionNotifications, ec2:DeleteVpcEndpointServiceConfigurations, ec2:DeleteVpcEndpoints, ec2:DeleteVpnConnection, ec2:DeleteVpnConnectionRoute, ec2:DeleteVpnGateway, ec2:DescribeAccountAttributes, ec2:DescribeAddresses, ec2:DescribeAvailabilityZones, ec2:DescribeCarrierGateways, ec2:DescribeClassicLinkInstances, ec2:DescribeCustomerGateways, ec2:DescribeDhcpOptions, ec2:DescribeEgressOnlyInternetGateways, ec2:DescribeFlowLogs, ec2:DescribeInstances, ec2:DescribeInternetGateways, ec2:DescribeKeyPairs, ec2:DescribeMovingAddresses, ec2:DescribeNatGateways, ec2:DescribeNetworkAcls, ec2:DescribeNetworkInterfaceAttribute, ec2:DescribeNetworkInterfacePermissions, ec2:DescribeNetworkInterfaces, ec2:DescribePlacementGroups, ec2:DescribePrefixLists, ec2:DescribeRouteTables, ec2:DescribeSecurityGroupReferences, ec2:DescribeSecurityGroupRules, ec2:DescribeSecurityGroups, ec2:DescribeStaleSecurityGroups, ec2:DescribeSubnets, ec2:DescribeTags, ec2:DescribeVpcAttribute, ec2:DescribeVpcClassicLink, ec2:DescribeVpcClassicLinkDnsSupport, ec2:DescribeVpcEndpointConnectionNotifications, ec2:DescribeVpcEndpointConnections, ec2:DescribeVpcEndpointServiceConfigurations, ec2:DescribeVpcEndpointServicePermissions, ec2:DescribeVpcEndpointServices, ec2:DescribeVpcEndpoints, ec2:DescribeVpcPeeringConnections, ec2:DescribeVpcs, ec2:DescribeVpnConnections, ec2:DescribeVpnGateways, ec2:DescribePublicIpv4Pools, ec2:DescribeIpv6Pools, ec2:DetachInternetGateway, ec2:DetachNetworkInterface, ec2:DetachVpnGateway, ec2:DisableVgwRoutePropagation, ec2:DisableVpcClassicLinkDnsSupport, ec2:DisassociateAddress, ec2:DisassociateRouteTable, ec2:DisassociateSubnetCidrBlock, ec2:DisassociateVpcCidrBlock, ec2:EnableVgwRoutePropagation, ec2:EnableVpcClassicLinkDnsSupport, ec2:ModifyNetworkInterfaceAttribute, ec2:ModifySecurityGroupRules, ec2:ModifySubnetAttribute, ec2:ModifyVpcAttribute, ec2:ModifyVpcEndpoint, ec2:ModifyVpcEndpointConnectionNotification, ec2:ModifyVpcEndpointServiceConfiguration, ec2:ModifyVpcEndpointServicePermissions, ec2:ModifyVpcPeeringConnectionOptions, ec2:ModifyVpcTenancy, ec2:MoveAddressToVpc, ec2:RejectVpcEndpointConnections, ec2:ReleaseAddress, ec2:ReplaceNetworkAclAssociation, ec2:ReplaceNetworkAclEntry, ec2:ReplaceRoute, ec2:ReplaceRouteTableAssociation, ec2:ResetNetworkInterfaceAttribute, ec2:RestoreAddressToClassic, ec2:UnassignIpv6Addresses, ec2:UnassignPrivateIpAddresses, ec2:UpdateSecurityGroupRuleDescriptionsEgress, ec2:UpdateSecurityGroupRuleDescriptionsIngress, elasticbeanstalk:Describe*, elasticbeanstalk:List*, elasticbeanstalk:RequestEnvironmentInfo, elasticbeanstalk:RetrieveEnvironmentInfo, elasticloadbalancing:*, logs:DescribeLogGroups, logs:DescribeLogStreams, logs:GetLogEvents, route53:*, route53domains:*, sns:CreateTopic, sns:ListSubscriptionsByTopic, sns:ListTopics, ec2:AcceptVpcPeeringConnection, ec2:AttachClassicLinkVpc, ec2:AuthorizeSecurityGroupEgress, ec2:AuthorizeSecurityGroupIngress, ec2:CreateVpcPeeringConnection, ec2:DeleteCustomerGateway, ec2:DeleteDhcpOptions, ec2:DeleteInternetGateway, ec2:DeleteNetworkAcl, ec2:DeleteNetworkAclEntry, ec2:DeleteRoute, ec2:DeleteRouteTable, ec2:DeleteSecurityGroup, ec2:DeleteVolume, ec2:DeleteVpcPeeringConnection, ec2:DetachClassicLinkVpc, ec2:DisableVpcClassicLink, ec2:EnableVpcClassicLink, ec2:GetConsoleScreenshot, ec2:RejectVpcPeeringConnection, ec2:RevokeSecurityGroupEgress, ec2:RevokeSecurityGroupIngress, ec2:CreateLocalGatewayRoute, ec2:CreateLocalGatewayRouteTableVpcAssociation, ec2:DeleteLocalGatewayRoute, ec2:DeleteLocalGatewayRouteTableVpcAssociation, ec2:DescribeLocalGatewayRouteTableVirtualInterfaceGroupAssociations, ec2:DescribeLocalGatewayRouteTableVpcAssociations, ec2:DescribeLocalGatewayRouteTables, ec2:DescribeLocalGatewayVirtualInterfaceGroups, ec2:DescribeLocalGatewayVirtualInterfaces, ec2:DescribeLocalGateways, ec2:SearchLocalGatewayRoutes, s3:GetBucketLocation, s3:GetBucketWebsite, s3:ListBucket, iam:GetRole, iam:ListRoles, iam:PassRole, ec2:AcceptTransitGatewayVpcAttachment, ec2:AssociateTransitGatewayRouteTable, ec2:CreateTransitGateway, ec2:CreateTransitGatewayRoute, ec2:CreateTransitGatewayRouteTable, ec2:CreateTransitGatewayVpcAttachment, ec2:DeleteTransitGateway, ec2:DeleteTransitGatewayRoute, ec2:DeleteTransitGatewayRouteTable, ec2:DeleteTransitGatewayVpcAttachment, ec2:DescribeTransitGatewayAttachments, ec2:DescribeTransitGatewayRouteTables, ec2:DescribeTransitGatewayVpcAttachments, ec2:DescribeTransitGateways, ec2:DisableTransitGatewayRouteTablePropagation, ec2:DisassociateTransitGatewayRouteTable, ec2:EnableTransitGatewayRouteTablePropagation, ec2:ExportTransitGatewayRoutes, ec2:GetTransitGatewayAttachmentPropagations, ec2:GetTransitGatewayRouteTableAssociations, ec2:GetTransitGatewayRouteTablePropagations, ec2:ModifyTransitGateway, ec2:ModifyTransitGatewayVpcAttachment, ec2:RejectTransitGatewayVpcAttachment, ec2:ReplaceTransitGatewayRoute, ec2:SearchTransitGatewayRoutes |
Manage Network access and firewall settings |
| BryteFlowAdmin | Custom Role | elasticmapreduce:ListClusters, glue:GetDatabase, athena:StartQueryExecution, athena:ListDatabases, glue:GetPartitions, glue:UpdateTable, athena:GetQueryResults, athena:GetDatabase, glue:GetTable, athena:StartQueryExecution, glue:CreateTable, glue:GetPartitions, elasticmapreduce:ListSteps, athena:GetQueryResults, s3:ListBucket, elasticmapreduce:DescribeCluster, glue:GetTable, glue:GetDatabase, s3:PutObject, s3:GetObject, elasticmapreduce:DescribeStep, athena:StopQueryExecution, athena:GetQueryExecution, s3:DeleteObject, elasticmapreduce:AddJobFlowSteps, s3:GetBucketLocation, s3:PutObjectAcl, secretsmanager:GetSecretValue, secretsmanager:DescribeSecret, secretsmanager:PutSecretValue, secretsmanager:UpdateSecret |
Able to manage BryteFlow configurations |
| Amazon S3 | Resource Based Policy | s3:PutObject, s3:GetObject, s3:DeleteObject, s3:GetBucketLocation, s3:PutObjectAclResource: arn:aws:s3:::<bucket-name>, arn:aws:s3:::<bucket-name>/* |
To manage bucket level permissions, resource-based policy for S3 should be applied to restrict the bucket level access. The policy is attached to the bucket, but the policy controls access to both the bucket and the objects in it. |
| Amazon Ec2 | Resource Based Policy | ec2:AcceptVpcEndpointConnections, ec2:AcceptVpcPeeringConnection, ec2:AssociateIamInstanceProfile, ec2:CreateTags, ec2:DescribeTags, ec2:RebootInstancesResource: arn:aws:ec2:<ec2_instance_id> |
To manage instance level permissions, resource-based policy for EC2 should be applied to restrict the access for the EC2 instance. |
| AWS Marketplace | AWS managed policy | aws-marketplace:ViewSubscriptions, aws-marketplace:Subscribe, aws-marketplace:Unsubscribe, aws-marketplace:CreatePrivateMarketplaceRequests, aws-marketplace:ListPrivateMarketplaceRequests, aws-marketplace:DescribePrivateMarketplaceRequests |
For a user to launch BryteFlow from AWS Marketplace should have ‘AWSMarketplaceManageSubscriptions’ policy attached. |
Environment Preparation
Below is the guide provided to prepare an environment for BryteFlow in AWS :
- Create an AWS account: To prepare the environment for BryteFlow in AWS its required for the User to have an AWS account. If you already have an AWS account, skip to the next step. If you don’t have an AWS account to create one refer to the AWS Guide.
-
Create an IAM User: Its recommended to create a separate user for managing all AWS services DO NOT use root user for any task. Refer to AWS guide to create an IAM admin user.
- Create and assign policy to the User: Use the AWS Management Console to create a customer managed policy and then attach that policy to the IAM user as per their role. The policy created allows an IAM test user to sign in directly to the AWS Management Console with assigned permissions.
- Signing in to AWS:
- Create a VPC: A virtual private cloud (VPC) is a virtual network dedicated to your AWS account. It is logically isolated from other virtual networks in the AWS Cloud. You can launch your BryteFlow application and all related AWS resources, such as Amazon EC2 instances, into your VPC. For details on creating a VPC refer to AWS guide.
- Creating a Private Subnet in Your VPC : Considering that BryteFlow Ingest needs to be setup in Customers VPC, its recommended to create a new Private subnet within the VPC for BryteFlow. Please follow detail AWS User Guide for Creating a Subnet.
- Creating Security Group: A security group acts as a virtual firewall for your instance to control inbound and outbound traffic. Security groups acts at the instance level, not the subnet level. Therefore, each instance in a subnet in your VPC can be assigned to a different set of security groups. If you don’t specify a particular group at launch time, the instance is automatically assigned to the default security group for the VPC which is highly not-recommended. For each security group, you add rules that control the inbound traffic to instances, and a separate set of rules that control the outbound traffic. For more details, refer to AWS guide for security Groups.
-
Security Group Rules: You can add or remove rules for a security group which is authorizing or revoking inbound or outbound access. A rule applies either to inbound traffic (ingress) or outbound traffic (egress). You can grant access to a specific CIDR range, or to another security group in your VPC or in a peer VPC (requires a VPC peering connection).
-
Creating IAM Role: BryteFlow uses IAM role assigned to the Ec2 where the application is hosted. The Ec2 role needs to have all the required policies attached. To create an IAM role for BryteFlow refer to the AWS guide. Assign the required policies to the newly created IAM role.
- Assigning Role to Users or Group: The IAM role needs to be assigned to an AWS Directory Service user or group. The role must have a trust relationship with AWS Directory Service. Refer to the AWS guide to assign users or groups to an existing IAM role.
- Creating Access Key ID and Secret Access Key, BryteFlow uses access key id and secret access key to connect to AWS services from an on-premises server. Its recommended to have a set of access keys for the BryteFlow User account. Please follow the below steps from Admin User account to create access keys:
- Sign in to the AWS Management Console and open the IAM console at https://console.aws.amazon.com/iam/.
- In the navigation pane, choose Users.
- Choose the name of the ‘separate BryteFlow‘ user whose access keys you want to manage, and then choose the Security credentials tab.
- In the Access keys section, to create an access key, choose Create access key. Then choose Download .csv file to save the access key ID and secret access key to a CSV file on your computer. Store the file in a secure location. You will not have access to the secret access key again after this dialog box closes. After you download the CSV file, choose Close. When you create an access key, the key pair is active by default, and you can use the pair right away.
For more information on secret keys refer to AWS documentation here.
For security reasons, when using access keys its recommended to rotate all keys after certain time, say at a period of 90 days. More details mentioned in the section ‘Managing Access Keys‘
5. Creating Auto-Scaling Group, When BryteFlow Ingest needs to be deployed in a HA environment, its recommended to have your EC2 alongwith an Auto Scaling Group.
Please follow the steps here to launch the same via AWS console. When launching an Auto-Scaling group via the console below are the recommended parameters that needs to be specified :
-
- When choosing an Amazon Machine Image in step 3, please select BryteFlow Standard or Enterprise Edition AMI option based on your requirement.
- In ‘Configure Instance Details’ choose the instance type referring to BryteFlow’s recommendations under the ‘Prerequisite’ section
- For ‘Number of Instances’, its recommended to have minimum of 2 for HA type of deployment.
- Under ‘Create Launch Configuration’ select the IAM Role as ‘BryteFlowEc2Role’
- Add Storage as per the recommendations under ‘Additional AWS Services’
- Choose the ‘Security Group’ created for BryteFlow in the previous steps.
- Choose a key pair to ‘Create Launch Configuration’
- Follow the remaining steps as mentioned here.
Creating An EC2 System
Please refer AWS documentation on how to create EC2 System.
Recommended Network ACL Rules for EC2
The following table shows the rules we recommend for your EC2. They block all traffic except that which is explicitly required.
The EC2 security group should have the required inbound and outbound rules as per below:
| Inbound | |||||
| Rule # | Source IP | Protocol | Port | Allow/Deny | Comments |
| 1 | Custom IP which requires access to BryteFlow Application | TCP | 80 | ALLOW | Allows inbound HTTP traffic from only known/ custom IPv4 address. |
| 2 | Public IPv4 address range of your home network | TCP | 22 | ALLOW | Allows inbound SSH traffic from your home network (over the Internet gateway). |
| 3 | Public IPv4 address range of your home network | TCP | 3389 | ALLOW | Allows inbound RDP traffic from your home network (over the Internet gateway). |
| 4 | 0.0.0.0/0 | all | all | DENY | Denies all inbound IPv4 traffic not already handled by a preceding rule (not modifiable). |
| Outbound | |||||
| Rule # | Dest IP | Protocol | Port | Allow/Deny | Comments |
| 1 | Source DB Host IP address | TCP | Custom port( port specific to source database ports) | ALLOW | Allows connections to Source database. |
| 2 | Redshift Cluster Host IP address | TCP | 5439 ( port specific to destination database i.e. Redshift ) | ALLOW | Allows connection to destination database, if Redshift is a preferred destination database. (not required if AWS S3, is a preferred destination) |
| 3 | 0.0.0.0/0 | all | all | DENY | Denies all outbound IPv4 traffic not already handled by a preceding rule (not modifiable). |
To open ports on Amazon Console
Please perform the steps to allow the inbound traffic to your Amazon instance, mentioned in the following link:
To open ports On Windows Server
Please perform the steps to allow the inbound traffic to your server, mentioned in the following link:
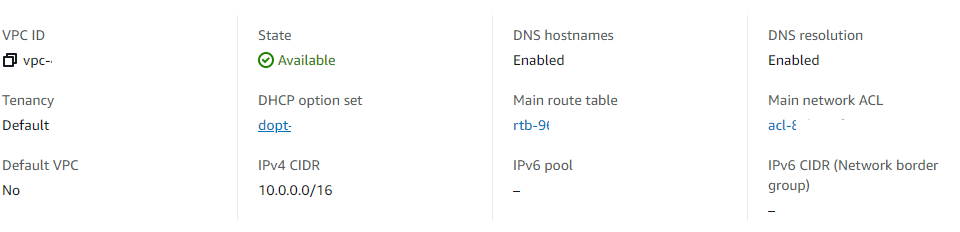
VPC Details:
Related Subnet details:
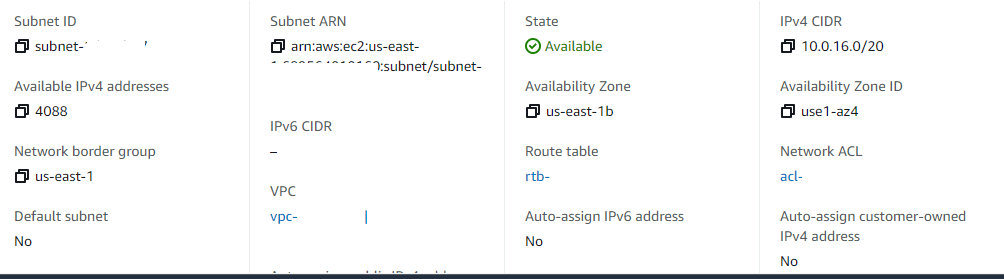
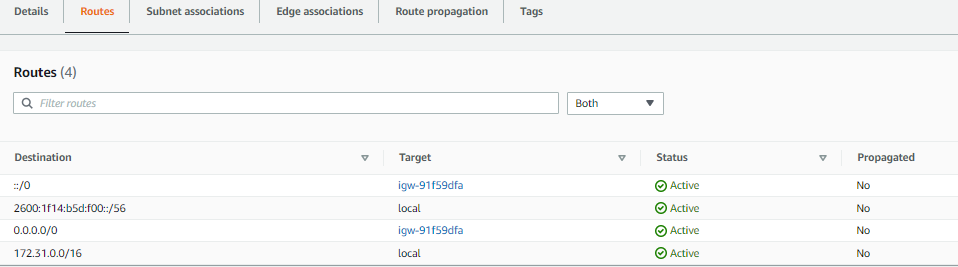
Below is the reference for Route table and CIDRs :

Outbound Connections
BryteFlow connects to any source and destination endpoints outside of its VPC using NAT/VPN or API Gateways.
A NAT gateway is a Network Address Translation (NAT) service. You can use a NAT gateway so that instances in a private subnet can connect to services outside your VPC but external services cannot initiate a connection with those instances. For more details refer to AWS guide.
To connect the VPC to remote network for enabling source/destination endpoint connections, use AWS VPN. For more details refer to AWS guide.
Creating S3 Bucket
Please refer AWS documentation for creating S3 bucket.
- http://docs.aws.amazon.com/AmazonS3/latest/gsg/CreatingABucket.html
- Also, its highly recommended to block all public access to S3, refer Setting Permissions: Block Public Access for more details.
Configuring EMR Cluster
Prior to launching an EMR cluster its recommended to verify the service limits for EMR within your AWS region.
When using BryteFlow in,
- Standard or Hybrid environment its recommended to have 3 instances for the EMR cluster(1 master and 2 core nodes)
- High Availability mode its recommended to have 6 instances. 3 additional are for DR mode whenever any failure occurs.
To know more about AWS service limits and how to manage service limits click on the respective links.
Launch EMR Cluster from AWS console :
Login to your AWS account and select the correct AWS region where your S3 bucket and EC2 container are located.
- Click on the services drop down in the header.
- Select EMR under Analytics or you can search for EMR.
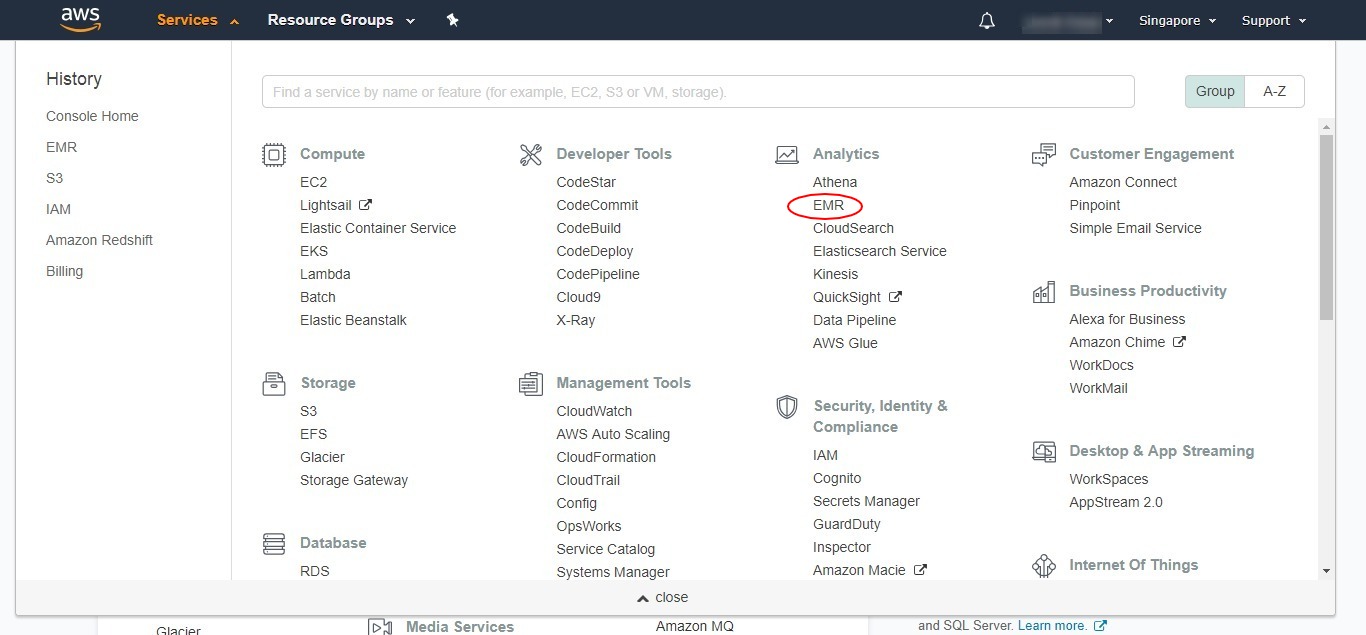
- Click on the ‘Create cluster’ button
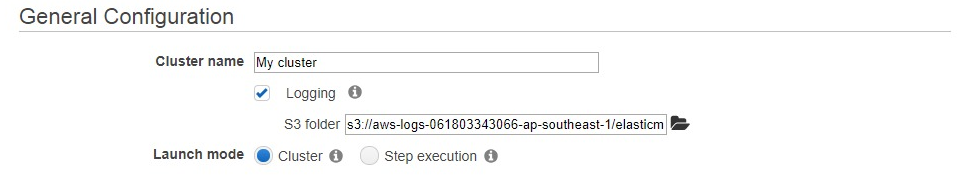
- In Create Cluster – Quick Options please type in Cluster Name (Name you will identify the Cluster with)
keep the Logging check box selected, the S3 folder will be selected by default. Launch mode should be Cluster.
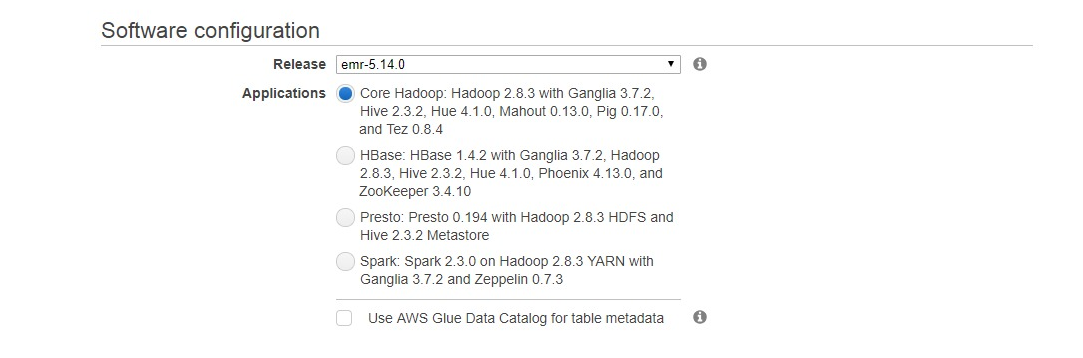
- Under Software configuration select release emr-5.14.0 and in Applications select Core Hadoop: Hadoop 2.8.3 with Ganglia 3.7.2, Hive 2.3.2, Hue 4.1.0, Mahout 0.13.0, Pig 0.17.0, and Tez 0.8.4
- Hardware configuration- Please select Instance type and number of Instances you want to run.

- Security and access –
Please select the EC2 key pair that you want to use with the EMR Cluster. This key will be used to SSH into the Cluster. Permission should be set to the ‘BryteFlowEc2Role’ created earlier. - You can add tags to your EMR cluster and configure the tag in Ingest to avoid the re-configuration in the software in case you plan to terminate the cluster and create a new. This helps user to keep control of their clusters and save cost on AWS resources.
- Click on the ‘Create cluster’ button (provisioning of a cluster can take up to 15-20 min).
Additional AWS services
As BryteFlow uses several AWS resources to fulfill user requirements, the cost of these services are separate to BryteFlow charges and are charged by AWS for your account. If you are using Snowflake as a destination the cost of Snowflake Data warehouse is separate to BryteFlow.
Below list provides list of other billable services within BryteFlow. Please use AWS Pricing calculator to estimate AWS cost of additional resources.
A sample estimate for a high availability setup with a source data volume of 100 GB is provided for reference here. Please note not all services are mandatory, the size and no. of services will vary for each customer environment. The sample is just for reference purposes.
Please note: ALL AWS Services has a service limit, do check for sufficient resources before launching the services, if needed request for increase in quota following AWS guidelines. Please refer to the AWS guide to check the service limit corresponding to each service.
| Service | Mandatory | Billing Type | Service Limits |
| AWS EC2 | Y | Pay-as-you-go | check EC2 quota here |
| Additional EBS storage attached to EC2 | Y | Based on size | |
| AWS S3 | N | Pay-as-you-go | check Amazon S3 quota here |
| AWS EMR | N (only required for S3 as a destination ) | Pay-as-you-go | check EMR quota here |
| AWS Redshift | N | Pay-as-you-go | check Amazon Redshift quota here |
| AWS CloudWatch Logs and metrics | N | Pay-as-you-go | check EC2 quota here |
| AWS SNS | N | Pay-as-you-go | check AWS SNS quota here |
| AWS Dynamo DB
(5 WCUs /5 RCUs) |
N | Pay-as-you-go | check Dynamo DB quota here |
| Snowflake DW | N | Pay-as-you-go | |
| AWS Lambda | N | Pay-as-you-go | check AWS Lambda quota here |
| AWS KMS | N | Pay-as-you-go | check Amazon KMS quota here |
| AWS Athena | N | Pay-as-you-go | check Amazon Athena quota here |
| AWS Kinesis | N | Pay-as-you-go | check Amazon Kinesis quota here |
BryteFlow recommends to use below mentioned instance types for EC2 with EBS volumes attached:
| EC2 Instance Type | BryteFlow Standard Edition | BryteFlow Enterprise Edition | Recommended EBS volumes | EBS Volume Type |
| t2.small | Volume < 100 GB | NA | 50 GB | General Purpose SSD (gp2) Volumes |
| t2.medium | Volume >100 and < 300 GB | Volume < 100 GB | 100 GB | General Purpose SSD (gp2) Volumes |
| t2.large | Volume > 300 GB and < 1 TB | Volume >100 and < 300 GB | 500 GB | General Purpose SSD (gp2) Volumes |
| m4.large | NA | Volume > 300 GB and < 1 TB | 500 GB | General Purpose SSD (gp2) Volumes |
IMDS Settings and Recommendations
–instance-id <instance id> \
–http-endpoint disabled
Managing Access Keys
BryteFlow uses Access key and secret key to authenticate to AWS services like S3, Redshift etc. It requires AWS access key id and AWS secret key for accessing the S3 and other services from on-premises. AWS IAM Roles are used when using an AMI or an EC2 server.
For security reasons, when using access keys or KMS Keys its recommended to rotate keys after certain time, say at a period of 90 days. After the new keys are generated it needs to updated in Ingest’s configuration. Please follow below mentioned steps:
- Open Ingest instance which needs to be updated with new key in the web browser
- Go to ‘Schedule’ tab. Stop the replication schedule for BryteFlow Ingest by turning ‘OFF’ the Schedule button.
- Go to ‘Connections’-> ‘Destination File System’
- Enter the new ‘Access key’ and ‘Secret access key’ in the respective text box and hit ‘Apply’
- Once the keys are saved, resume replication by turning ‘ON’ the schedule.
Details of key rotation can be found in AWS documentation https://docs.aws.amazon.com/kms/latest/developerguide/rotate-keys.html
IAM role for ‘BryteFlow’ should have recommended policies attached. Please refer to section ‘AWS Identity and Access Management (IAM) for BryteFlow‘ for the list of policies and permissions.
Data Security and Encryption
BryteFlow ensures various mechanisms for data security by applying encryption,
- With KMS, BryteFlow Ingest uses customer specified KMS key to encrypt customer data on AWS S3, Secrets Manager, DynamoDB. Configure the customer KMS id in BryteFlow, which is used to encrypt data stored on various AWS services.
- With AES-256, BryteFlow Ingest supports server side encryption. Amazon S3 server-side encryption uses one of the strongest block ciphers available, 256-bit Advanced Encryption Standard (AES-256), to encrypt your data, which is supported by BryteFlow by default.
BryteFlow Ingest doesn’t store any data outside of Customer’s designated environment. It can store data into the below AWS services depending on the customer requirements:
- Amazon EC2, only for temporary staging and pipeline configuration, refer the AWS guide for enabling encryption.
- EBS Storage, only for temporary staging and pipeline configuration, refer the AWS guide for enabling encryption.
- Amazon S3, only when S3 is a destination endpoint. Refer the AWS guide for enabling encryption
- Amazon Redshift, only when Redshift is a destination endpoint. Refer the AWS guide for enabling encryption.
- Amazon Athena, only when Athena is a destination endpoint. Refer the AWS guide for enabling encryption.
- Amazon Aurora DB, only when S3 is a destination endpoint. Refer the AWS guide for enabling encryption.
- Amazon DynamoDB, when configured for High Availability. Refer the AWS guide for enabling encryption.
- AWS Secrets Manager, for storing all credentials setup for the pipeline. Refer the AWS guide for details on encryption.
Also, all Non-AWS destination endpoints:
- Snowflake – Data encryption on Snowflake
- Kafka – BryteFlow uses TLS encryption to load data to Kafka streams. Setup encryption in Kafka streams refer the user guide.
As a best practice BryteFlow recommends to enable encryption on all the services wherever the data is getting stored.
Key Rotation
BryteFlow recommends to rotate all keys that are being configured in Ingest, every 90 days period for security reasons. This includes all the sources and destination endpoints credentials. Below are some references for AWS services for more details.
For AWS KMS key rotation refer to the AWS guide.
For AWS Redshift key rotation refer to the AWS Guide.
Follow the recommendations as below for all Non-AWS sources and destinations:
| External Applications | Reference for Key Rotation |
| SAP | SAP password rotation |
| Oracle | Oracle Password Rotation |
| MS SQL Server | MS SQL Server password rotation |
| Salesforce | Salesforce password rotation |
| MySQL | MySQL password rotation |
| PostgreSQL | PostgreSQL password rotation |
Configure Data Encryption
BryteFlow adheres to AWS recommendation of applying encryption of data at rest and in transit. It can be achieved by creating the keys and certificates that are used for encryption.
For more information, refer to AWS documentation on Providing Keys for Encrypting Data at Rest with Amazon EMR and Providing Certificates for Encrypting Data in Transit with Amazon EMR Encryption.
For Amazon Redshift destination, its recommended to enable database encryption to protect data at-rest. Refer to AWS guide for more details.
AWS Secrets Manager uses encryption via AWS KMS, for more details refer to AWS Guide.
Specifying Encryption Options Using the AWS Console
Choose options under Encryption according to the following guidelines :
- Choose options under At rest encryption to encrypt data stored within the file system.
Under S3 data encryption, for Encryption mode, choose a value to determine how Amazon EMR encrypts Amazon S3 data with EMRFS. BryteFlow Ingest supports the below encryption mechanism.
- SSE-S3
- SSE-KMS or CSE-KMS
Encryption in-transit
BryteFlow uses SSL to establish any connection(AWS services, databases etc.) for data flow, ensuring secure communication in-transit.
SSL involves complexity of managing security certificates and its important to keep the certificates active all the time for uninterrupted service.
AWS Certificate Manager handles the complexity of creating and managing public SSL/TLS certificates. Customers can have settings to get notified before the expiry date is approaching and can renew upfront, so that the services run uninterruptedly. Refer AWS guide to manage ACM here.
Storing and Managing Credentials
BryteFlow uses AWS Secrets Manager to store any/all credentials. This includes both source and destination endpoint credentials for Databases and APIs. All the secrets are encrypted using the KMS encryption. BrytFlow creates a secret in AWS secrets Manager for all credentials alongwith BryteFlow admin user details and also allows to modify the secret from the GUI as well. Go to the respective setup page in BryteFlow application to update the secret details. Its recommended to rotate all keys stored in Secrets Manager, refer to AWS guide for the same.
Testing The Connections
Verify if the connectivity to remote services is available.
To test the remote connections you would need telnet utility. Telnet has to be enabled from the control panel in Turn on Windows Feature.
- Go to start and then Run and type CMD, and click OK.
- Type the following at the command prompt.
telnet <IP address or Hostname> Port number
For example
telnet 192.168.1.1 8081
If the connection is unsuccessful then an error will be shown.
If the command prompt window is blank only with the cursor, then the connection is successful and the service is available.
Connection error to source or destination database server.
In case of any connectivity issue to source or destination database, please check if the BryteFlow server is able to reach the remote host:port.
You can test the connection to the IP address and port using the telnet command.
telnet <IP address or Hostname> Port number
Or you can use the PowerShell command to verify the connection.
tnc <IP address or Hostname> Port number
Unable to start windows service
Error: Unable to start Windows service ‘BryteFlow Ingest’
Resolution: If Java is not installed or the system path is not updated, then Ingest service will throw an error on startup. Install Java 1.8 or add the java path to the system path. To verify the same, goto CMD and type: java -version
If the response is ‘unable to recognize command’, please check the java path in the Environment variables ‘path’ and update to correct path.
Application not able to launch
Once the BryteFlow Ingest service is installed and started, but the application is not launching on the browser
Resolution: BryteFlow application requires java 1.8 to function. Please install the correct version of java and restart the service.
If Java 11 is installed, then Ingest service will startup up, but the page will display an error message.
To verify the version, goto CMD and type: java -version
Expected result : java 1.8 <any build>
For Example: java version “1.8.0_171”
Java(TM) SE Runtime Environment (build 1.8.0_171-b11)
Java HotSpot(TM) 64-Bit Server VM (build 25.171-b11, mixed mode)
If the java version is higher please uninstall java and install the required version.
Grants not available on the database
Error: ‘Cannot Open database ‘demo’ requested by the login’
Resolution: The user does not have the grants to connect to the database. Apply the correct grants to the user and try again.
Login failed for user
Error: ‘Login failed for User ‘Demo’
Resolution: The user does not exist or there is a typo in the username or the password is incorrect.
MS SQL Server as a source connector
Please follow below recommended steps to setup your MS SQL source connector.
Preparing MS SQL Server
SQL Server setup depends on the replication option chosen, Change Tracking OR Change Data Capture. Prerequisites for each option are described in detail. Follow the link for details.
Security for MS SQL Server
The BryteFlow Ingest database replication login user should have VIEW CHANGE TRACKING permission to view the Change Tracking information.
--Review all change tracking tables that are = 1 enabled, or = 0 disabled
SELECT *
  FROM sys.all_objects
 WHERE object_id IN (SELECT object_id
                       FROM sys.change_tracking_tables
                      WHERE is_track_columns_updated_on = 1);
Verification of MS SQL Server source
To verify if change tracking is already enabled on the database run the following SQL queries. If a row is returned then Change Tracking has been enabled for the database
SELECT *
  FROM sys.change_tracking_databases
 WHERE database_id = DB_ID('databasename');
The following SQL will list all the tables for which Change Tracking has been enabled for the selected database
USE databasename;
SELECT sys.schemas.name as schema_name,
       sys.tables.name as table_name
  FROM sys.change_tracking_tables
  JOIN sys.tables ON sys.tables.object_id = sys.change_tracking_tables.object_id
  JOIN sys.schemas ON sys.schemas.schema_id = sys.tables.schema_id;
Data Types in MS SQL Server
BryteFlow Ingest source supports most MS SQL Server data types, see the following table for the supported list:
MS SQL Server Data Types
| BIGINT | REAL | VARCHAR (max) |
| BIT | FLOAT | NCHAR |
| DECIMAL | DATETIME | NVARCHAR (length) |
| INT | DATETIME2 | NVARCHAR (max) |
| MONEY | SMALLDATETIME | BINARY |
| NUMERIC (p,s) | DATE | VARBINARY |
| SMALLINT | TIME | VARBINARY (max) |
| SMALLMONEY | DATETIMEOFFSET | TIMESTAMP |
| TINYINT | CHAR | UNIQUEIDENTIFIER |
| VARCHAR | HIERARCHYID | XML |
Oracle DB as a source connector
Please follow below recommended steps to setup your Oracle source connector.
Preparing Oracle on Amazon RDS
Enable Change Tracking for a database on Amazon Oracle RDS
- In Oracle on Amazon RDS, the supplemental logging should be turned on at the database level.
- Supplemental logging is required so that additional details are logged in the archive logs.
To turn on supplemental logging at the database level, execute the following queries.exec rdsadmin.rdsadmin_util.alter_supplemental_logging('ADD','ALL');
- To retain archived redo logs on your DB instance, execute the following command (example 24 hours)
exec rdsadmin.rdsadmin_util.set_configuration('archivelog retention hours',24); - To turn on supplemental logging at the table level, execute the following statement
ALTER TABLE <schema>.<tablename> ADD SUPPLEMENTAL LOG DATA (ALL) COLUMNS;
Preparing On-premises Oracle
Enable Change Tracking for an On-Premises Oracle Server
Execute the following queries on Oracle Server to enable change tracking.
- Oracle database should be in ARCHIVELOG mode.
- The supplemental logging has to be turned on at the database level. Supplemental logging is required so that additional details are logged in the archive logs.
To turn on supplemental logging at the database level, execute the following statements:ALTER DATABASE ADD SUPPLEMENTAL LOG DATA (ALL) COLUMNS;
- Alternatively to turn on minimal database supplemental logging execute the following statements:
ALTER DATABASE ADD SUPPLEMENTAL LOG DATA;
ALTER DATABASE FORCE LOGGING;
- In Oracle, ensure that supplemental logging is turned on at the table level. To turn on supplemental logging at the table level, execute the following statement:
ALTER TABLE <schema>.<tablename> ADD SUPPLEMENTAL LOG DATA (ALL) COLUMNS;
Security for Oracle
The Oracle user running BryteFlow Ingest must have the following security privileges:
SELECT access on all tables to be replicated
The following statement should return records…
SELECT * FROM V$ARCHIVED_LOG;
If no records are returned, select access on V_$ARCHIVED_LOG should be provided, or check if the database is in ACHIVELOG mode.
The following security permissions should be assigned to the user
CREATE SESSION
SELECT access on V_$LOGMNR_CONTENTS
SELECT access on V_$LOGMNR_LOGS
SELECT access on ANY TRANSACTION
SELECT access on DBA_OBJECTS
EXECUTE access on DBMS_LOGMNR
Run the following grant statements for <user> for the above requirements
GRANT SELECT ON V_$ARCHIVED_LOG TO <user>;
GRANT SELECT ON V_$LOGMNR_CONTENTS TO <user>;
GRANT EXECUTE ON DBMS_LOGMNR TO <user>;
GRANT SELECT ON V_$LOGMNR_LOGS TO <user>;
GRANT SELECT ANY TRANSACTION TO <user>;
GRANT SELECT ON DBA_OBJECTS TO <user>;
Verification of Oracle source
To verify if Oracle is setup correctly for change detection execute the following queries.
| Condition to be checked | SQL to be executed | Result expected |
|---|---|---|
| Is ArchiveLog mode enabled? |
SELECT log_mode FROM V$DATABASE; |
ARCHIVELOG |
| Is Supplemental logging turned on at database level? |
SELECT supplemental_log_data_min FROM V$DATABASE; |
YES |
| Is Supplemental Logging turned on at table level? |
SELECT log_group_name,
       table_name,
       always,
       log_group_type
  FROM dba_log_groups;
|
RESULT <log group name>, <table name>, ALWAYS, ALL COLUMN LOGGING |
Data Types in Oracle
BryteFlow Ingest source supports most Oracle data types, see the following table for the supported list:
Oracle Data Types
| BINARY_DOUBLE | BINARY_FLOAT | CHAR |
| DATE | INTERVAL DAY TO SECOND | LONG |
| LONG RAW | NCHAR | NUMBER |
| NVARCHAR | RAW | REF |
| TIMESTAMP | TIMESTAMP WITH LOCAL TIME ZONE | VARCHAR2 |
Preparing On-premises MySQL
To prepare MySQL for change tracking perform the following steps.
To enable binary logging, the following parameters need to be configured as below in my.ini file on MySQL on Windows or in my.cnf file on MySQL on UNIX:
| Parameter | Value |
|---|---|
| server_id | Any value from 1. E.g. server_id = 1 |
| log_bin=<path> | Path to the binary log file. E.g. log_bin = D:\MySQLLogs\BinLog |
| binlog_format | binlog_format=row |
| expire_logs_days | To avoid disk space issues it is strongly recommended not to use the default value (0). E.g. expire_log_days = 4 |
| binlog_checksum | This parameter can be set to binlog_checksum=none. BryteFlow does support CRC32 as well |
| binlog_row_image | binlog_row_image=full |
Preparing MySQL on Amazon RDS
Enabling Change tracking on MySQL on Amazon RDS
To enable change tracking MySQL on Amazon RDS perform the following steps.
- In the AWS management console, for MySQL on Amazon RDS create a new DB parameter group and the following parameters should be configured as shown.
- The MySQL RDS DB instance should use the newly created DB parameter group for binary logging to be enabled.
binlog_format: binlog_format=row
binlog_checksum : binlog_checksum=none OR CRC32.
Security for MySQL
The Ingest user id must have the following privileges:
- Replication client, and Replication Slave.
- Select privileges on the source tables designated for replication.
- Execute the following queries to grant permissions to a MySQL user.
CREATE USER 'bflow_ingest_user' IDENTIFIED BY '*****';
GRANT SELECT, REPLICATION CLIENT, SHOW DATABASES ON *.* TO bflow_ingest_user;
GRANT SELECT, REPLICATION slave, SHOW DATABASES ON *.* TO bflow_ingest_user;

P.S. If the source DB type is Amazon RDS MySQL DB, please download 'mysqlbinlog.exe' and add its directory path in Windows 'Environment variable' 'PATH' on the Client machine(BryteFlow Server)
To enable change tracking MariaDB on Amazon RDS perform the following steps.
- In the AWS management console, for MariaDB on Amazon RDS create a new DB parameter group and the following parameters should be configured as shown.
- The MariaDB RDS DB instance should use the newly created DB parameter group for binary logging to be enabled.
binlog_format: binlog_format=row
binlog_checksum : binlog_checksum=none OR CRC32.
Preparing PostgreSQL DB
- Use a PostgreSQL database that is version 9.4.x or later
- The IP address of the BryteFlow machine must be added to the pg_hba.conf
configuration file with the “replication” keyword in the database field.
Example:
host replication all 189.452.1.212/32 trust - Set the following parameters and values in the postgresql.conf configuration file:Set wal_level = logicalSet max_replication_slots to a value greater than 1.
The max_replication_slots value should be set according to the number of tasks that you want to run. For example, to run four tasks you need to set a minimum of four slots. Slots open automatically as soon as a task starts and remain open even when the task is no longer running. You need to manually delete open slots.
Set max_wal_senders to a value greater than 1.
The max_wal_senders parameter sets the number of concurrent tasks that can run.
Set wal_sender_timeout =0
The wal_sender_timeout parameter terminates replication connections that are inactive longer than the specified number of milliseconds. Although the default is 60 seconds, we recommend that you set this parameter to zero, which disables the timeout mechanism.
Note:- After changing these parameters, a restart is needed for PostgreSQL
- Grant superuser permissions for the user account specified for the PostgreSQL source database. Superuser permissions are needed to access replication-specific functions in the source.
Preparing Salesforce account for Bryteflow Ingest
On Salesforce Change Data Capture is turned on by default, please do not turn it off.
You would need to generate a security token to be used with Bryteflow Ingest.
A security token is a case-sensitive alphanumeric key that appended to your Salesforce password.
eg. Your Salesforce password to be used with Ingest will be “<your Salesforce password ><security_token>”
A token can be generated by following these steps:
1. Log in to your salesforce account and go to My Setting > Personal > Reset my security token.
2. Click on Reset Security Token button. The token will be emailed to the email account associated with your salesforce account.
Preparing for BryteFlow Trigger solution
For the databases such as DB2, Firebird or for any RDBMS where there are no access to archive logs to get the change data, BryteFlow has the trigger option to get the change data.
For this solution there are certain prerequisites which needs to be implemented:
- BryteFlow replication user should have ‘select‘ access on the tables to be replicated
- BryteFlow replication user should have access to ‘create triggers’ to be replicated
- BryteFlow replication user should have access to ‘create tables’ on the source database
Please provide relevant grants to BryteFlow replication user in order to proceed with the Trigger Solution.
Pre-Requisites for SAP HANA (Change tracking) :
1.Create a user account for BryteFlow.
CREATE USER <USERNAME> PASSWORD <PASSWORD>;
2. BryteFlow replication user should have ‘select‘ access on the tables to be replicated.
BryteFlow replication user should have access to ‘create triggers’ to be replicated
Grant below priviledges to BryteFlow user created above.
GRANT SELECT, TRIGGER ON SCHEMA <YOURSCHEMA> TO <USERNAME>;
3. BryteFlow replication user should have access to a schema where it can create a table on the source database.
This is used to store transactions for restart and recoverability
Grant below priviledges to BryteFlow user created above.
GRANT CREATE ANY ON SCHEMA <YOURSCHEMA> TO <USERNAME>;
Starting & Stopping BryteFlow Ingest
If you are using the AMI from AWS Marketplace, BryteFlow Ingest will be preinstalled as a service in Windows.
Alternatively, you can install the service by executing the following command using the Command Prompt(Admin).
- Navigate to the directory of the installation.
-
service.exe --WinRun4J:RegisterService
To Start BryteFlow Ingest
- Start the BryteFlow Ingest service using Windows Services or Windows Task Manager
- Type the URL in the Chrome browser
localhost:8081
To Stop Bryteflow Ingest
- Stop the BryteFlow Ingest service
- Replication processes can also be aborted immediately by going to Task Manager
-> Processes -> service.exe – and selecting “End Task”
Configuration of BryteFlow Ingest
The configuration of BryteFlow Ingest is performed though the web console
- Type the URL in the Chrome browser
localhost:8081
The screen will then present the following tabs (left side of the screen)
- Dashboard
- Connections
- Data
- Schedule
- Configuration
- Log
Configure Source Databases using below API :
POST http://host:port/ingest/api/ingest?cmd=conn&conn=s
Body:
func=save&src-db=<database name>&src-host=<database host>&src-options=&src-port=<database port>&src-pwd=<database password>&src-pwd2=<database password>&src-type=rds.oracle11lm&src-uid=<database user id>&type=src
Configure Destination Databases using below API :
POST http://host:port/ingest/api/ingest?cmd=conn&conn=d
Body:
dst-bucket=<S3 bucket>&dst-db=<database name>&dst-dir=<S3 work directory>&dst-host=<Redshift host>&dst-iam_role=<IAM Role>&dst-options=&dst-port=<Redshift port>&dst-pwd=<Redshift password>&dst-pwd2=<Redshift password>&dst-type=rds.redmulti&dst-uid=<Redshift user id>&func=save&type=dst
Dashboard
The dashboard provides a central screen when the overall status of this instance of BryteFlow Ingest can be monitored
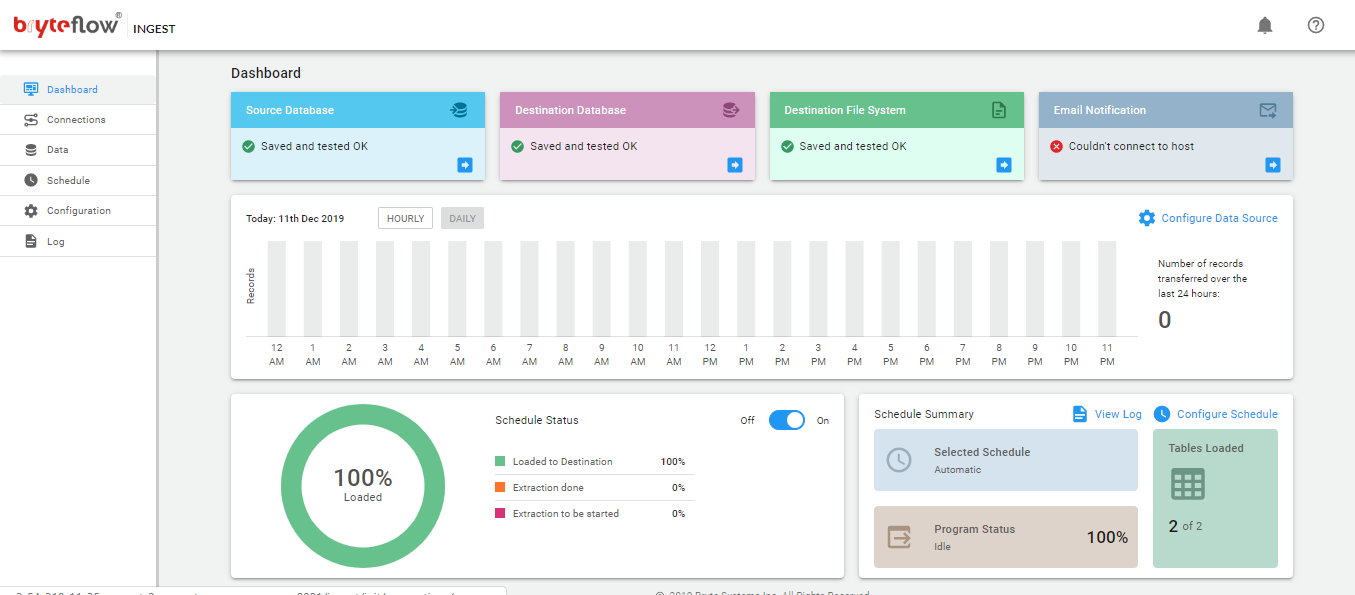
- The Data Sources Transfer Summary shows the number of records transferred. When hourly is selected you can view the transfer statistics for 24 hours, if daily is selected the monthly statistics are displayed.
- The pie chart displays the status of the process
- Extraction, denoted by red
- Loading, denoted by orange
- Loaded, denoted by green
- Hovering on the bar graph gives the exact number of records transferred.
- The pie chart displays the status of the process
- Schedule Extract Status displays the schedule status.
- The Configure icon will take you to the configuration of the source tables, specifically the table, type of transfer, table primary key(s) and the selection of masked columns.

- The Dashboard provides quick access for configuration of BryteFlow Ingest (Source, Destination Database, Destination File System and Email Notification)

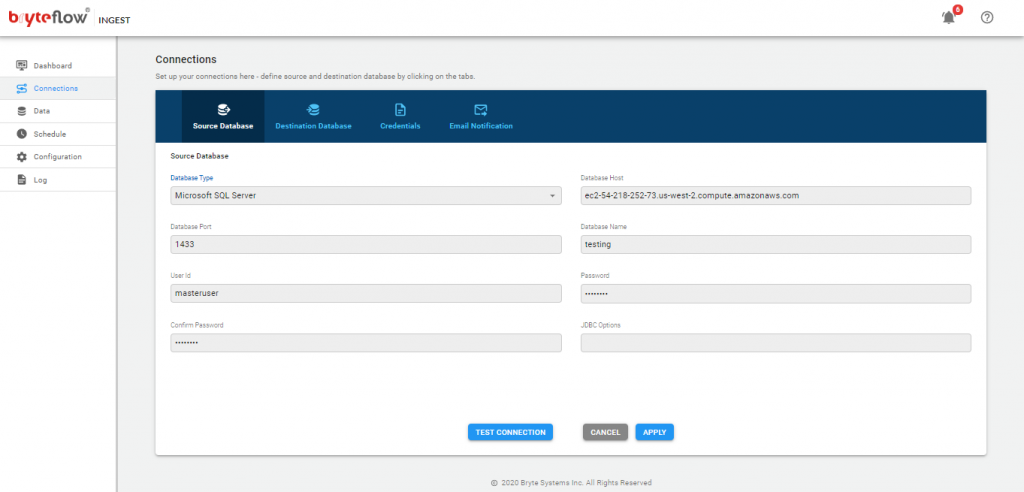
Connections
The connections tab provides access to the the following sub-tabs
- Source Database
- Destination Database
- Credentials
- Email Notification
Source Database
Configuration of MS SQL Server, Oracle, SAP (MS SQL Server), SAP (Oracle), MySQL, Salesforce, PostgreSQL, S/4 HANA, SAP ECC and others as a source database.
MS SQL Server DB
- In the Database Type select “Microsoft SQL Server Change Tracking” from the drop-down list.
- In the Database Host field please enter the IP address or hostname of the database server
- In the Database Port field please enter the port number on which the database server is listening on. The default port for MS SQL Server is 1433
- In the Database Name field please enter the name of your database e.g. BryteMSSQL
- Enter a valid MS SQL Server database user Id that will be used with BryteFlow Ingest. If a Windows user is required, please contact BryteFlow support info@bryteflow.com to understand how to configure this
- Enter Password; then confirm it by re-entering in Confirm Password
- Please note, passwords are encrypted within BryteFlow Ingest
- JDBC options are optional, can be used in order to extend the JDBC URL used to access the databases.
- Click on the ‘Test Connection’ button to test connectivity
- Click on the ‘Apply’ button to confirm and save the details
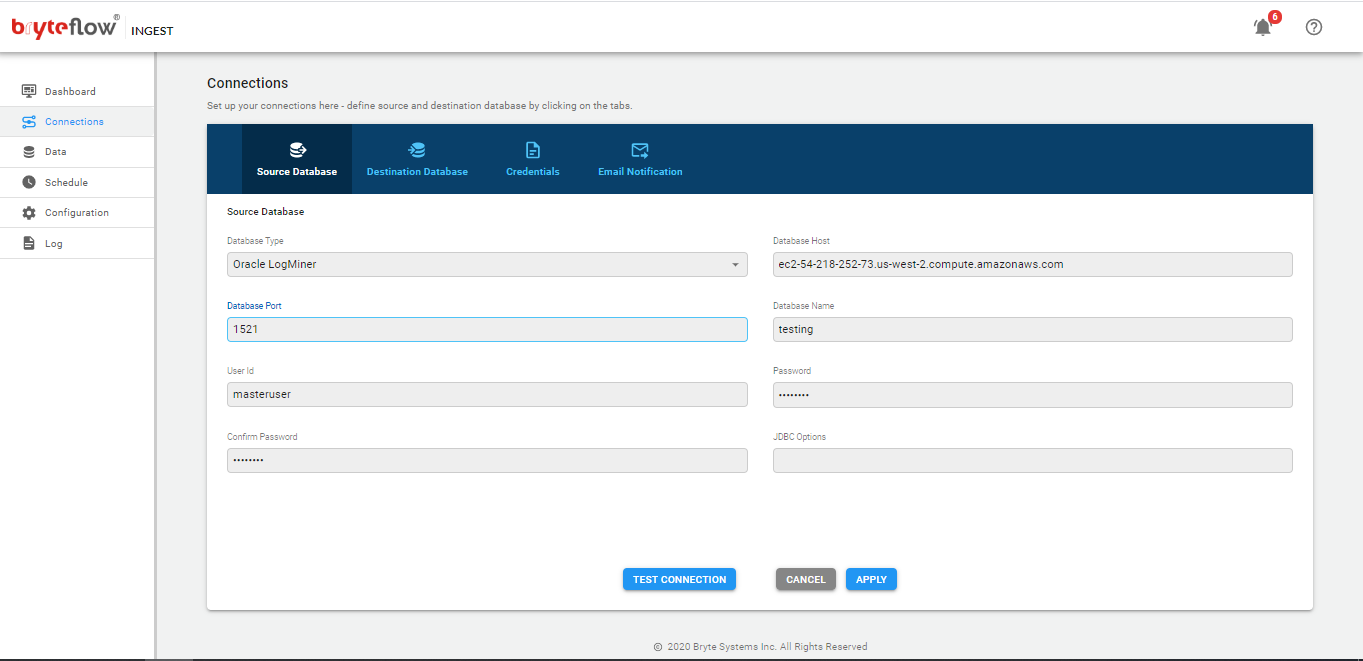
Available source connectors for Oracle database
- Oracle Logminer: Available for all versions of Oracle database. Extracts changed data from Oracle database archived logs only.
- Oracle Logminer (Pluggable DB): Available for all versions of Oracle Pluggable databases. Extracts changed data from Oracle database archived logs only.
- Oracle Remote Logminer: Available for all versions of Oracle database. Extracts changed data from a remote Oracle database for archived logs only.
- Oracle Remote Logminer (Pluggable DB): Available for all versions of Oracle Pluggable databases. Extracts changed data from a remote Oracle database for archived logs only.
- Oracle Continuous Logminer: Available for Oracle database versions 18c and below. Extracts changed data from Oracle database Redo logs as well as Archived logs.
- Oracle Continuous Logminer (Pluggable DB): Available for Oracle Pluggable database versions 18c and below. Extracts changed data from Oracle database Redo logs as well as Archived logs.
- Oracle 19c Continuous Logminer: Available for Oracle 19c database. Extracts changed data from Oracle database Redo logs as well as Archived logs.
- Oracle 19c Continuous Logminer (Pluggable DB): Available for Oracle 19c Pluggable database. Extracts changed data from Oracle database Redo logs as well as Archived logs.
- Oracle Fast Logminer : Available for all versions of Oracle database. Allows multi-threaded extraction of changed data from Oracle database archived logs only.
- Oracle RAC : Available for all Oracle database versions. Extracts changed data from Oracle RAC archive logs, it uses Oracle logmining.
- Oracle RAC (Pluggable DB): Available for all Oracle Pluggable database versions. Extracts changed data from Oracle RAC archive logs, it uses Oracle logmining.
- Oracle (Full Extracts): Available for all versions of Oracle database. It performs ‘Full Refresh’ of data in every delta load.
- Oracle (Timestamps): Available for all versions of Oracle database. It gets incremental data based on the timestamp columns.
Oracle DB
- In the database type select the preferred connector from the drop-down list.
- In the database host field please enter the IP address or hostname of the database server.
- In the Database Port field please enter the port number on which the database server is listening on. The default port for Oracle is 1521
- In the database name field please enter Oracle SID
- Enter a valid Oracle database user id that will be used with Bryteflow Ingest.
- Enter Password; then confirm it by re-entering in Confirm Password
- Please note, passwords are encrypted within BryteFlow Ingest
- JDBC options are optional, can be used in order to extend the JDBC URL used to access the databases.
- Click on the ‘Test Connection’ button to test connectivity
- Click on the ‘Apply’ button to confirm and save the details
Please note: When using SID to connect to a dedicated Oracle server instance use ‘:SID’ in the Database Name of source configuration.
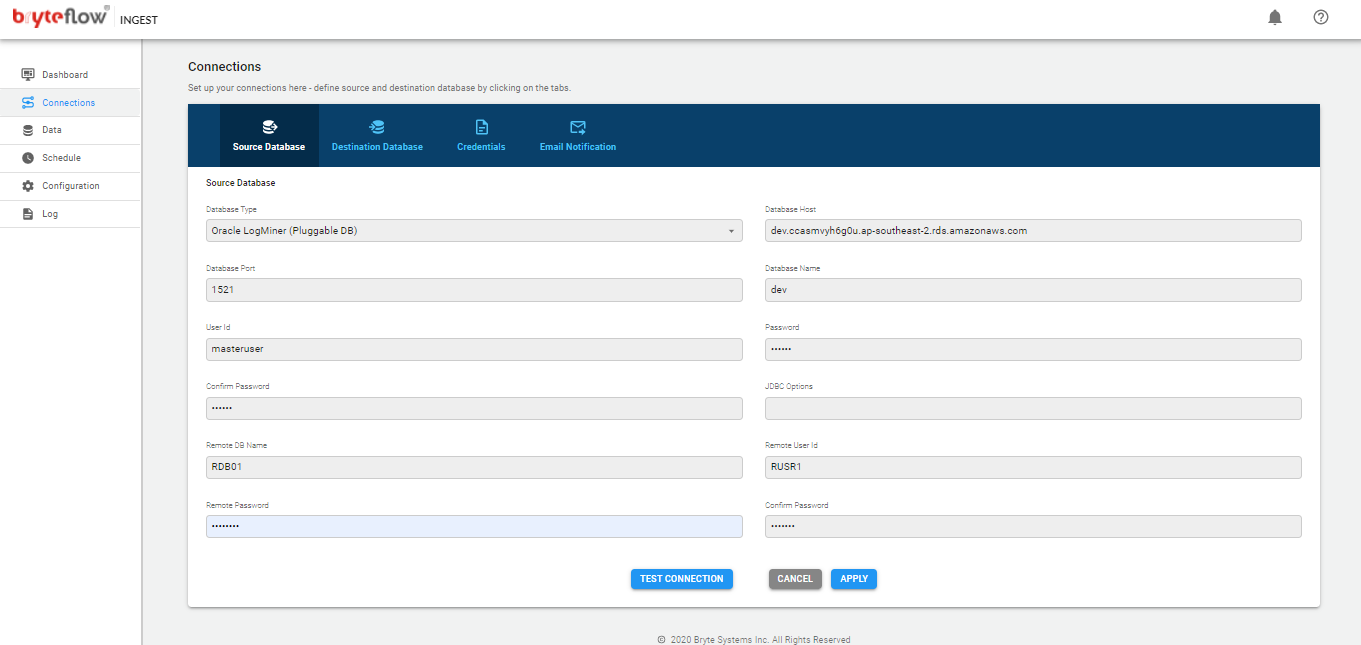
Oracle Pluggable DB:
- In the database type select appropriate option ‘Oracle Log Miner (Pluggable DB)’ , ‘Oracle Continuous LogMiner (Pluggable DB)’ from the drop-down list.
- In the database host field please enter the IP address or hostname of the PDB container.
- In the Database Port field please enter the port number on which the pluggable database is listening on. The default port for Oracle is 1521
- In the database name field please enter Oracle SID
- Enter a valid Oracle database user id for the pluggable db that will be used with Bryteflow Ingest.
- Enter Password; then confirm it by re-entering in Confirm Password
- Please note, passwords are encrypted within BryteFlow Ingest
- Enter the root container database name in ‘Remote DB Name’
- Enter root container user id in the ‘Remote User ID’
- Enter Password for the root user in ‘Remote Password’ ; then confirm it by re-entering in Confirm Password
- Please note, passwords are encrypted within BryteFlow Ingest
- JDBC options are optional, can be used in order to extend the JDBC URL used to access the databases.
- Click on the ‘Test Connection’ button to test connectivity
- Click on the ‘Apply’ button to confirm and save the details
Please note: When using SID to connect to a dedicated Oracle server instance use ‘:SID’ in the Database Name of source configuration.
MySQL
- In the Database Type select “ MySQL 5.1 or later” from the drop-down list.
- In the Database Host field please enter the IP address or hostname of the database server.
- In the Database Port field please enter the port number on which the database server is listening on. The default port for MySQL Server is 3306.
- In the Database Name field please enter the name of your database e.g. BryteMySQL.
- Enter a valid MySQL database user Id that will be used with BryteFlow Ingest.
- Enter Password; then confirm it by re-entering in Confirm Password.
- Please note, passwords are encrypted within BryteFlow Ingest.
- JDBC options are optional, can be used in order to extend the JDBC URL used to access the databases
- Click on the ‘Apply’ button to confirm and save the details.
- Click on the ‘Test Connection’ button to test connectivity.
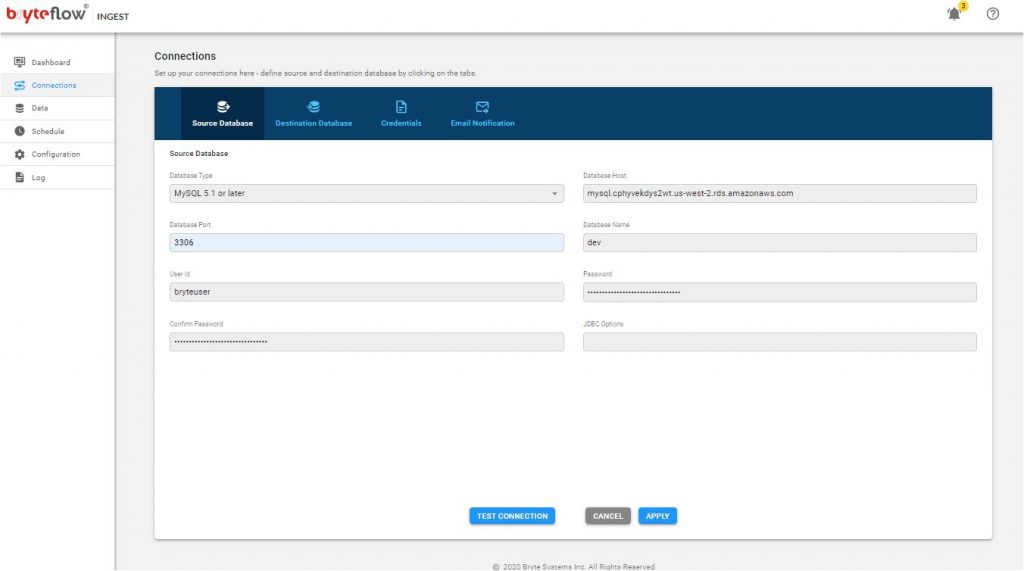
Salesforce
- In the Database Type select “Salesforce” from the drop-down list.
- In the Database Name field please enter “login”.
- Enter a valid Salesforce user Id that will be used with BryteFlow Ingest.
- In Password field enter Salesforce password appended with the security token; then confirm it by re-entering in Confirm Password.
- Please note, passwords are encrypted within BryteFlow Ingest.
- Click on the ‘Test Connection’ button to test connectivity.
- Click on the ‘Apply’ button to confirm and save the details.
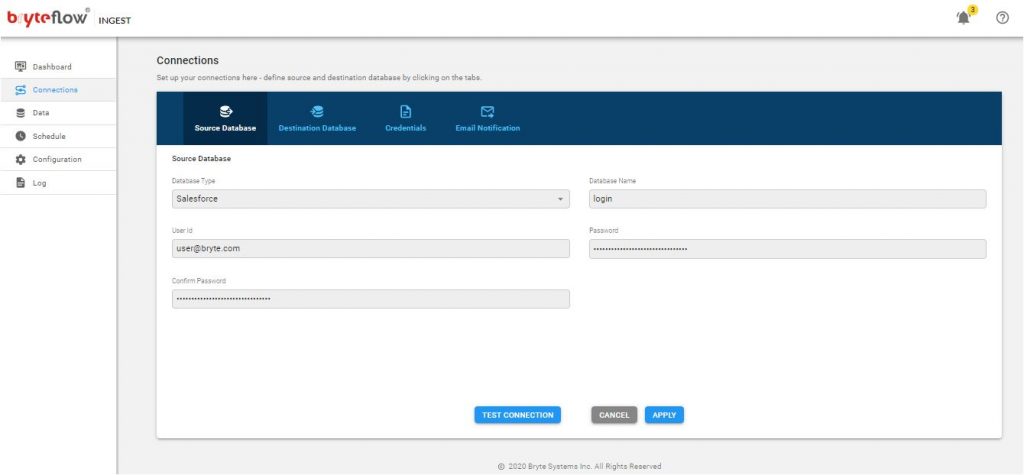
SAP HANA DB(All Options)
- In the Database Type for SAP HANA (Change Tracking), SAP HANA(Full Extract), SAP HANA(Timestamps), choose the desired option from the drop-down list.
- In the Source Driver field please enter the SAP HANA jdbc driver as “com.sap.db.jdbc.Driver”.
- Enter a valid jdbc URL for the host database in the format: jdbc:sap://<hostname>:<port no.>
- In the ‘User Id’ field enter the database username.
- In Password field enter database password, then confirm it by re-entering in Confirm Password.
- Please note, passwords are encrypted within BryteFlow Ingest.
- Click on the ‘Test Connection’ button to test connectivity.
- Click on the ‘Apply’ button to confirm and save the details.
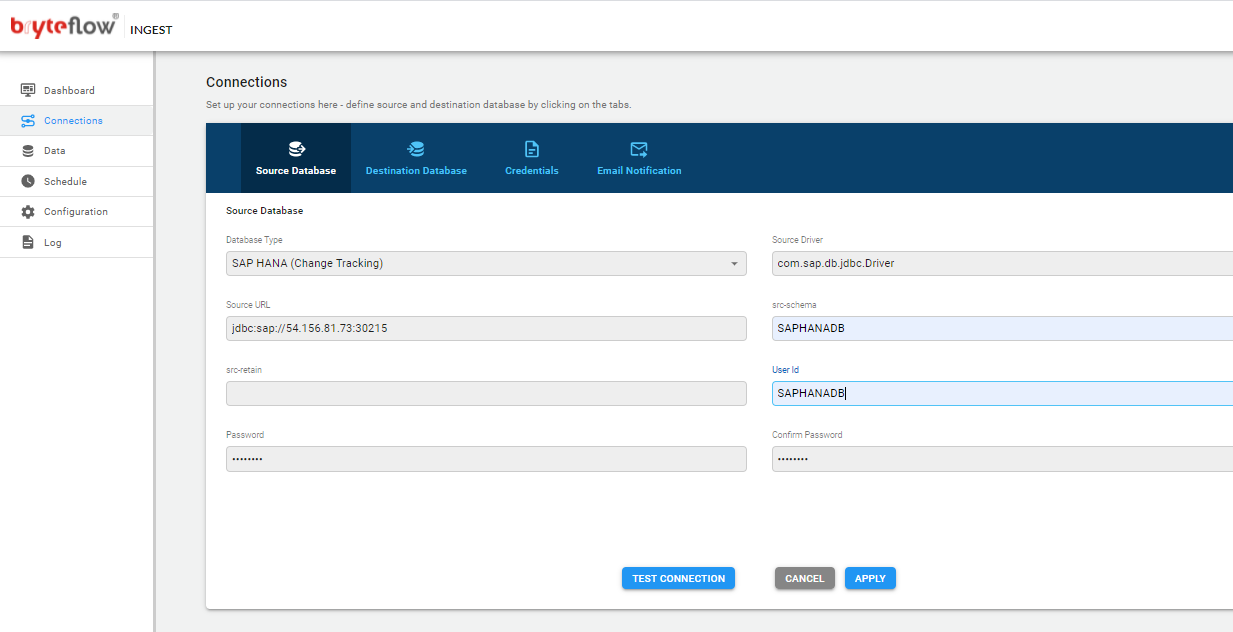
JDBC Full Extracts / Any Database (Full Extracts)
This connector allows all RDMS databases as a source connector to do a Full Extract and Load. It uses JDBC drivers to connect and extracts the initial data and takes it over to any BryteFLow supported destination.
Please note incremental CDC via logs is not supported for this driver.
- In the database type select ‘JDBC Full Extracts or Any Database (Full Extracts)’
- In the source driver provide the jdbc driver name for the source database . For eg. for SAP HANA DB: ‘com.sap.db.jdbc.Driver’ , For Snowflake: ‘com.snowflake.client.jdbc.SnowflakeDriver’
- In the Source URL field please enter the JDBC connection string for the source database in the format: jdbc:<rdbms>://<hostname>:<port no.>
- Enter a valid database user id that will be used with Bryteflow Ingest.
- Enter Password; then confirm it by re-entering in Confirm Password
- Please note, passwords are encrypted within BryteFlow Ingest
- Click on the ‘Test Connection’ button to test connectivity
- Click on the ‘Apply’ button to confirm and save the details.
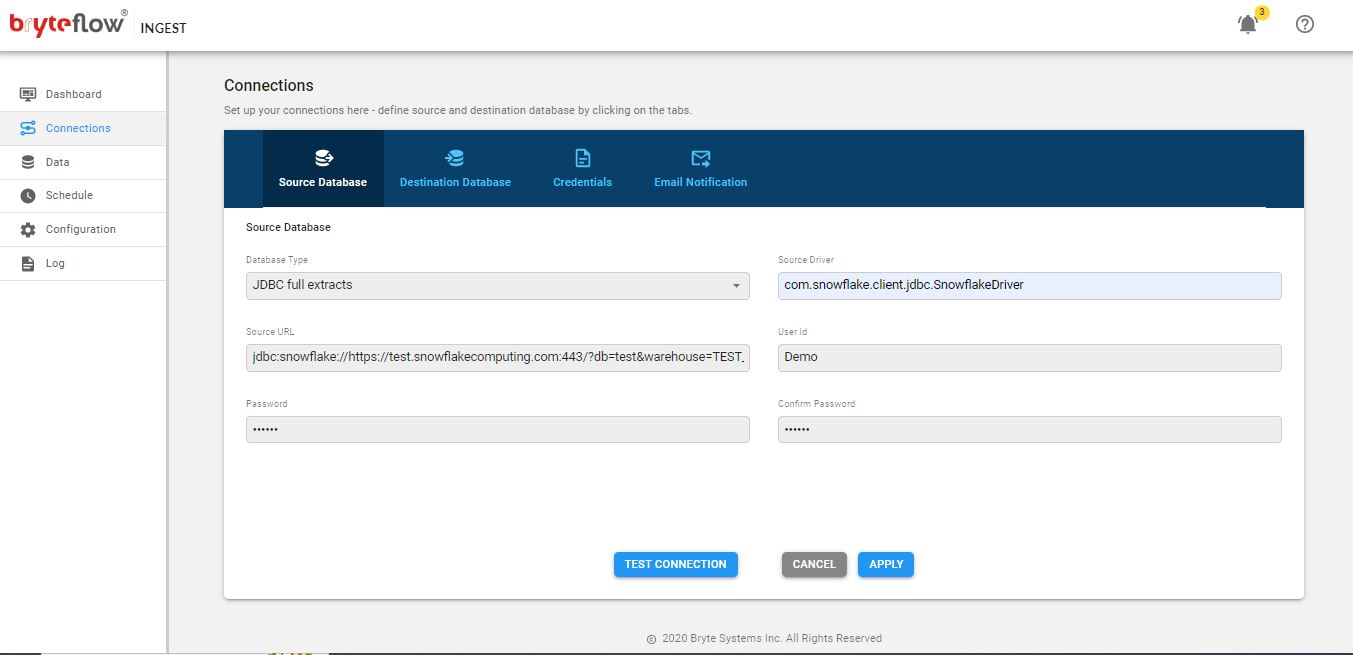
Destination Database
Available Destinations for AWS Cloud are:
- S3 files using EMR
- S3 files using EMR + Load to Redshift
- S3 files using EMR + Load to Athena
- Load to Redshift direct
- Load to Snowflake direct
- Load to Snowflake Multiload
- Load to Snowflake using S3
- Load S3 Deltas
- Load Kafka Deltas
- PostgreSQL
- Load to Databricks using S3
- Oracle
S3 files using EMR
- Enter Database Type: To use Amazon S3 as the destination, please use “S3 Files using EMR” from the drop-down list
- Enter S3 bucket name
- eg brytetest
- Enter Data Directory name
- eg data
- Enter working directory name under “Delta Directory”
- eg delta
- Enter EMR instance id:
- eg j-EMRINSID123 or EMR tag name like tag=brytetest
- Click on the ‘Test Connection’ button to test the connection details
- Click on the ‘Apply’ button to confirm and save the details

S3 files using EMR + Load to Redshift
- Enter Database Type: To use Amazon S3 and Amazon Redshift as your destination, select “
- S3 files using EMR + Load to Redshift” from the drop-down list.
- Enter S3 bucket name
- eg brytetest
- Enter Data Directory name
- eg data
- Enter working directory name under “Delta Directory”
- eg delta
- Enter EMR instance id:
- eg j-EMRINSID123 or EMR tag name like tag=brytetest
- Enter Database Host: Enter the endpoint for Amazon Redshift (excluding port)
- eg. bryte-dc1.hdyesjdsdf.us-west-2.redshift.amazonaws.com
- Enter Database Port: Redshift default port being 5439
- Enter Database Name
- eg dev
- Enter User Id: This is the Redshift user id that will load the schemas, tables, and data automatically to Redshift:
- eg redshift_user
- Enter Password; re-enter to confirm
- Please note, passwords are encrypted within BryteFlow Ingest
- When connecting to Redshift using IAM Role, Enter the ‘IAM Role’ and apply.
- JDBC options are optional, in order to extend the JDBC URL used to access the databases.
- Click on the ‘Test Connection’ button to test the connection details
- Click on the ‘Apply’ button to confirm and save the details
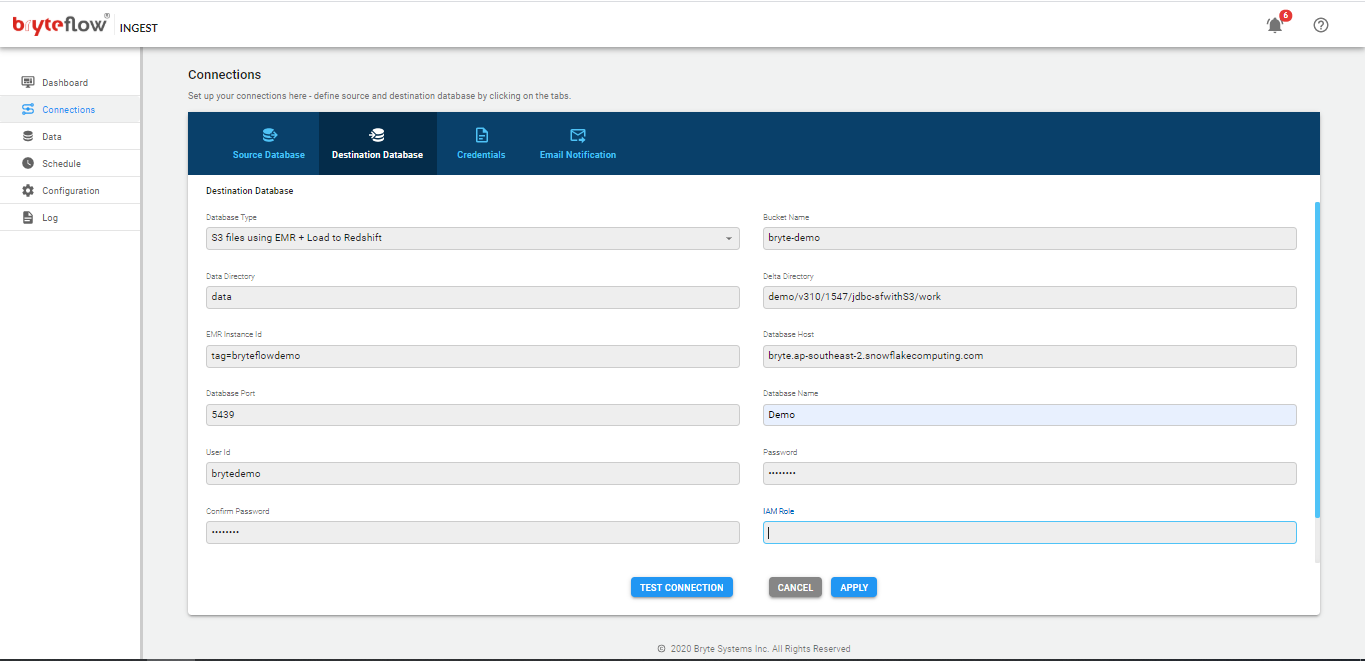
S3 files using EMR + Load to Athena
- Enter Database Type: To use Amazon S3 and Amazon Athena as your destination,
- Select “S3 files using EMR + Load to Athena” as your destination from the drop-down list.
- Enter Database Name : provide the database name for Amazon Athena
- Enter S3 bucket name
- eg brytetest
- Enter Data Directory name
- eg data
- Enter working directory name under “Delta Directory”
- eg delta
- Enter EMR instance id:
- eg j-EMRINSID123 or EMR tag name like tag=brytetest
- Click on the ‘Test Connection’ button to test the connection details
- Click on the ‘Apply’ button to confirm and save the details
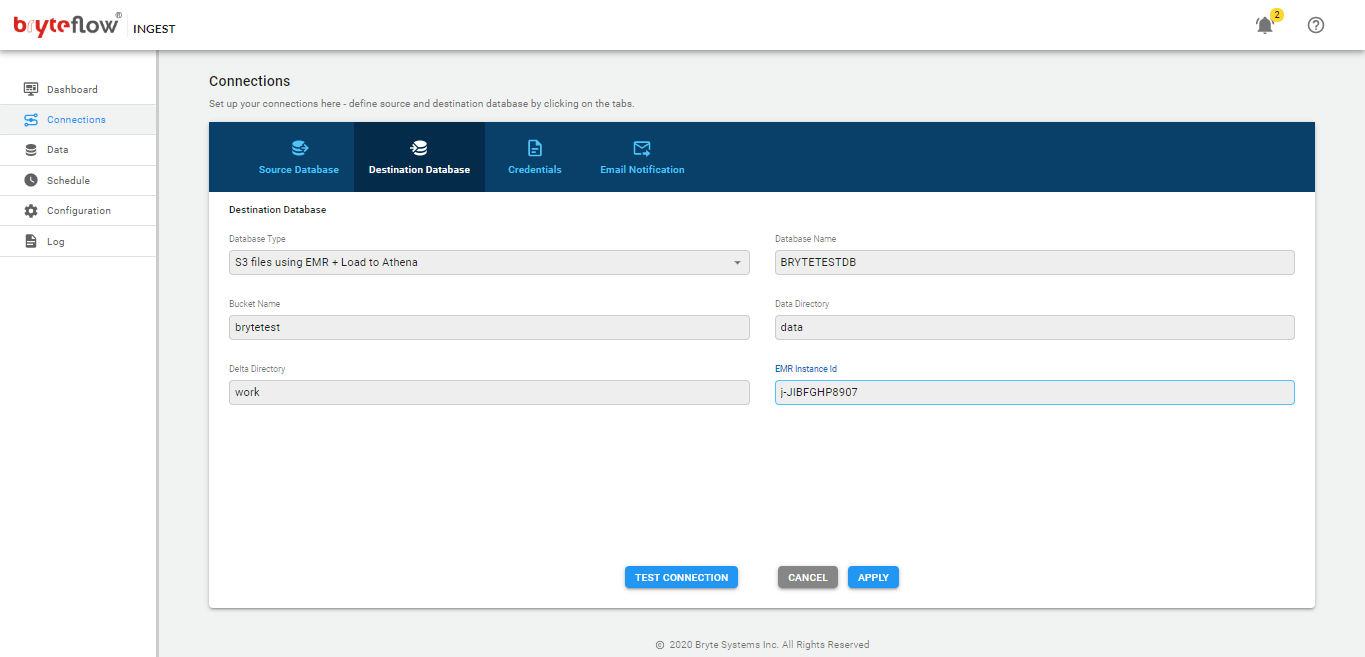
Load to Redshift direct
- Enter ‘Database Type’ as ‘Load to Redshift Direct’
-
- Enter S3 bucket name
- eg brytetest
- Enter working directory name under “Delta Directory”
- eg delta
- Enter Database Host: Enter the endpoint for Amazon Redshift (excluding port)
- eg. bryte-dc1.hdyesjdsdf.us-west-2.redshift.amazonaws.com
- Enter Database Port: Redshift default port being 5439
- Enter Database Name
- eg dev
- Enter User Id: This is the Redshift user id that will load the schemas, tables, and data automatically to Redshift:
- eg redshift_user
- Enter Password; re-enter to confirm
- Please note, passwords are encrypted within BryteFlow Ingest
- When connecting to Redshift using IAM Role, Enter the ‘IAM Role’ and apply.
- Click on the ‘Test Connection’ button to test the connection details
- Click on the ‘Apply’ button to confirm and save the details
- JDBC options are optional, in order to extend the JDBC URL used to access the databases.
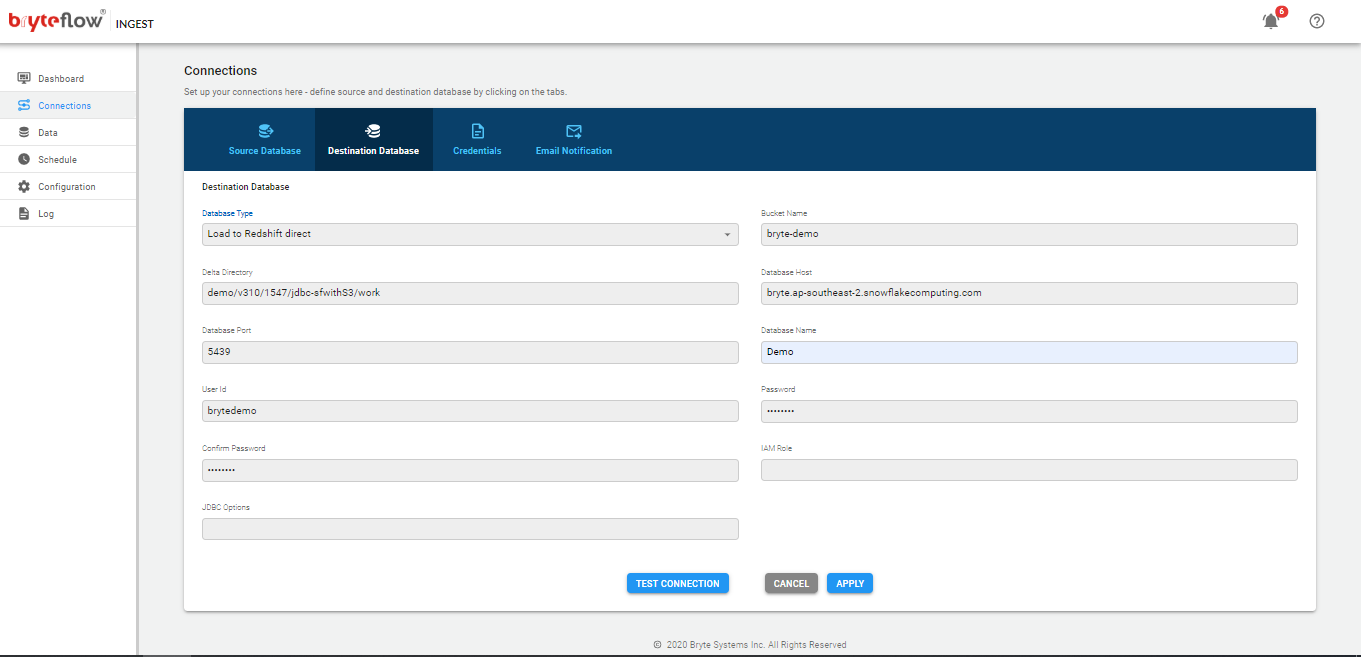
- Enter S3 bucket name
Load to Snowflake direct
- Enter ‘Database Type’ as ‘Load to Snowflake Direct’
- Database host is the Snowflake account URL For eg: abc123.ap-southeast-2.snowflakecomputing.com
- Provide Snowflake Account name under ‘Account name’
- Enter Snowflake Data warehouse name in ‘Warehouse Name’ field
- Enter Snowflake Database name in ‘Database Name’ field
- Enter Snowflake UserID in the Userid field
- Password to be configured under Password and Confirm Password section.
- JDBC options are optional, in order to extend the JDBC URL used to access the databases.
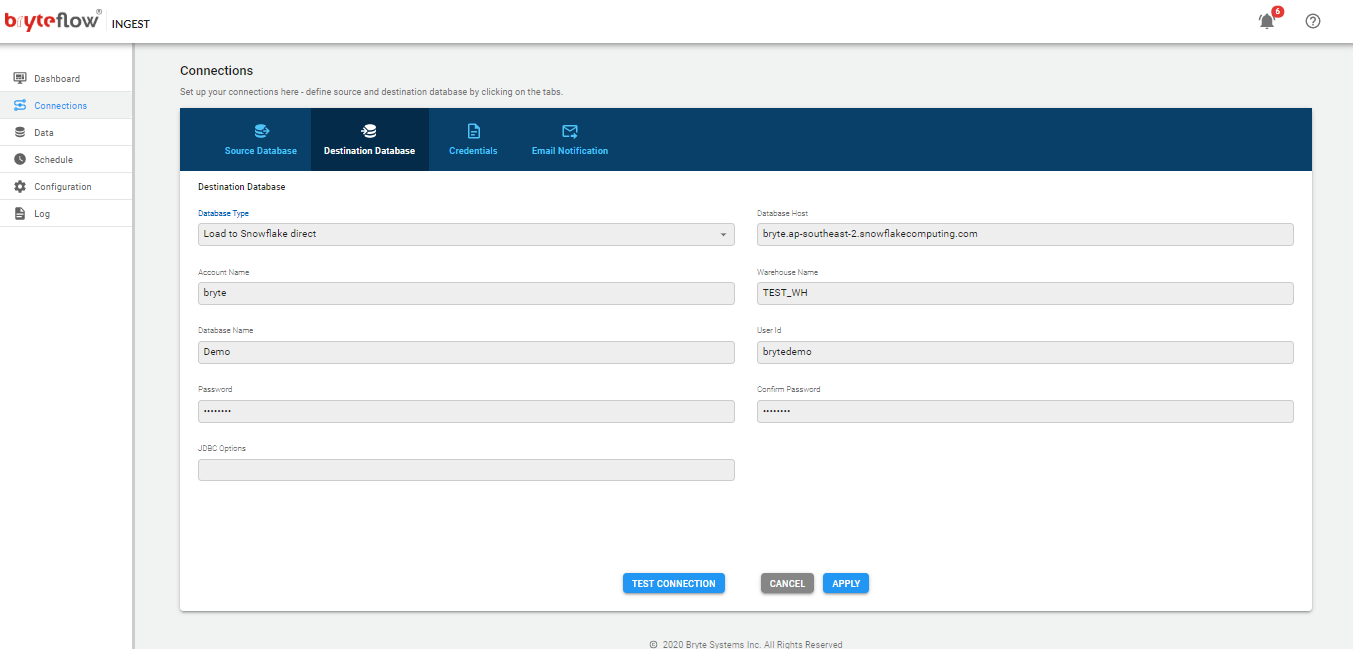
Load to Snowflake using S3
- Enter ‘Database Type’ as ‘Load to Snowflake using S3’
- Enter S3 bucket name
- eg brytetest
- Enter working directory name under “Delta Directory”
- eg delta
- Database host is the Snowflake account URL For eg: abc123.ap-southeast-2.snowflakecomputing.com
- Provide Snowflake Account name under ‘Account name’
- Enter Snowflake Data warehouse name in ‘Warehouse Name’ field
- Enter Snowflake Database name in ‘Database Name’ field
- Enter Snowflake UserID in the Userid field
- Password to be configured under Password and Confirm Password section.
- JDBC options are optional, in order to extend the JDBC URL used to access the databases.
- Click on the ‘Test Connection’ button to test the connection details
- Click on the ‘Apply’ button to confirm and save the details
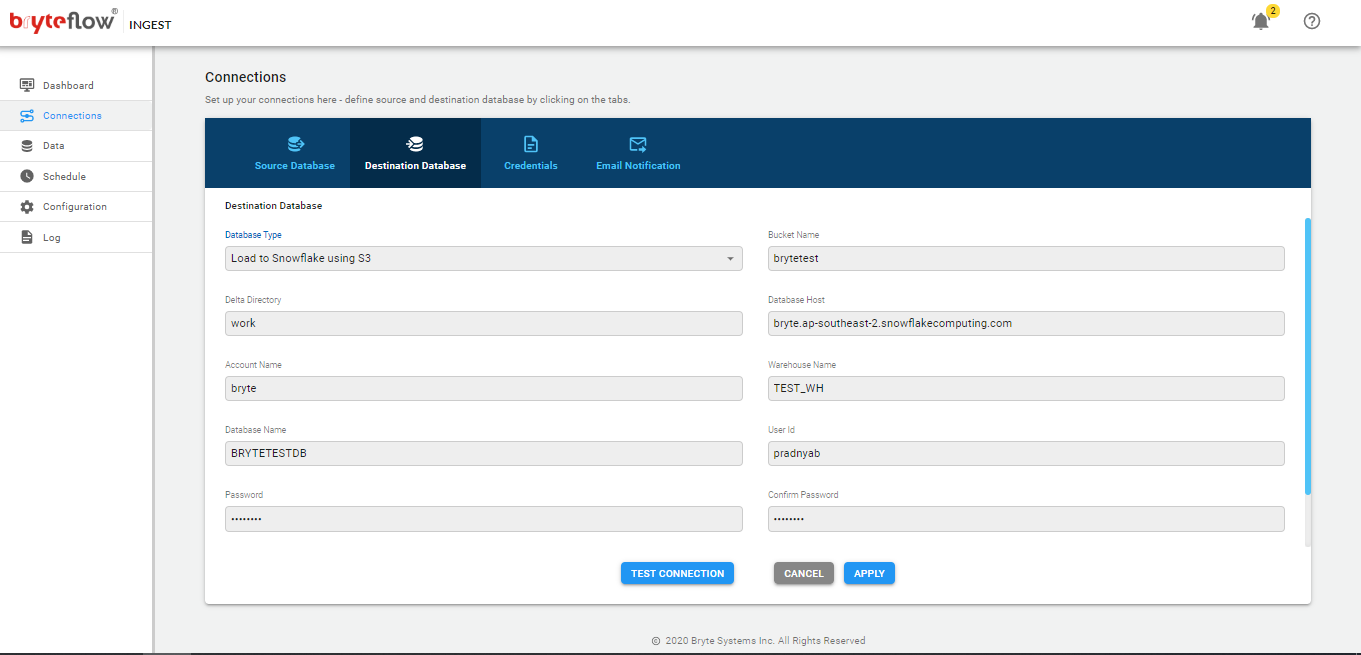
Load Kafka Deltas
BryteFlow Ingest supports Apache Kafka as a destination. It integrates changes into Kafka location.
The incremental data is loaded as a message to Kafka Topics.
Kafka Message Keys and Partitioning is supported in BryteFlow. The Kafka messages contain a ‘key’ in each JSON message and messages can be put into partitions for parallel consumption.
BryteFlow Ingest puts messages into Kafka Topic in JSON format by default.
The minimum size of a Kafka message sent is 4096 bytes.
Prerequisites for Kafka as a target:
- Kafka Host URL or Kafka Broker
- Kafka Client
- Kafka Topic Name
- Kafka ConsumerGroup

BryteFlow allows connection to SSL enabled Kafka.
Below are the required fields for Kafka SSL configuration:
- kafka.ssl.truststore.location : The full path to the truststore JKS file.
- kafka.ssl.truststore.username: The username to the truststore.
- kafka.ssl.truststore.password: The password to the truststore.
BryteFlow allows connection to Kafka using Kerberos authentication.
Below are the required fields for Kafka Kerberos authentication:
- kafka.sasl.kerberos.service.name : The Kerberos service name value.
- kafka.ssl.truststore.location : The full path to the truststore JKS file.
- kafka.ssl.truststore.password: The password to the truststore.
Load to Databricks using Amazon S3
Databricks is a unified cloud-based platform that lends itself to a variety of data goals, including data science, machine learning, and analytics, as well as data engineering, reporting, and business intelligence (BI). Because a single system can handle both, affordable data storage as expected of a data lake, and analytical capabilities as expected of a data warehouse, the Databricks Lakehouse is a much-in-demand platform that makes data access simpler, faster, and more affordable.
BryteFlow supports Databricks on AWS as a destination connector.
Configure Databricks in BryteFlow, Please follow the easy steps as below:
-
- Bucket Name: S3 bucket name where data will be loaded.
- Delta directory: Directory structure where staging data gets loaded.
- Databricks JDBC URL: Configure the jdbc URL for your Databricks warehouse.
- Password: Password is the Databricks access token (PWD)
- Database Name: Its the metastore name: ‘hive_metastore’
Steps to generate JDBC URL for Databricks:
-
- Login to Databricks account
- Go to Data Science & Engineering
- Click on Compute
- Click on cluster (Which will be used)
- Click on Advanced options
- Goto JDBC/ODBC tab
- Copy JDBC URL For Eg: (jdbc:databricks://dbc-.cloud.
databricks.com:443/default; transportMode=http;ssl=1; AuthMech=3;httpPath=/sql/1.0/ warehouses/testabcd)
Steps to generate access tokens:
-
- Login to Databricks account.
- Click on the user setting.
- Go to the Access tokens tab
- Click on Generate token
- Apply the token in ‘Password’ and ‘Confirm Password’ fields on the connection page.
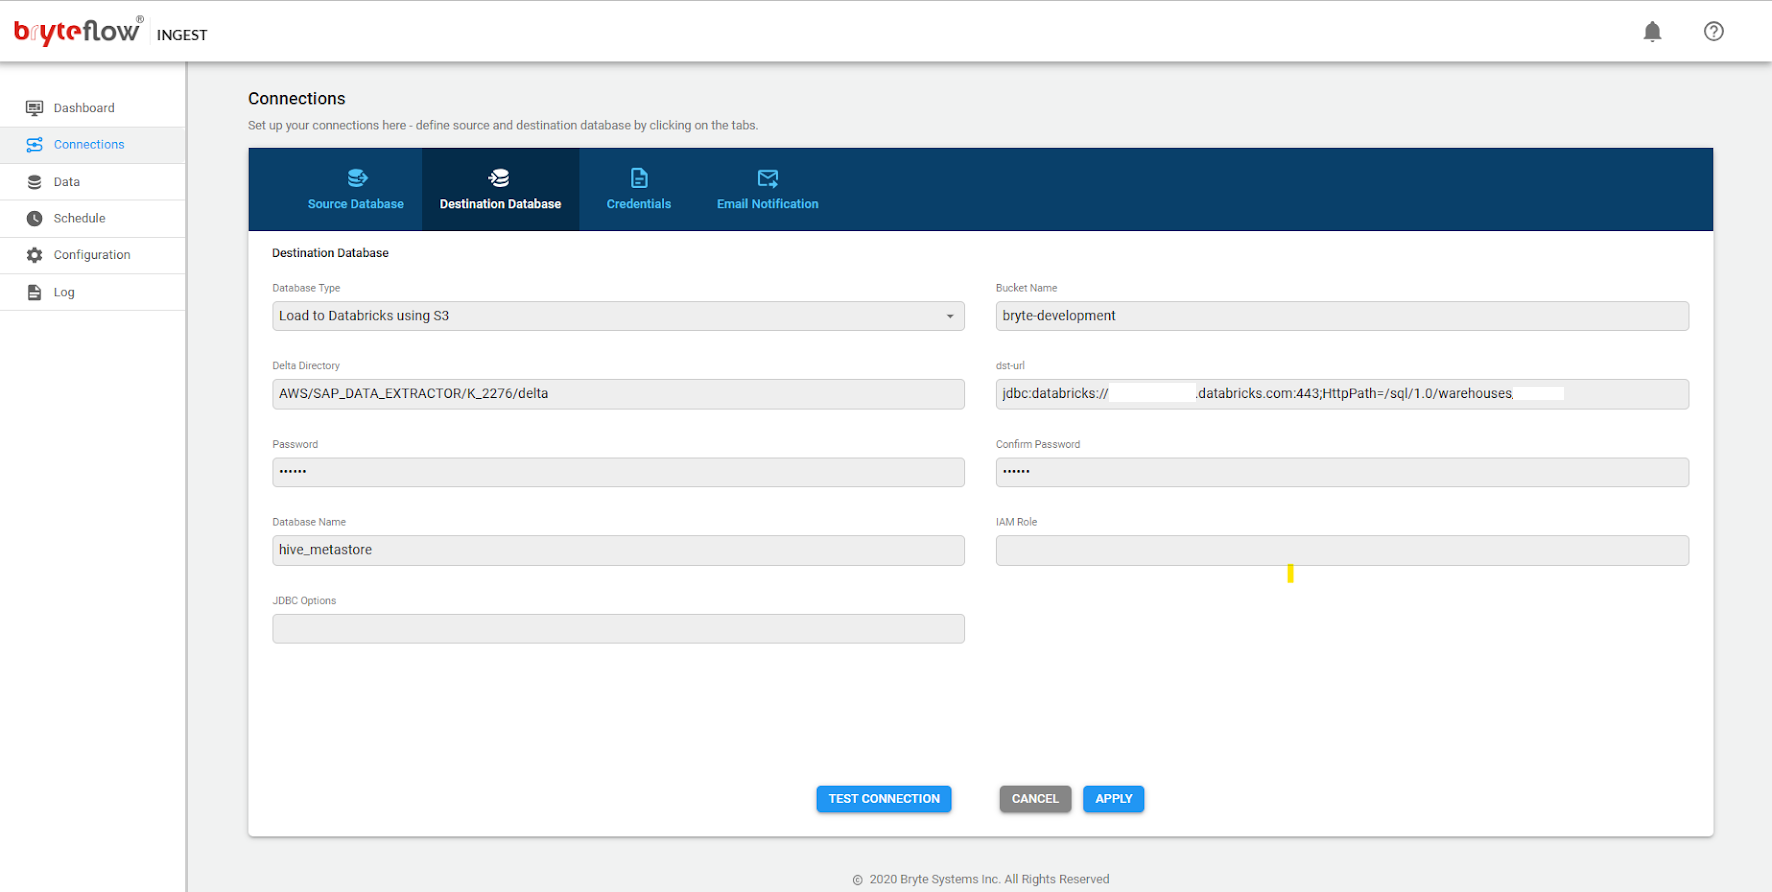
Destinations for Microsoft Azure cloud
Available Destinations for Microsoft Azure cloud are:
- Microsoft SQL Server databases
- Azure SQL DB
- Azure Synapse SQL
- ADLS2 (Azure Data Lake Services Generation 2)
- Snowflake on Azure
Microsoft SQL Server Databases
- Select ‘Database Type’ as ‘Microsoft SQL Server’ from the drop-down list.
- In the Database Host field please enter the IP address or hostname of the database server
- In the Database Port field please enter the port number on which the database server is listening on. The default port for MS SQL Server is 1433
- In the Database Name field please enter the name of your database e.g. BryteMSSQL
- Enter a valid MS SQL Server database user Id that will be used with BryteFlow Ingest. If a Windows user is required, please contact BryteFlow support info@bryteflow.com to understand how to configure this
- Enter Password; then confirm it by re-entering in Confirm Password
- Please note, passwords are encrypted within BryteFlow Ingest
- Click on the ‘Test Connection’ button to test connectivity
- Click on the ‘Apply’ button to confirm and save the details.
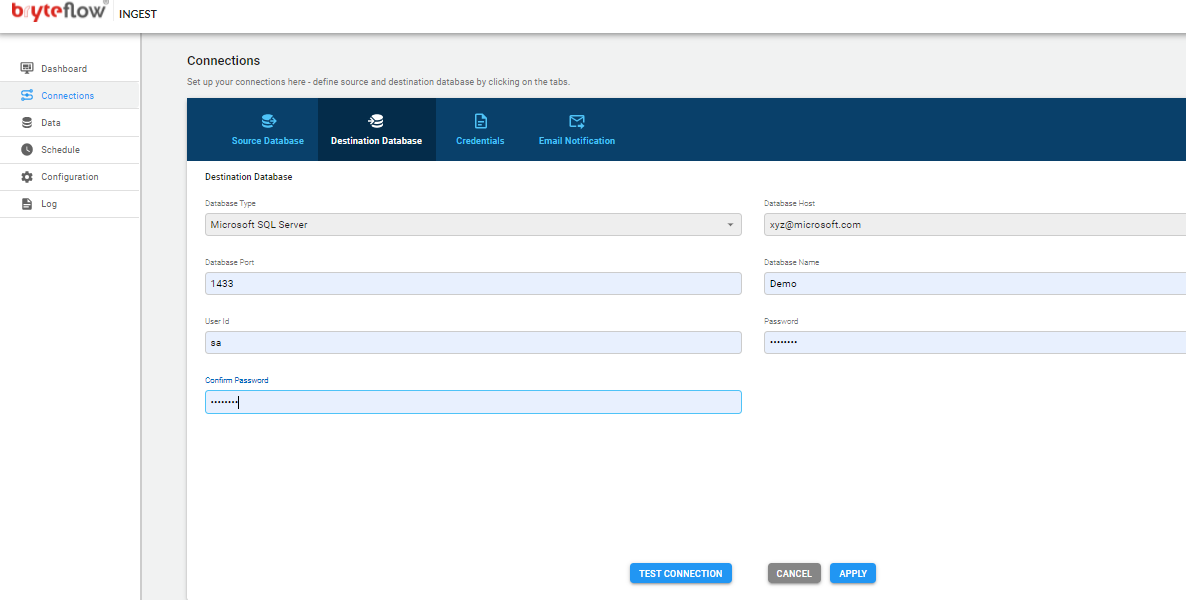
Azure SQL DB
- Select ‘Database Type’ as ‘Azure SQL DB’ from the drop-down list.
- In the Database Host field please enter the IP address or hostname of the database server
- In the Database Port field please enter the port number on which the database server is listening on. The default port for SQL database is 1433
- In the Database Name field please enter the name of your database e.g. mysampleDB
- Enter a valid Azure SQL DB database user Id that will be used with BryteFlow Ingest. If a Windows user is required, please contact BryteFlow support info@bryteflow.com to understand how to configure this
- Enter Password; then confirm it by re-entering in Confirm Password
- Please note, passwords are encrypted within BryteFlow Ingest
- Click on the ‘Test Connection’ button to test connectivity
- Click on the ‘Apply’ button to confirm and save the details.

Azure Synapse SQL
- Select ‘Database Type’ as ‘Azure Synapse SQL‘ from the drop-down list.
- In the Database Host field please enter the IP address or hostname of the database server
- In the Database Port field please enter the port number on which the database server is listening on.
- In the Database Name field please enter the name of your database e.g. mysampleazuredb
- Enter a valid database user Id that will be used with BryteFlow Ingest. If a Windows user is required, please contact BryteFlow support info@bryteflow.com to understand how to configure this
- Enter Password; then confirm it by re-entering in Confirm Password
- Please note, passwords are encrypted within BryteFlow Ingest
- Click on the ‘Test Connection’ button to test connectivity.
- Click on the ‘Apply’ button to confirm and save the details.
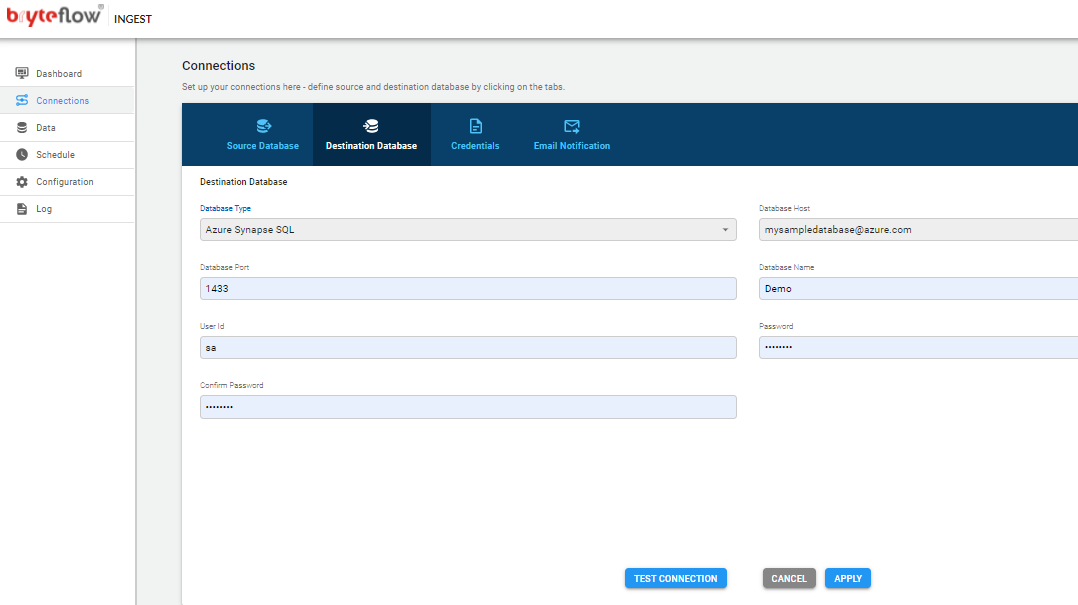
Azure ADLS2
- Select ‘Database Type’ as ‘Azure ADLS2‘ from the drop-down list.
- Enter the Azure storage account name in ‘Account Name‘ field.
- Enter the Azure storage account container name in the ‘Container Name‘ field.
- Enter the Access key for the Storage account in the ‘Account Key’ field.
- Please note, access keys are encrypted within BryteFlow Ingest
- Click on the ‘Test Connection’ button to test connectivity.
- Click on the ‘Apply’ button to confirm and save the details.
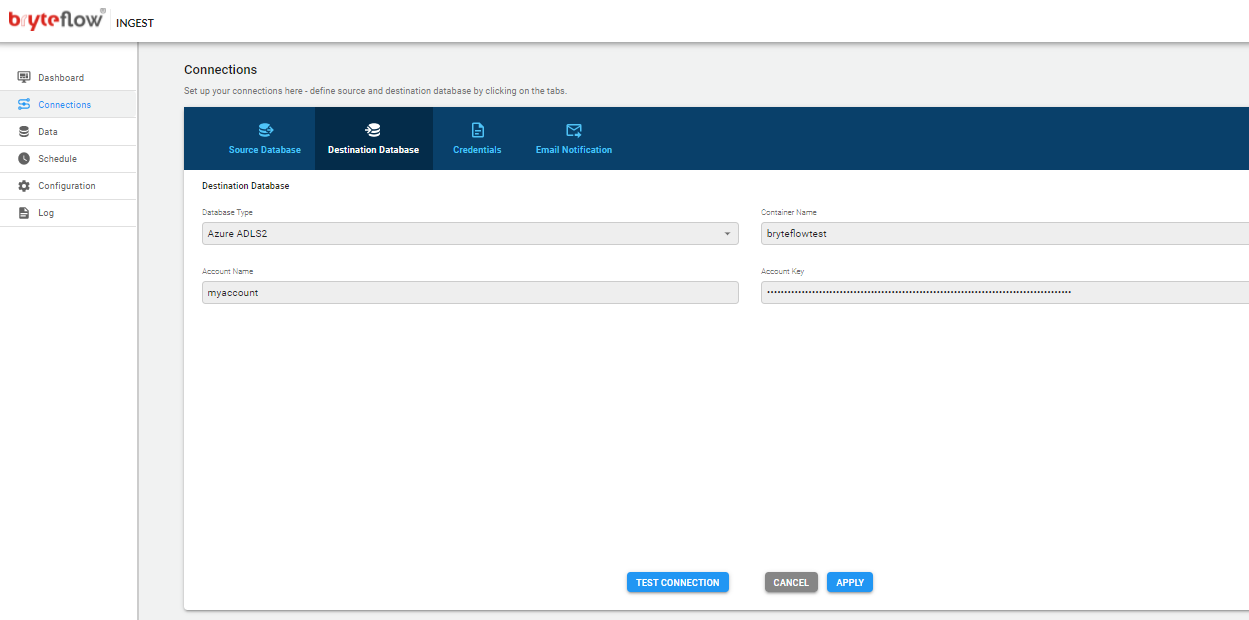
Load to Databricks using ADLS
BryteFlow supports Databricks on Azure as a destination connector.
Configure Databricks in BryteFlow, Please follow the description as below:
- DBFS Mount Point– The mount point field value should be added here as shown below.
The DBFS mount point is to be created by creating a notebook on Azure Databricks with the following sample code and run it:
Please update the AZ URL according to the setup.
dbutils.fs.mount(source = ‘wasbs://demo@demoadls2.blob.core.windows.net‘,mount_point = ‘/mnt/blobstorage’,extra_configs = {‘fs.azure.sas.demo.demoadls2.blob.core.windows.net‘:’?sv=2022-11-02&ss=bfqt&srt=co&sp=rwdlacupyx&se=2024-07-25T20:02:42Z&st=2023-07-25T12:02:42Z&spr=https&sig=IPDudzCistFlSkKSb1t2KGneuCmEV7IQTQJwxZroRBo%3D’})dbutils.fs.ls(‘/mnt/blobstorage’)
2. JDBC URL –Can be obtained from AZ Databricks as per the steps mentioned below.
- Login to Databricks account
- Go to Data Science & Engineering
- Click on Compute
- Click on cluster (Which will be used)
- Click on Advanced options
- Goto JDBC/ODBC tab
- Copy JDBC URL For Eg: (jdbc:databricks://dbc-.cloud.
databricks.com:443/default; transportMode=http;ssl=1; AuthMech=3;httpPath=/sql/1.0/ warehouses/testabcd)
3. Password – Please enter the Databricks Personal access token as password.
4. Database Name –Please enter the Databricks DB name, usually HIVE_METASTORE.
5. Container Name –Please enter the ADLS container name, used as a spool directory to load dat files.
6. Account Name– Please enter the ADLS Account name.
7. Account Key– Please enter the ADLS Account key field
8. Data Directory– Please enter the ADLS data directory path.
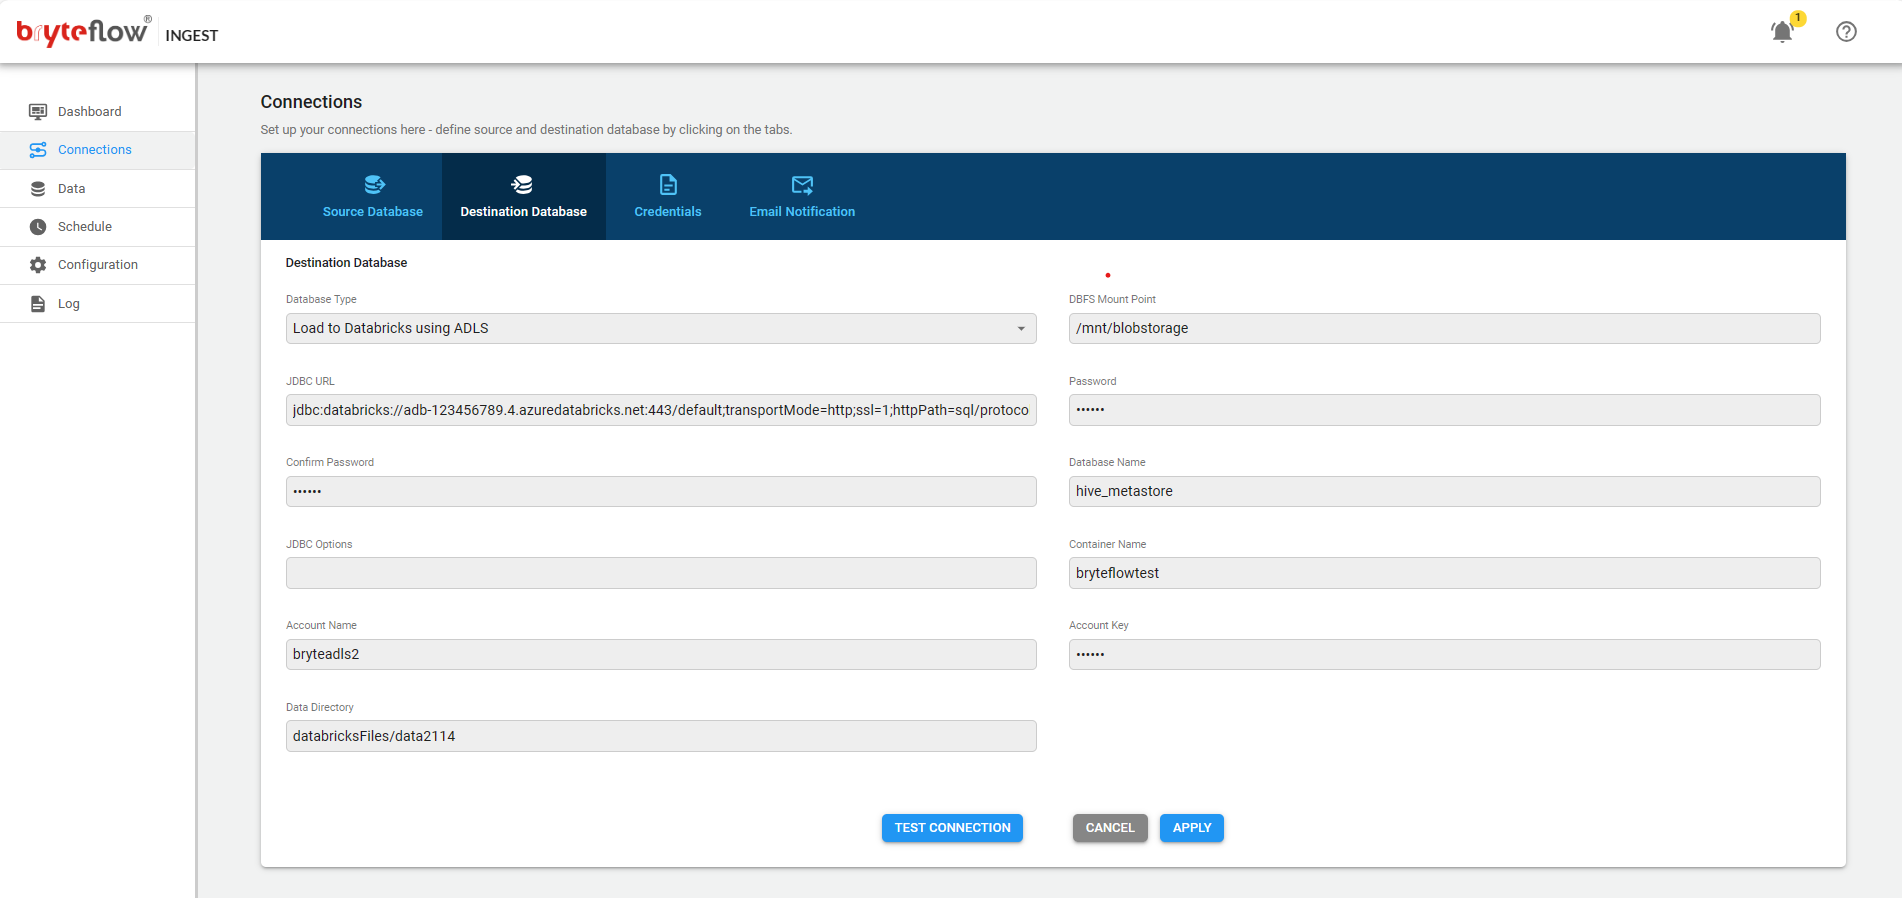
Destinations for Google Cloud Platform
Google Bigquery is the available Destination for Google Cloud Platform
Destination File System
Please Note: This section should not be referred for BryeFlow Ingest v3.10 and onward. The user interface is re-designed to give a more logical representation and is available ony to be used as a reference for the previous versions.
To Configure S3 as the file system perform the following steps.
- Select File System as “AWS S3 with EMR” from the drop-down.
- In the bucket name field, enter the bucket name that you have created on Amazon S3.
- In the Delta Directory and Data Directory field, type in the name of the folders on Amazon S3
- Enter the Amazon EMR instance ID eg. j-1ARB3SOSWXZUZ
- EMR instance can be specified by Instance ID (as before) or a tag ‘value’ for the tag ‘BryteflowIngest’ or a tag and value expressed as ‘tag=value’. If more than one instance fits the criteria, the first one in the list will be picked. For direct loads to Snowflake or Redshift, enter “none”.
- In AWS Region select the correct region from the drop-down list.
- Enter AWS access key id and AWS secret key for accessing the S3 service if installation is on-premises, else IAM roles will be used.
- Please note, keys are encrypted within BryteFlow Ingest
- If you are using the KMS enter the KMS key
- Please note, keys are encrypted within BryteFlow Ingest
- Click on the ‘Test Directory’ button to test connectivity
- Click on the ‘Apply’ button to confirm and save the details
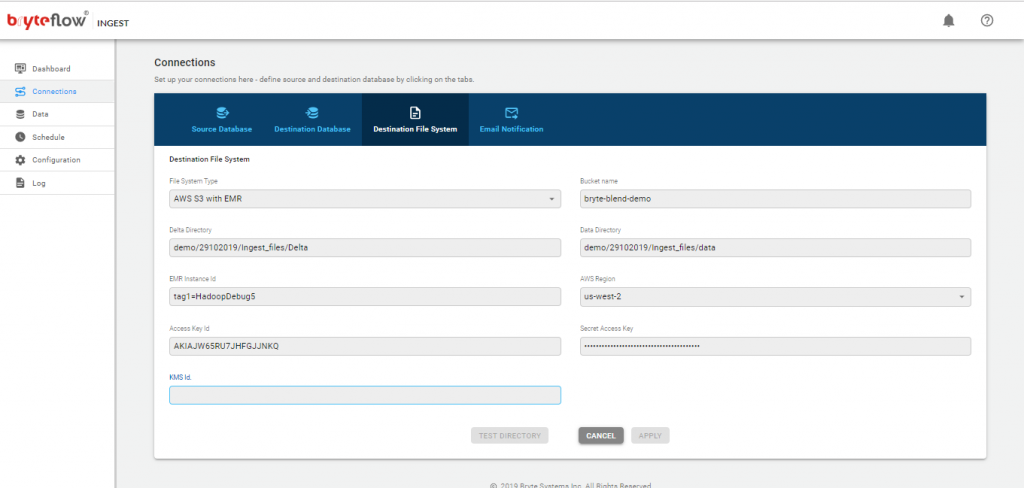
Credentials
Please Note: This section is available in BryteFlow Ingest v3.10 and onward.
BryteFlow Ingest can access AWS services using IAM roles or via Access keys when used on-premises. The access method and credentials needs to be configured in Ingest.
There are below two options:
AWS Credentials
When accessing AWS services from BryteFlow server which is on-premises please select ‘AWS Credentials’ in the File system type and provide information as below:
- In AWS Region select the correct region from the drop-down list.
- Enter AWS access key id and AWS secret key for accessing the S3 service if installation is on-premises, else IAM roles will be used.
- Please note, keys are encrypted within BryteFlow Ingest
- If you are using the KMS enter the KMS key
- Please note, keys are encrypted within BryteFlow Ingest
- Click on the ‘Test Directory’ button to test connectivity
- Click on the ‘Apply’ button to confirm and save the details
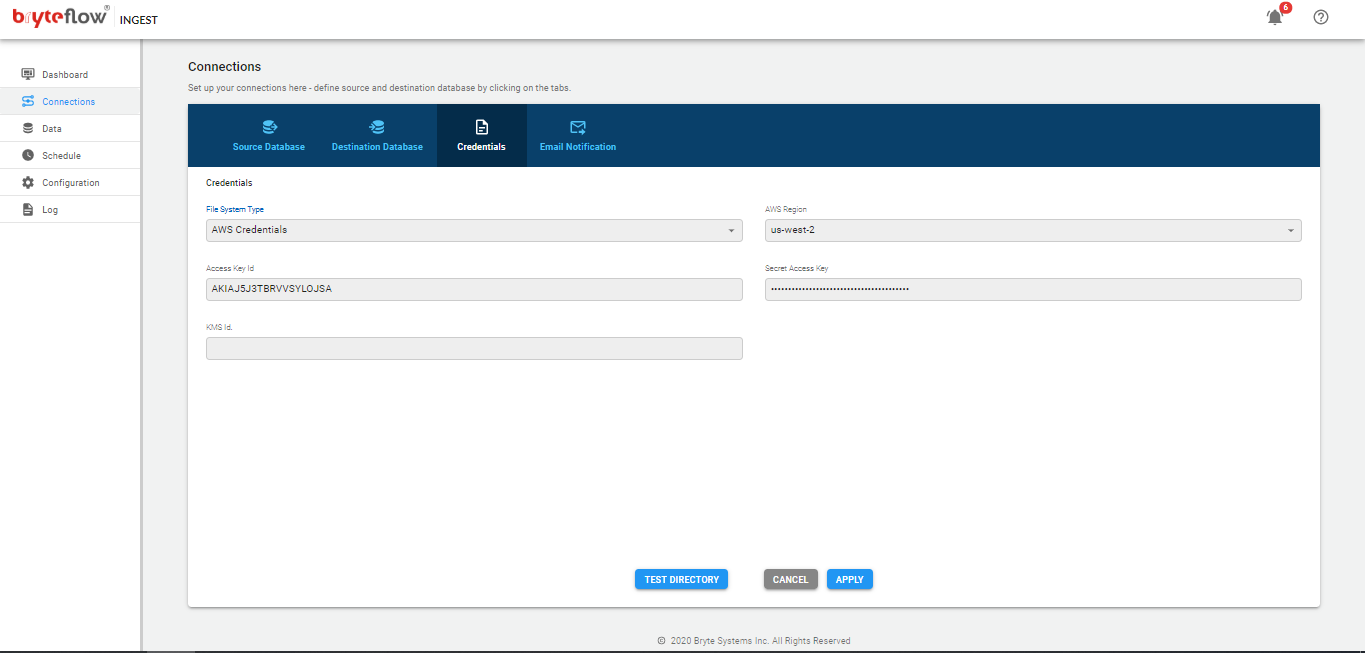
AWS IAM Access
Configure IAM roles in BryteFlow Ingest to access AWS services.
- Select ‘AWS IAM Access’ from the dropdown
- In AWS Region select the correct region from the drop-down list.
- Enter the KMS Id
- Click on the ‘Test Directory’ button to test connectivity
- Click on the ‘Apply’ button to confirm and save the details
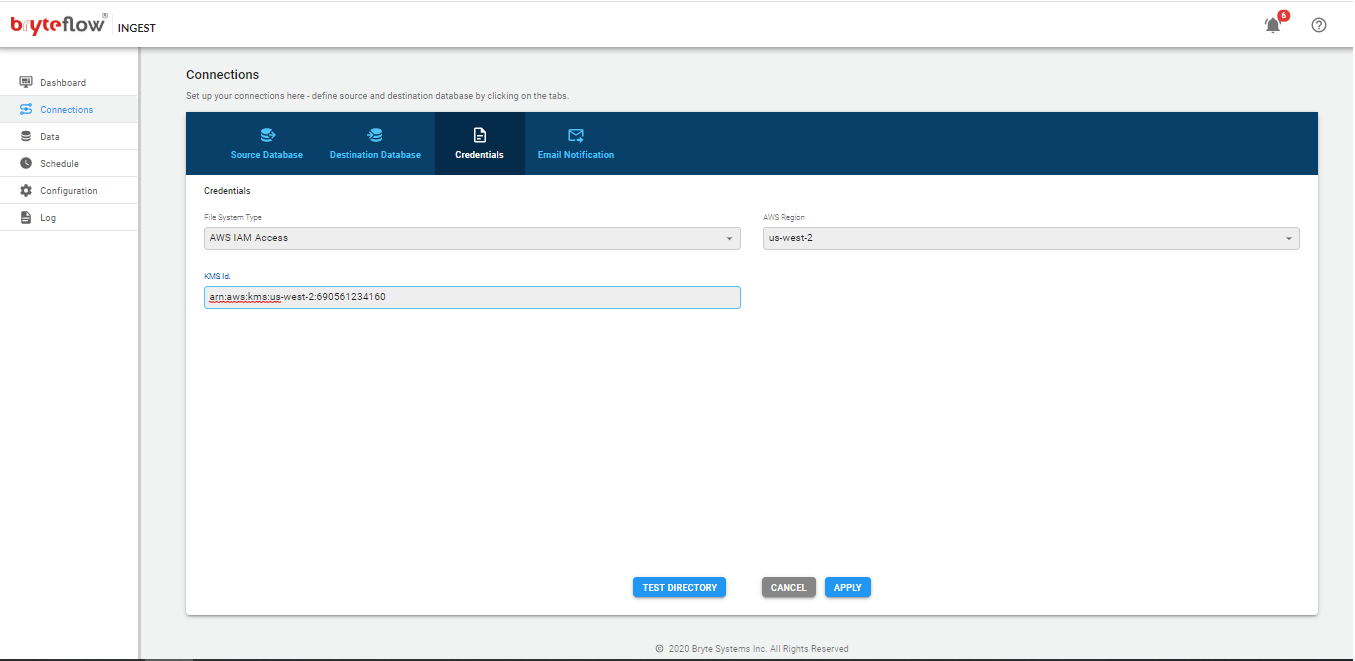
Email Notification
To configure email updates to sent perform the following steps
- Choose Mail Type: SMTP using TLS from the drop-down
- In the Email Host, field type in the address of your SMTP server.
- In the Email Port field, type in the port number on which the SMTP server is listening.
- In the user id field type your complete email address from which will authenticate with the SMTP server.
- Enter Password for the email; confirm.
- Please note, passwords are encrypted within BryteFlow Ingest
- In Send From, enter the email id from which the email will be send from, it has to be a valid email address on the server.
- In Send To field enter the email address to which the notifications are sent to.
- Click on Test Connection and then Apply to test the connection and save the settings.

Data
NOTE: Please review this section in conjunction with Appendix: Understanding Extraction Process
To select the table for transferring to destination database on Amazon Redshift and/or Amazon S3 bucket perform the following steps.
- Expand the Database.
- Browse to the table you want to be synced with Amazon Redshift or Amazon S3.
- Select the checkbox next to the table and then click on the table.
- On the right-hand side pane, select the type of transfer for the table i.e. By Primary Key or By Primary Key with History. With the Primary Key option, the table is replicated like for like to the destination. With the Primary Key with History option, the table is replicated as time series data with very change recorded with Slowly Changing Dimension type2 history (aka point in time)
- In the Primary Key column, select the Primary Key for the table by checking the checkbox next to the column name.
- You can also mask a column by checking the checkbox. By masking a column, the selected column will not be transferred to the destination.
- Type Change can be specified for the columns that needs a datatype conversion by selecting the ‘TChange’ checkbox against the column(s).
- Click on the ‘Apply’ button to confirm and save the details
This process of selecting tables, configuring primary keys and mask columns should be repeated for each of the tables. Once complete the next step is to…
- Navigate to the Schedule tab
- Click on the ‘Full Extract’ button to initiate the Initial Extract and Load process
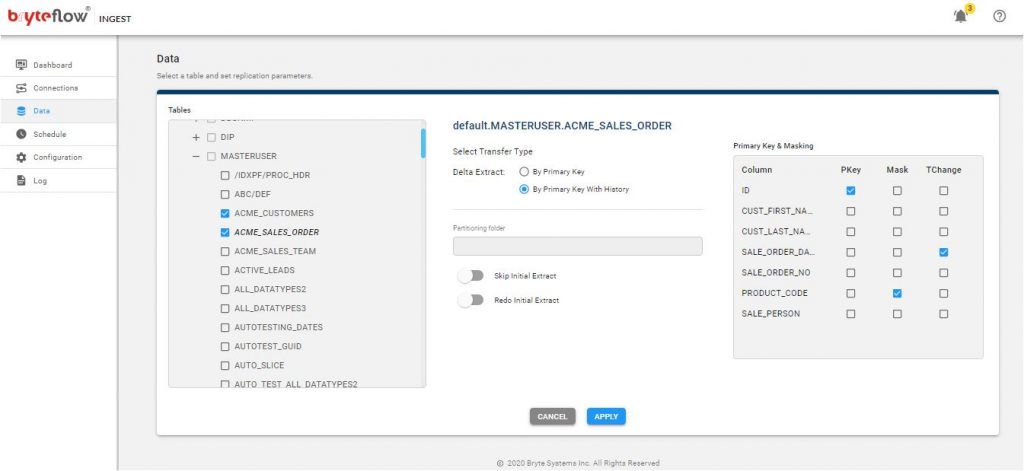
Column Type Change
This feature is mostly used in SAP environments. This is to allow Type Change of column/fields from native character or numeric format to Integer, Long, Float, Date and Timestamp.
BryteFlow Ingest automatically convert data types during data replication or CDC to the destination formats.
The destination data types are:
| INTEGER | @I |
| LONG | @L |
| FLOAT | @F |
| DATE (including format clause e.g. yyyyMMdd) | @D(format) |
| TIMESTAMP (including format clause e.g. yyyy-MM-dd HH:mm:ss) | @T(format) |
Please note: The (format) part can be almost anything based on the value in the source column.
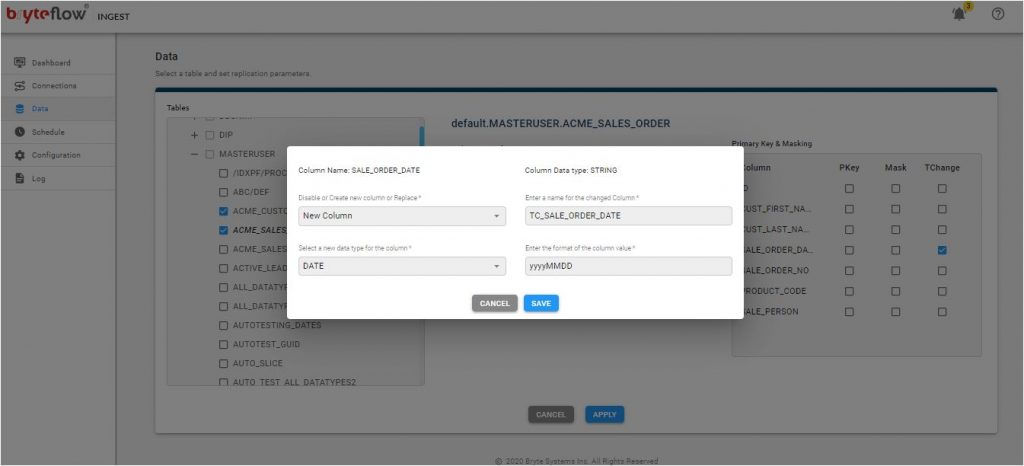
Partitioning
Amazon S3 And Amazon Redshift
Partitioning can dramatically improve efficiency and performance, it can be set up when replicating to S3 (data is partitioned in folders) and/or Redshift (data is partitioned into tables). The partitioning string is entered into the Partitioning folder field. The format for partitioning is as follows
/@<column index>(<partition prefix>=<partition_format>)
Column Index
To build a partitioning folder structure the column index (starting from 1) of the column(s) to be used in the partition need to be known, in this simple table there are 3 columns…
- customer.contact_id would be column index 1
- customer.fullname would be column index 2
- customer.email would be column index 3
Partition Prefix (optional)
Each partition can be prefixed with a named fixed string. The last character the Partition Prefix can be set to ‘=’, ending with ‘=’ is useful when creating partitions on S3 as this facilitates the automated build/recovery of partitions (see below).
- The partition prefix string should be in lower case
- The partition prefix string should not be the same as any of the existing column names
An example for partitioning on the first letter of of column 2 (fullname in this case) is as follows:
/@2(fullname_start=%1s)
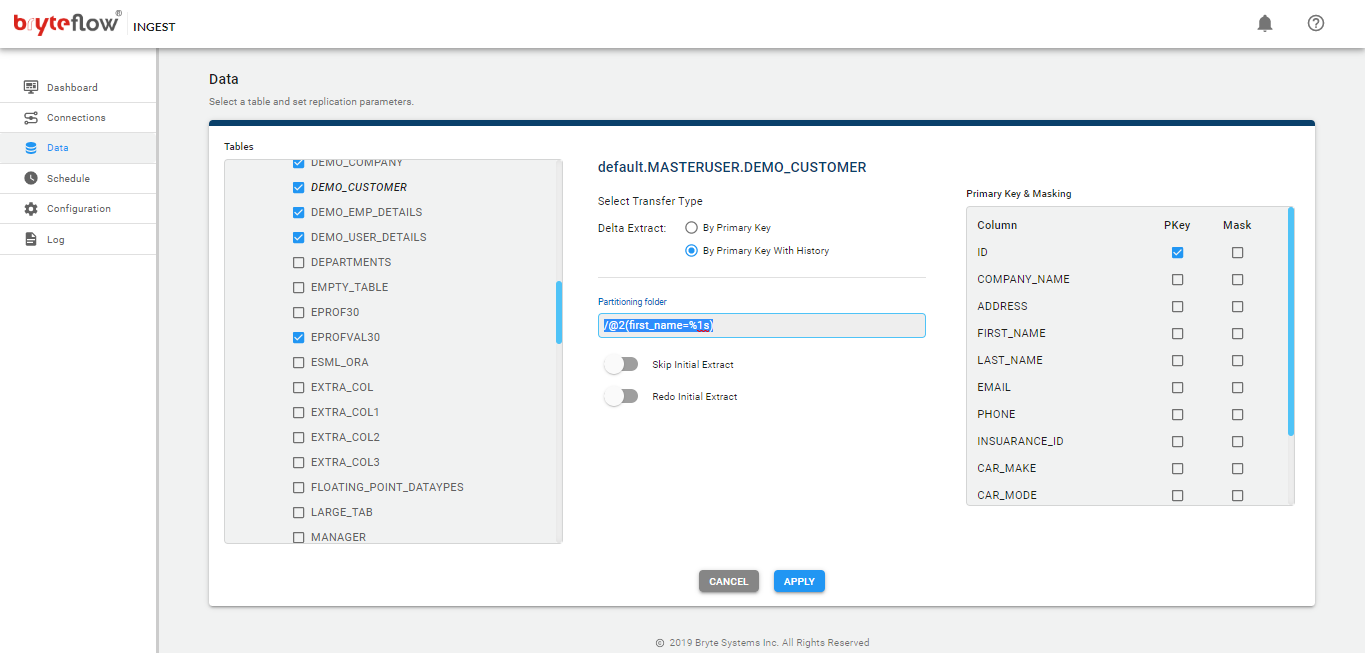
Refer to the MSCK REPAIR TABLE command in AWS Athena documentation. A lower case partition prefix is recommended as an upper/mixed case partition prefix can result in issues when using Athena.
--Builds/recovers partitions and data associated with partitions
MSCK REPAIR TABLE <athena_table_name>;
Once the MSCK REPAIR TABLE <athena_table_name>; has been executed all data will be added to the relevant partitions….any new data will be automatically added to the existing partitions. However if new partitions are created by BryteFlow Ingest the MSCK REPAIR TABLE <athena_table_name>; command will have to be re-executed to make the data available for query purposes in the Athena table.
Format
The format is applied to the column index specified above, for example to partition the data by year (on a date column) you’d use the format %y, to partition by the 24 hour format of time you’d use the format %H.
Partition Examples
Example 1: Year
Assuming Column Index 7 was a date field…
/@7(year=%y)
This would create partition folders such as
- year=2016
- year=2017
- year=2018
- year=2019
Example 2: YearMonthDay
Assuming Column Index 7 was a date field…
/@7(%y%M%d)
This would create partition folders such as
- 20190101
- 20190102
- 20190103
- 20190104
Example 3: yyyymmdd=YearMonthDay
Assuming Column Index 7 was a date field…
/@7(yyyymmdd=%y%M%d)
This would create partition folders such as (useful format to automate recovery/initial population of data associated with partitions when using Athena)
- yyyymmdd=20190101
- yyyymmdd=20190102
- yyyymmdd=20190103
- yyyymmdd=20190104
Example 4: DOB column was used to create sub partitions of yr, mth and day
Assuming DOB Column Index 4 was a date
/@4(yr=%y)/@4(mth=%M)/@4(day=%d)
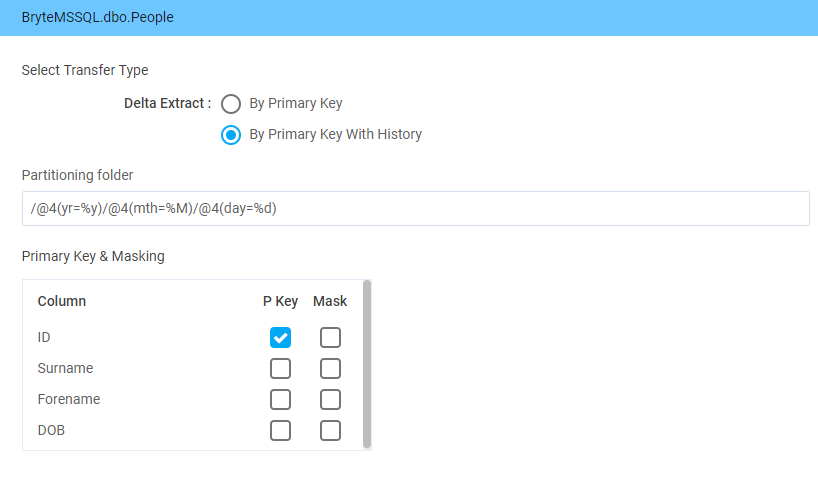
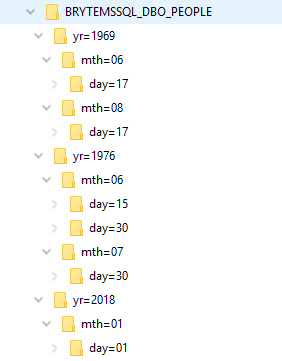
Example 5: model_nm=model_values and then sub partitions of yearmonth=YearMonth (multiple column partitioning)
Assuming Column Index 6 was a string (containing for example model_name_a, example model_name_b and example model_name_c) and Column Index 13 was a date field…
/@6(model_nm=%s)/@13(yearmonth=%y%M)
- model_nm=model_name_a
- yearmonth=201801
- yearmonth=201802
- yearmonth=201803
- model_nm=model_name_b
- yearmonth=201801
- yearmonth=201802
- yearmonth=201803
- model_nm=model_name_c
- yearmonth=201801
- yearmonth=201802
- yearmonth=201803
Available Partition Options
| Format | Datatype | Description |
%y |
TIMESTAMP |
Four digit year e.g. 2018 |
%M |
TIMESTAMP |
Two digit month with zero prefix e.g. March -> 03 |
%d |
TIMESTAMP |
Two digit date with zero prefix e.g. 01 |
%H |
TIMESTAMP |
Two digit 24 hour with zero prefix e.g. 00 |
%q |
TIMESTAMP |
Two digit month indicating the start month of the quarter e.g. March -> 01 |
%Q |
TIMESTAMP |
Two digit month indicating the end month of the quarter e.g. March -> 03 |
%r |
TIMESTAMP |
Two digit month indicating the start of the half year e.g. March -> 01 |
%R |
TIMESTAMP |
Two digit month indicating the end of the half year e.g. March -> 06 |
%i |
INTEGER |
Value of the integer e.g. 12345 |
%<n>i |
INTEGER |
Value of the integer prefixed by zeros to specified width e.g. %8i for 12345 is 00012345 |
%<m>.<n>i |
INTEGER |
Value of the integer is truncated to the number of zeros specified by <n> and prefixed by zeros to the width specified by <m> e.g. %8.2i for 12345 is 00012300 |
%.<n>i |
INTEGER |
Value of the integer is truncated to the number of zeros specified by <n> e.g. %.2i for 12345 is 12300 |
%s |
VARCHAR |
Value of the string e.g. ABCD |
%<n>s |
VARCHAR |
Value of the string truncated to the specified width e.g. %2s for ABCD is AB |
Schedule
To configure extracts to run at a specific time perform the following steps.
- In case of Oracle Automatic is pre-selected and other options are disabled by default.
- For MS SQL Server you can choose the period in minutes.
- A daily extraction can be done at a specific time of the day by choosing hour and minutes in the drop-down.
- Extraction can also be scheduled on specific days of the week at a fixed time by checking the checkboxes next to the days and selecting hours and minutes in the drop-down.
- Click on the ‘Apply’ button to save the schedule.
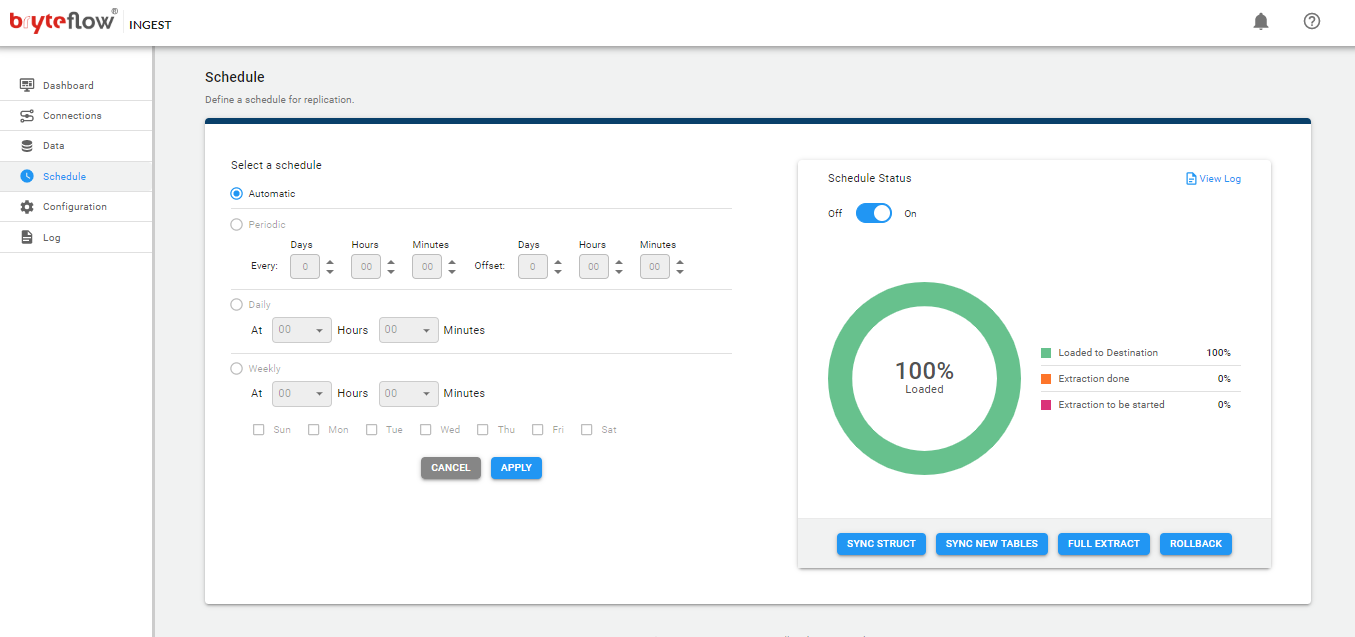
API Controls for the Schedule:
Disable the Schedule by executing the below URL :
http://host:port/bryteflow/wv?cmd=rstat&func=off
Enable the Schedule by executing the below URL :
http://host:port/bryteflow/wv?cmd=rstat&func=on
API Controls to get the Statistics of the Ingest instance:
Executing the below URL will return the statistics of Ingest:
http://host:port/bryteflow/ingest/init?cmd=dcon&func=getstat
Add a new table to existing Extracts
You can add additional table(s) if the replication is up and running and the need arises to add a new table to extraction process…
- Click the Schedule ‘off’ (top right of screen under Schedule tab)
- Navigate to the ‘Data’ tab
- Select the new table(s) by navigating into database instance name, schema name and table name(s)
- Configure the table, considering the following
- Transfer type
- Partitioning folder (refer to the Partitioning section of this document for details)
- Primary key column(s)
- Columns to be masked (optional, masked columns are excluded from replication, for example salary data)
- Click on the ‘Apply’ button
- Repeat process for each table that is required
- Navigate to the ‘Schedule’ Tab
- Click on the ‘Sync New Tables’ button
This will initiate the new table(s) for a full extract, once completed BryteFlow Ingest will automatically resume with processing deltas for the new and all the previously configured tables.
Resync data for Existing tables
If the Table transfer type is Primary Key with History, to resync all the data from source, perform the following steps
- Click the Schedule ‘off’ (top right of screen under Schedule tab)
- For Resync Data on ALL configured tables…
- Navigate to Schedule tab
- Click on the ‘Full Extract’ button
- For Resync Data on selected tables…
- Navigate to Data Sources tab
- Select the table(s) by navigating into database instance name, schema name and table name(s)
- Click on the ‘Redo Initial Extract’ button
- Repeat process if more than one table is required
- Navigate to the ‘Schedule’ Tab
- Click on the ‘Sync New Tables’ button
- Navigate to Data Sources tab
Rollback
In the event of unexpected issues (such as intermittent source database outages or perhaps network connectivity issues etc) it is possible to wind back in time the status of BryteFlow Ingest and replay all of the changes. Suppose there was a problem that occurred at say perhaps 16:04 hours, you can rollback BryteFlow Ingest to a point in time before these issues starting occurring, say 15:00. To perform this operation….
- Navigate to the Schedule tab.
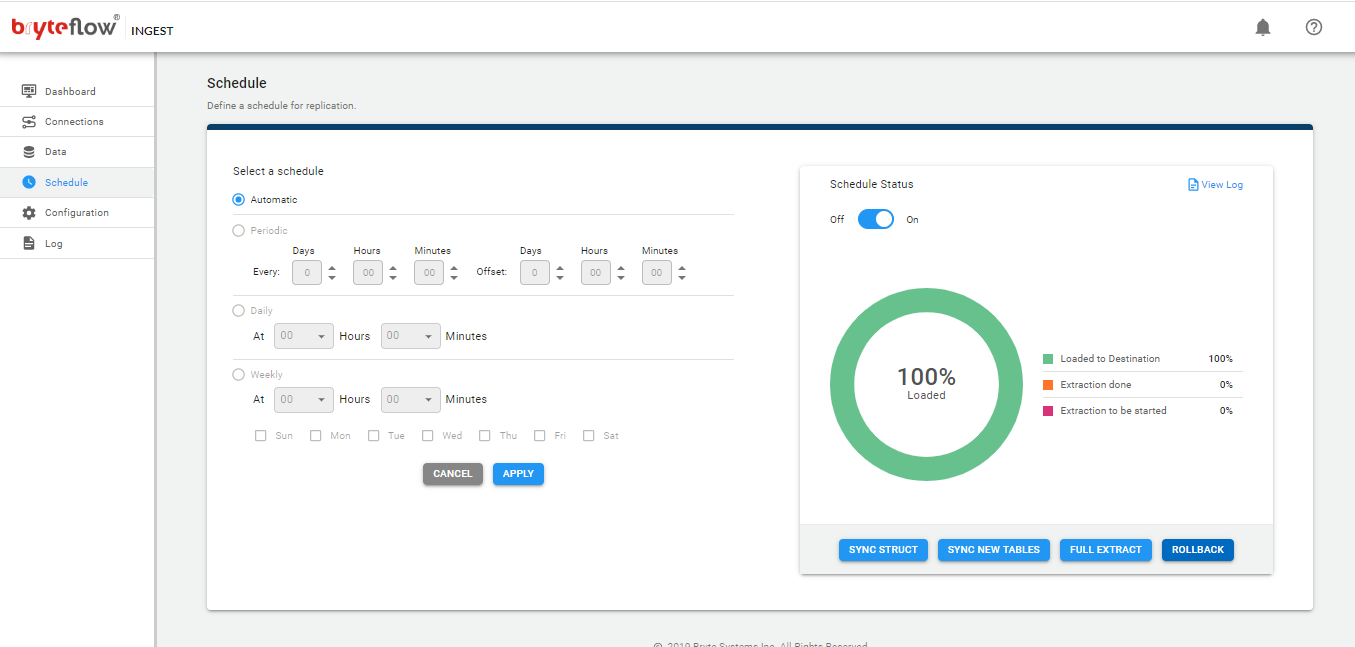
- Click on the ‘Rollback’ button
- The rollback screen appears, it provides a list of all of the points in time you can rollback to in descending order.
- Dependent upon the source database log retention policy
- Select the required date (radio button) and click ‘Select’
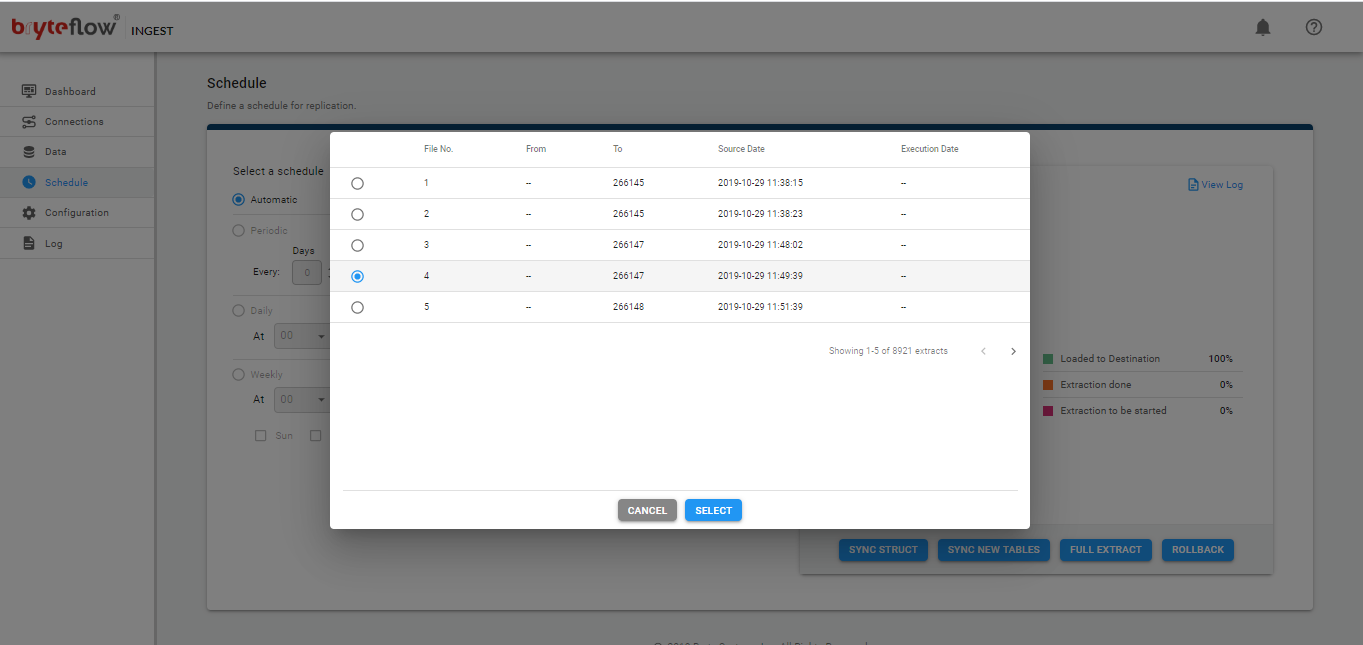
- Click on ‘Rollback’ to initiate the Rollback
- The rollback will now catch up from 11:49 to ‘now’ automatically replaying all of the log entries and applying them to the destination
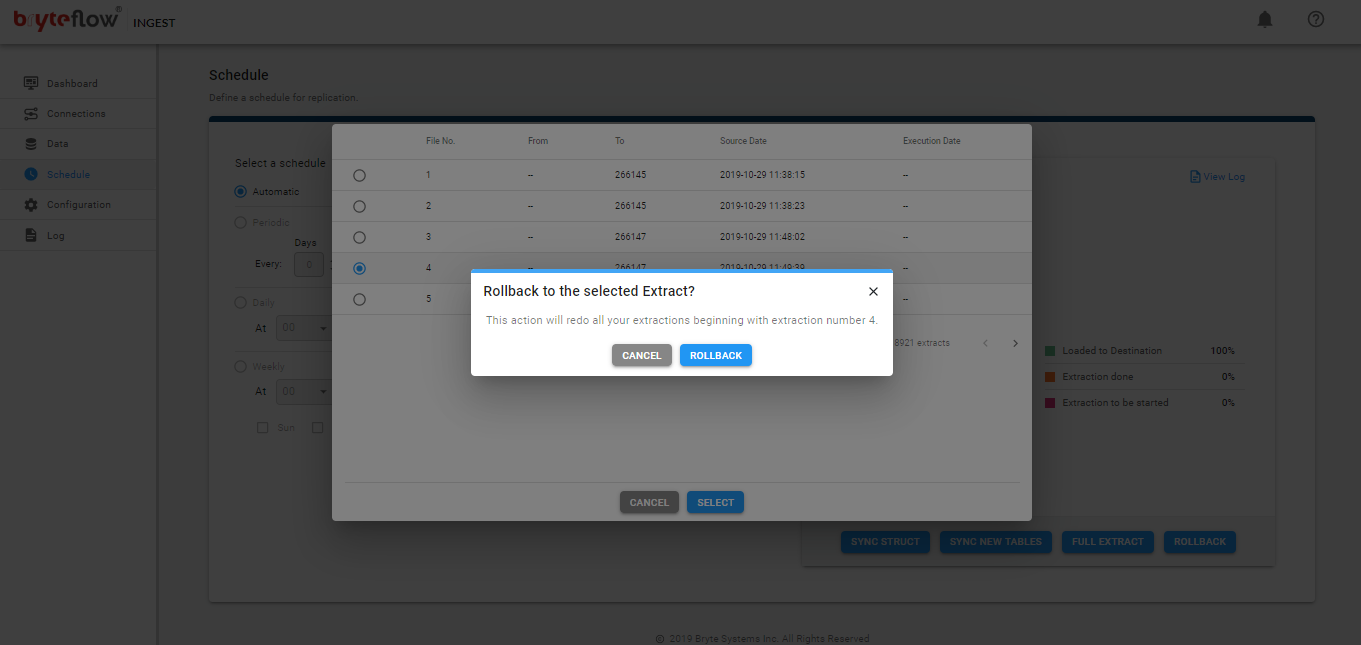
Configuration
The configuration tab provides access to the the following sub-tabs
- Source Database
- Destination Database
- Credentials
- License
- Recovery
- Remote Monitoring
Source Database
Web Port: The port on which the BrtyeFlow Ingest server will run on.
Max Catchup Log: The number of Oracle archive logs will be processed at one instance.
Run Every: Set timer for the minimum minutes between catchup batches.
Convert RAW to Hex: To handle raw columns by converting to hex string instead of ignoring as CHAR(1).
Destination Database
Some additional configurations for Destination Databases,
File compression: Output Compression method, available options are as follows
- None
- BZIP2
- GZIP
- Parquet
- ORC(snappy)
- ORC(zlib)
Loading threads: Number of Redshift loading threads.
Schema for all tables: Ignore source schema and put all tables in this schema on destination
Schema for staging tables: Schema name to be used for staging tables in destination.
Retaining staging tables: Check to Retain staging tables in destination.
Source Start Date: Column name for source date for type-2 SCD record.
History End Date: Column name for history end date for type-2 SCD record.
End Date Value: End date used for history.
Ignore database name in schema: Check to ignore DB name as part of schema prefix for destination tables.
No. of data slices: Number of slices to split data file in to.
Max Updates: Combine updates that exceed this value.
Credentials / Destination File System
Keep S3 Files: Retain files in S3 after loading into AWS Redshift.
Use SSE: Store in S3 using SSE (server-side encryption).
S3 Proxy Host: S3 proxy host name.
S3 Proxy Host Port: S3 proxy port.
S3 Proxy user ID: S3 proxy user id.
S3 Proxy Password: S3 proxy password.
License
To get a valid license go to Configuration tab, then to the License tab and email the “Product ID” to the Bryte support team – support@bryteflow.com
NOTE: Licensing is not applicable when sourced from the AWS Marketplace.

High Availability / Recovery
BryteFlow Ingest provides High Availability Support, this means it automatically saves the current configuration and execution state to S3 and DynamoDB. As a result an instance of BryteFlow Ingest (including it’s current state) can be recovered should it be catastrophically lost. Before use this must be configured, select the Configuration tab and then the Recovery sub-tab to enter the required configuration.
BryteFlow keeps backup of every successful job execution on S3 and Dynamo DB and makes the latest version available for user to recover from. Follow the below steps to setup recovery and on how to recover in case of failure.
Recovery Configuration
Pre-requisite for Enabling recovery:
- DynamoDB – PITR Enabled for backup and recovery.
- Enable S3 versioning
Follow below steps to configure the S3 backup location for BryteFlow Ingest:
- In the Instance Name field enter a business friendly name for the current instance of BryteFlow Ingest
- Check ‘Enable Recovery’
- Enter the destination of the recovery data in S3, for example s3://your_bucket_name/your_folder_name/Your_Ingest_name
- S3 KMS Id: Enter KMS Id in order to encrypt logs on S3, this is optional but recommended. Once provided, the logs will be encrypted using KMS encryption.
- Click on the ‘Apply’ button to confirm and save the details
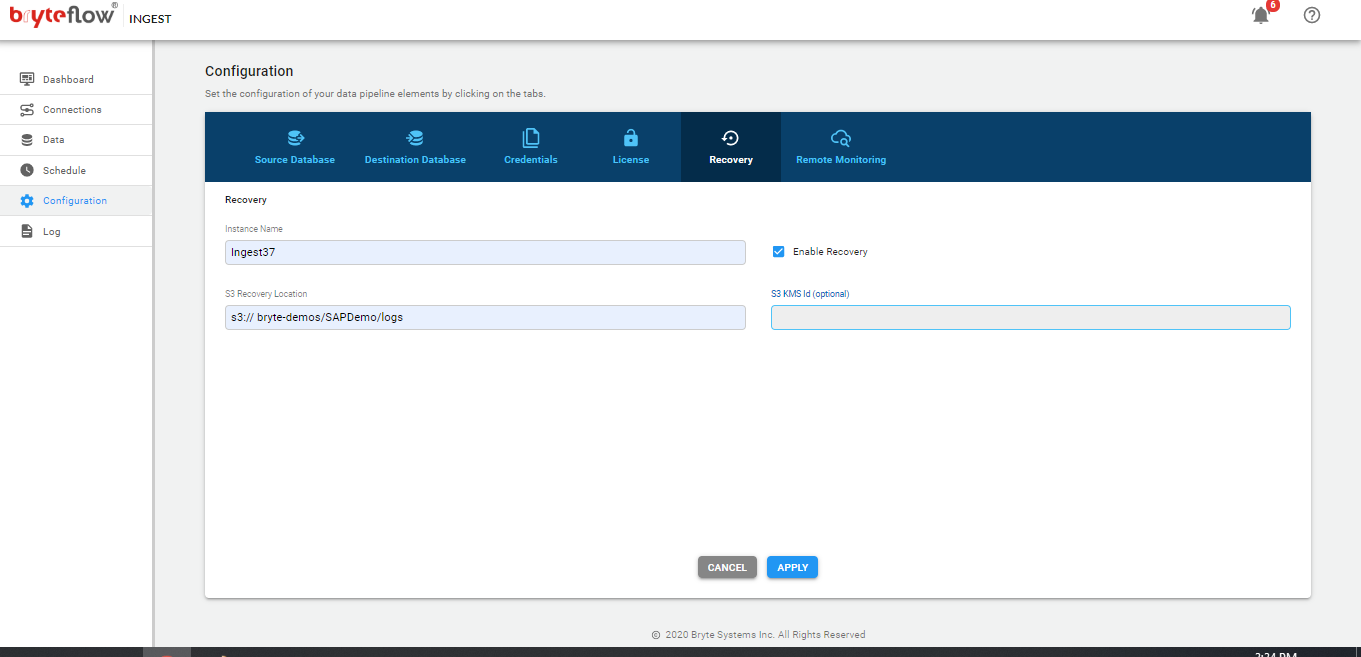
The recovery data is stored in the DynamoDB (AWS fully managed NoSQL database service). The recovery data for the named instance (in this example Your_Ingest_Name is stored in a DynamoDB table called BryteFlow.Ingest as shown below:
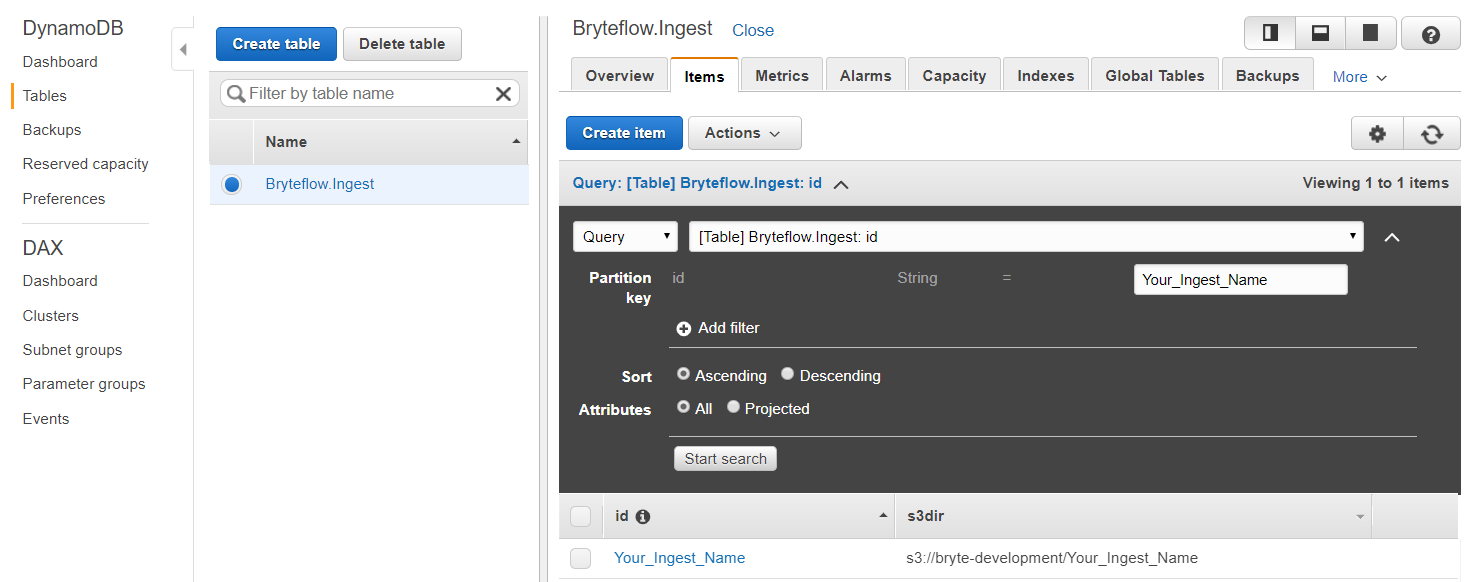
Recovery Utilisation
To recover an instance of BryteFlow Ingest, you should source a new Instance of BryteFlow Ingest from the AWS Marketplace
- Use the AMI sourced from the AWS Marketplace
- https://aws.amazon.com/marketplace/pp/B01MRLEJTK
- Requires selection of BryteFlow Ingest volume
- Requires selection of EC2 instance type
- For details of launching the AMI from AWS Marketplace refer to BryteFlow user guide.
- The endpoint will be an EC2 instance running BryteFlow Ingest (as a windows service) on port 8081
- The role assigned to the EC2 should have the required policy. Please refer to the BryeFlow guide for the same.
- The list of instances are held in DynamoDB. The EC2 role allows access to DynamoDB and the underlying table with the saved instances, make sure to have the needed permissions.
- https://aws.amazon.com/marketplace/pp/B01MRLEJTK
- Once the EC2 is launched, Type
localhost:8081into the Chrome browser to open the BryteFlow Ingest web console - Click on the ‘Existing Instance’ button
- Select the existing instance you wish to restore from the list displayed, in this example there is only one (it being ‘Your_Ingest_Name’), once the required instance has been selected click on the the ‘Select’ button
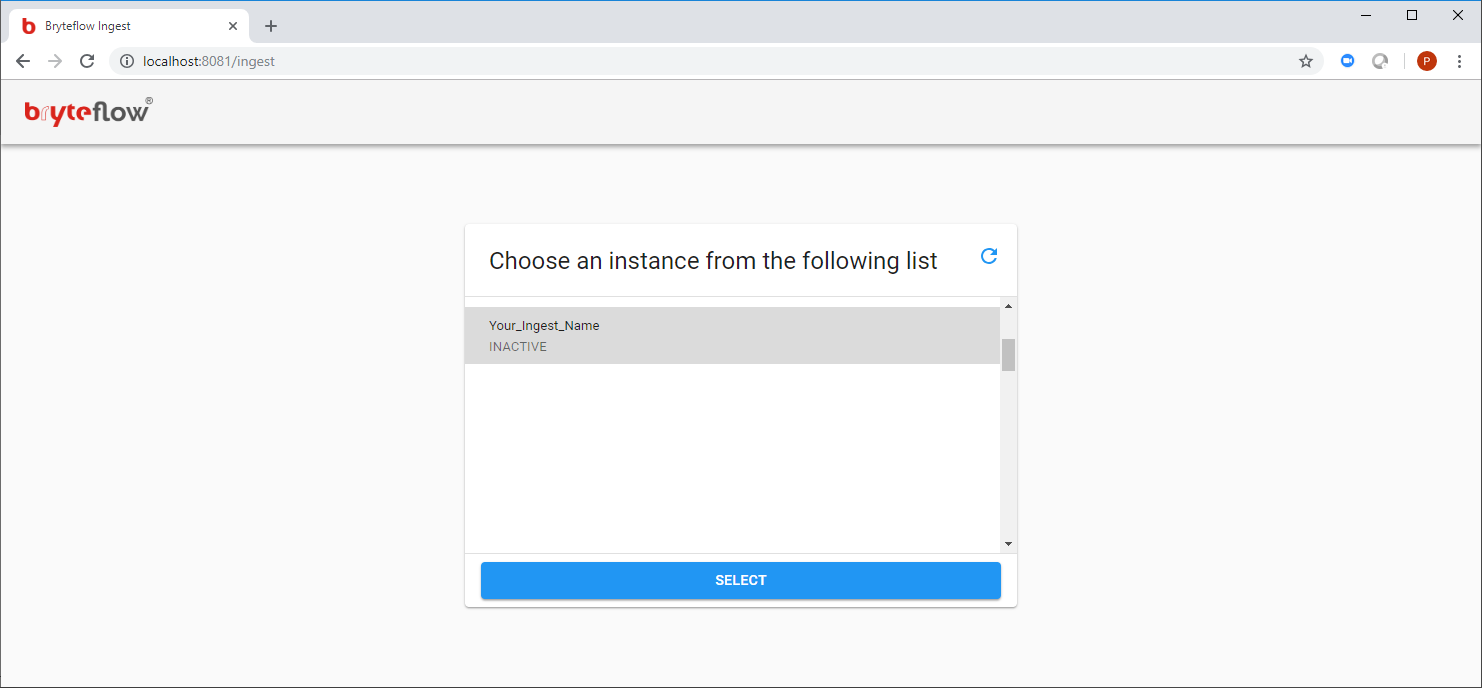
BryteFlow Ingest will collect the configuration and saved execution state of the instance selected (in this case ‘Your_Ingest_Name’) and restore accordingly.
Once restored, its recommended to stop the EC2 at fault(previous install):
- Go to AWS Ec2 console
- Search for the tag for ‘BryteFlow Ingest’ or the one used to launch the application.
- Select the older EC2 instance
- Go to ‘Actions’ -> ‘Instance State’ and click ‘Terminate’
NOTE: Recovery can also be a method of partial migration between environments (for example DEV to PROD stacks). As the restore will clone the exact source environment and source state further configuration will be required (for example updating configuration options of the PROD stack EMR instance, S3 location etc). But this method could cut down on some of the workload in cases where there are 100’s of tables to be configured and you’re moving to a new EC2 instance.
Recovery from Faults
BryteFlow supports high availability and auto recovery mechanisms in case of faults and failures.
- In case of AZ faults or Instance failures or when,
- EC2 instance is terminated/effected, BryteFlow saves the last successful loads as a savepoint. Its resumes from the savepoint when re-started again in another AZ or on another EC2 instance.
- EMR cluster failures, BryteFlow does continuous retries until successful.
- EMR step failures, BryteFlow does continuous retries with exponential backoff feature, this prevents throttling exception to occur.
- Redshift/ Snowflake connection issues, BryteFlow does continuous retries until successful.
- Source DB Connection issues, BryteFlow does continuous retries until successful.
- AWS S3 connection issue, BryteFlow does continuous retries until successful.
Customers looking for high availability support are recommended to configure their BryteFlow Ingest instance for High availability and recovery. Details to setup this feature is mentioned in the High Availability / Recovery section.
- In case of Application faults and failures
- Get notified by enabling CloudWatch Logs and metrics in BryteFlow Ingest. AWS CloudWatch events can be used for alerting by writing Lamdba functions for customer specific requirements.
- Or Enable SNS’s in BryteFlow Ingest and subscribe to the SNS topic from AWS console
Details to setup these features are mentioned in the Remote Monitoring section.
- EC2 monitoring : Its recommended to enable Cloudwatch monitoring for EC2’s or have health checks running on the EC2 and have proper alerts to get notified of any issues.
- For disk space, BryteFlow Ingest sends status to CW Logs that includes free disk space in GB. Users can write Lambda functions around this to raise alarms.
Prerequisite:
- Create an IAM role
- Attach policy that allows Lambda functions to call AWS services as below:
-
{
  "Version": "2012-10-17",
  "Statement": [
    {
      "Sid": "Stmt1",
      "Action": [
        "logs:FilterLogEvents",
        "logs:GetLogEvents",
        "logs:PutLogEvents"
      ],
      "Effect": "Allow",
      "Resource": "arn:aws:logs:<region>:<account_ID>:log-group:<log-group-name>:log-stream:<log-stream-name>"
    },
    {
     "Sid": "Stmt2",
     "Action": [
        "sns:Publish",
        "sns:TagResource"
        ],
     "Effect": "Allow",
     "Resource": "arn:aws:sns:<region>:<account_ID>:<topic_name>"
    }
  ]
}
-
- Create an SNS topic (refer AWS documentation) and use the ARN in your AWS Lambda code.
Step to create a Lambda function:
- Login to AWS console and go to AWS Lambda dashboard.
- Click on Create function
- Give Function name
- Choose the runtime language Python 3.8 from the dropdown.
- Click on create the function
- On the next screen click on Add trigger
- Select CloudWatch Log from the dropdown
- Choose your log group
- Give filter name
- Click on Add (You can add multiple log group 1 by 1)
- Add your Lambda code in the function code window (scroll down the screen)
- Choose the ‘Lambda Execution role’
- Click on the Save button.
import boto3
freeGb = 100;
cloudwatch = boto3.client(‘logs’)
response = cloudwatch.get_log_events(
logGroupName=’Oracle_LogGroup’
logStreamName=’Oracle_
startFromHead=False,
limit=100
)
#print(“events list “, response[“events”])
print (“———————> “)
for i in response[“events”]:
#print(“message –> “, i[“message”])
msg = json.loads(i[“message”])
#print(“type –> “,msg[“type”])
if msg[“type”] == “Status” and msg[“diskFreeGB”] < freeGb:
#print(“diskFreeGB –> “, msg[“diskFreeGB”])
sns = boto3.client(‘sns’)
sns.publish(TopicArn=’arn:aws:
Message=’Your free disk size is getting low please contact concerned team!’
Time to Recover
Recovery Point Objective(RPO)
BryteFlow does auto recovery of the instance and as it uses most durable services like S3 and Dynamo db to store its data, the data has unlimited retention.
In case of customer data, it totally depends on the Customer’s source db settings for data retention. If the source data is available BryteFlow Ingest can recover and replicate from thereon.
BryteFlow ensures it meets the customer expectation of near real time latency and hence tries to recover automatically in most of the failure scenarios.
Recovery Time Objective(RTO)
For EC2 failures, RTO for BryteFlow applications is very minimal(in minutes) as it maintains the save-point of Ingest application in near real-time onto Dynamo DB, which is highly durable AWS service. When the Ingest instance is back online after a restart or after it was terminated abruptly(mostly in case of EC2 failures). It resumes from the last successful save-point and continues onward replication, without needing any full reload.
For EMR Failures, the RTO depends on the time taken to launch a new cluster so when using single EMR cluster the time varies from 10-30 minutes. Until the EMR is up it retries with exponential back-off mechanism until a successful connection is established and replication continues from the same point, without any data loss.
Please note: No full-reload is needed unlike other available solutions.
Recovery Testing
Once BryteFlow Ingest is recovered from any failure, follow below steps to perform basic checks before starting the replication in order to avoid any further errors or issues:
- Start BryteFlow Ingest service
- Open Ingest web console in chrome browser
- Go to ‘Connections’ tab in the left menu
- Under ‘Source’ check your source db configurations and do a ‘Test Connection’ to check the connectivity between BryteFlow and source db.
- If all is good, do the same for ‘Destination’ connections.
- If any hiccups encountered in source or destination db connectivity, troubleshoot further to resolve the issue until successful connection is established.
- Turn the ‘Schedule to ‘ON’ and resume ongoing replication.
Recommended Risk Audit mechanisms
It is important for any organisation to maintain server and access logs for security and audit purposes. BryteFlow recommends to enable logging for most of the AWS services being used like AWS S3 and AWS EMR.
For enabling logs on S3 please refer to AWS documentation below : https://docs.aws.amazon.com/AmazonS3/latest/dev/ServerLogs.html#server-access-logging-overview
Amazon EMR produces logs by default, these are written to the master node. BryteFlow recommends to launch the EMR cluster in ‘Logging’ mode, which enables logs to be written to S3 bucket. EMR is integrated with AWS CloudTrail. CloudTrail captures all API calls for Amazon EMR as events. All Amazon EMR actions are logged by CloudTrail and are documented in the Amazon EMR API Reference.
Customers can enable continuous delivery of CloudTrail events to an Amazon S3 bucket, including events for Amazon EMR. The information collected by CloudTrail can help determine the request that was made to Amazon EMR, the IP address from which the request was made, who made the request, when it was made, and additional details.
For more details on Logging Amazon EMR API Calls in AWS CloudTrail refer to AWS documentation below: https://docs.aws.amazon.com/emr/latest/ManagementGuide/logging_emr_api_calls.html
Remote Monitoring
BryteFlow Ingest comes pre-configured with remote monitoring capabilities. These capabilities leverage existing AWS technology such as CloudWatch Logs/Events. CloudWatch can be used (in conjunction with other assets in the AWS ecosystem) to monitor the execution of BryteFlow Ingest and in the event of errors/failures raise the appropriate alarms. The events from Ingest application flows to CloudWatch Logs and Kinesis(if configured). These events provides in detail application stats which can be used for any kind of custom monitoring.
In addition to the integration with CloudWatch and Kinesis, BryteFlow Ingest also writes the internal logs directly to S3 (BryteFlow Ingest console execution and error logs).
Prerequisites for enabling Remote Monitoring in BryteFlow Ingest are as below:
Please note below services are optional and Customers can choose to setup any, all or none.
- Create Cloudwatch Log Group. Refer AWS documentation for detailed steps.
- Create Cloudwatch Log stream. Refer AWS documentation for detailed steps.
- Create Cloudwatch Log stream. Refer AWS documentation for detailed steps.
- Create SNS topic. Refer AWS documentation for detailed steps.
- Create Kinesis stream. Refer AWS documentation for detailed steps.
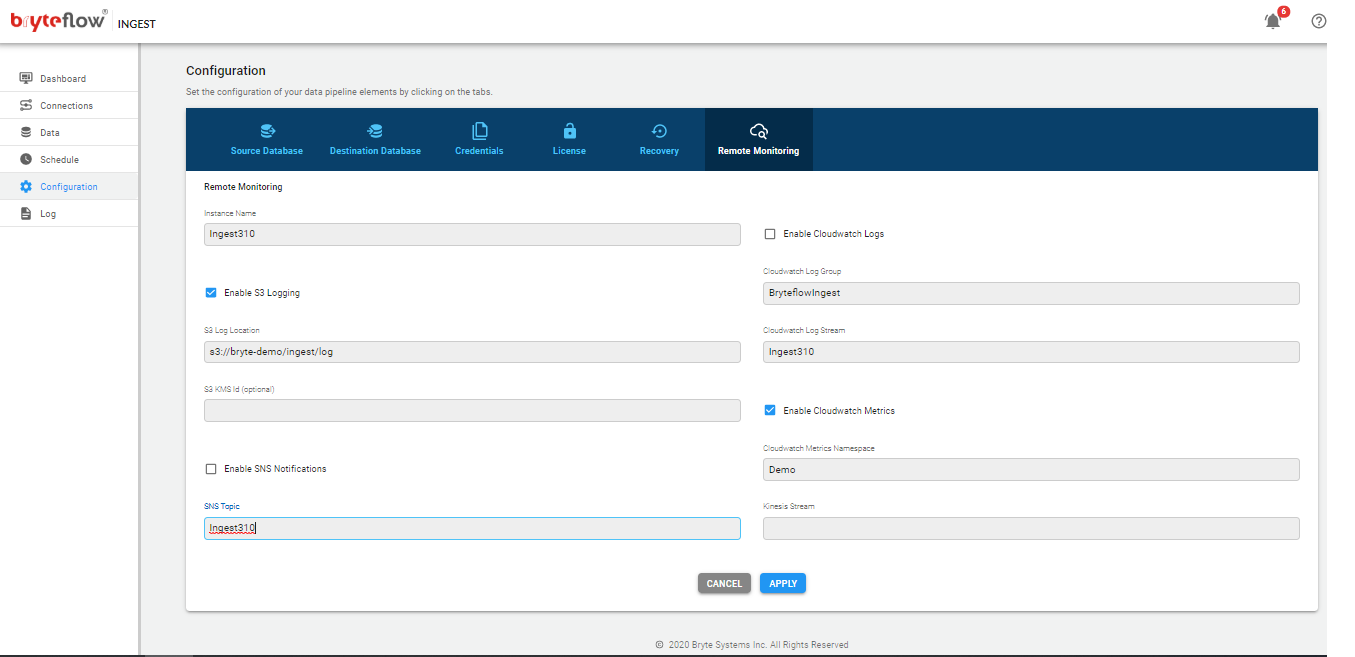
To Configure the remote monitoring perform the following steps :
- Enter an Instance Name, this being a business friendly name for the current instance of BryteFlow Ingest.
- Check Enable S3 Logging if you want to record data to S3 (console/execution logs).
- Enter the destination of the logging data in S3, for example s3://your_bucket_name/your_folder_name
- Enter the name of the CloudWatch Log Group (this needs to be created first in the AWS console)
- Enter the name of the CloudWatch Log Stream under the aforementioned Log Group (again this needs to be created first in the AWS console)
- Check Enable CloudWatch Metrics if required
- Check Enable SNS Notifications
- Enter the Topic ARN or SNS Topic Name in the SNS Topic input box
- If the events needs to be flown to Kinesis, please provide the Kinesis Stream name in the ‘Kinesis Stream’ field.
- Click apply to save the changes
The events that BryteFlow Ingest pushes to AWS CloudWatch Logs and metrics console are as follows, please refer to Appendix: Understanding Extraction Process for a more detailed breakdown.
| Bryte Events | Description |
|---|---|
| LogfileProcessed | Archive log file processed (Oracle only) |
| TableExtracted | Source table extract complete MS SQL Server and Oracle (initial extracts only) |
| ExtractCompleted | Source extraction batch is complete |
| TableLoaded | Destination table load is complete |
| LoadCompleted | All destination table loads in a batch is complete |
| HaltError | Unrecoverable error occurred and turned the Scheduler to OFF |
| RetryError | Error occurred but will retry |
Log
You can monitor the progress of your extracts and loads by navigating to the “Log” tab. The log shows the progress and current activity of the Ingest instance. Filters can be set to view specific logs like errors etc.
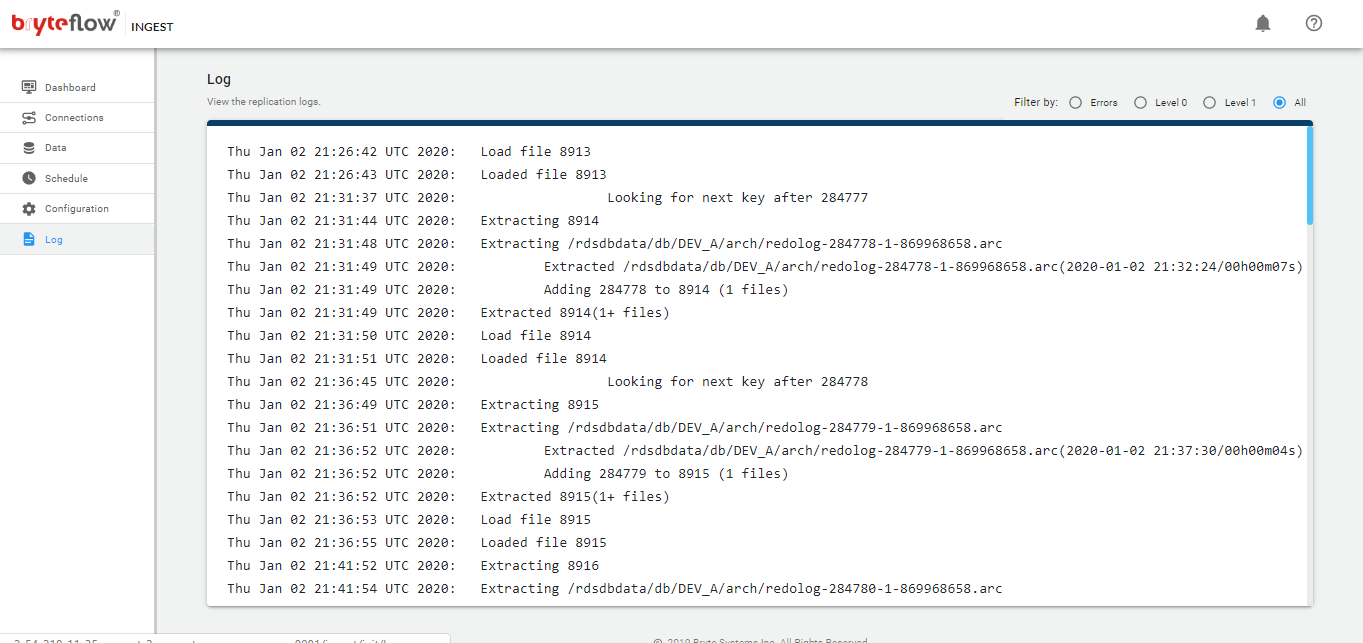
BryteFlow Ingest stores the log files under your install folder, specifically under the \log folder.
The path to log file is as follows <install folder of Ingest>\log\sirus*.log, for example
c:\Bryte\Bryte_Ingest_37\log\sirus-2019-01.log
The error files are also stored under the \log folder.
The path to log file is as follows <install folder of Ingest>\log\error*.log, for example
c:\Bryte\Bryte_Ingest_37\log\error-2019-01.log

These logs can also be reviewed/stored in S3, please refer to the following section on Remote Monitoring for details.
Optimize usage of AWS resources / Save Cost
EMR Tagging
BryteFlow Ingest supports EMR Tagging feature which helps you dramatically to save cost on the EMR Clusters. This helps customers to control EMR cost by terminating the cluster when not in use without interrupting Ingest config and schedule.
You can add default tag ‘BryteflowIngest’ when creating a new Amazon EMR cluster for Ingest or you can add, edit, or remove tags from a running Amazon EMR cluster. And, use the tag name and value in the EMR Configuration section of Ingest as in below image. Also very well handles the EMR changeover, in case an existing cluster tag name is changed and a new cluster with the correct tag is created, any existing jobs on the old cluster will complete and new jobs is started on the new cluster.
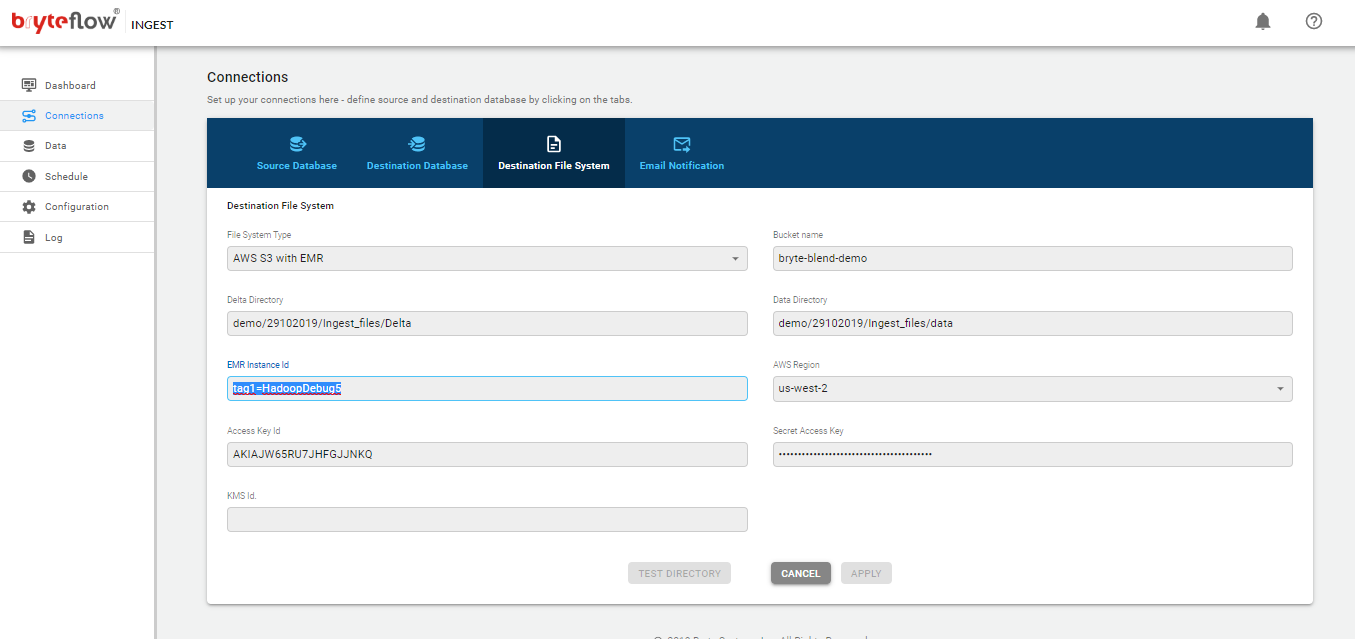
Tagging AWS Resources
AWS allows customers to assign metadata to their AWS resources in the form of tags. It is also recommended that you tag all the AWS resources created for and by BryteFlow for managing and organizing resources, access control, cost tracking, automation, and organization.
Its recommended to use tags with names which are specific to the instance being created, for example, for a BryteFlow instance which is replicating source db which is a Production database server for Billing and Finances, tag names should reflect the dbname it is dedicated to like ‘BryteFlowIngest_BFS_EC2_Prod’, similarily for UAT environment it can be ‘BryteFlowIngest_BFS_EC2_UAT’. By doing this Customers can easily differentiate between the various AWS resources being used within their environment. Use similar tag names for each service.
BryteFlow recommends to tag the below listed AWS services used by with unique identifiable tag name.
- AWS EC2
- AWS EMR
- AWS Redshift instances
For the detail guide on tagging resources in AWS refer to the AWS documentation links provided:
https://docs.aws.amazon.com/AWSEC2/latest/UserGuide/Using_Tags.html
https://docs.aws.amazon.com/emr/latest/ManagementGuide/emr-plan-tags.html
https://docs.aws.amazon.com/redshift/latest/mgmt/amazon-redshift-tagging.html
Upgrade software versions from AWS Marketplace
Users already using BryteFlow AMI Standard Edition can easily upgrade to the latest version of the software directly from AWS Marketplace by following few easy steps .
Steps to perform in your current install :
- As you are planning to upgrade you need to make sure you have all your setup backed up.
- To save your current instance setup and stats go to ‘Configuration’ -> ‘Recovery’
- In the Instance Name field enter a business friendly name for the current instance of BryteFlow Ingest
- Check Enable Recovery
- Enter the destination of the recovery data in S3, for example s3://your_bucket_name/your_folder_name/Your_Ingest_name
- Click on the ‘Apply’ button to confirm and save the details
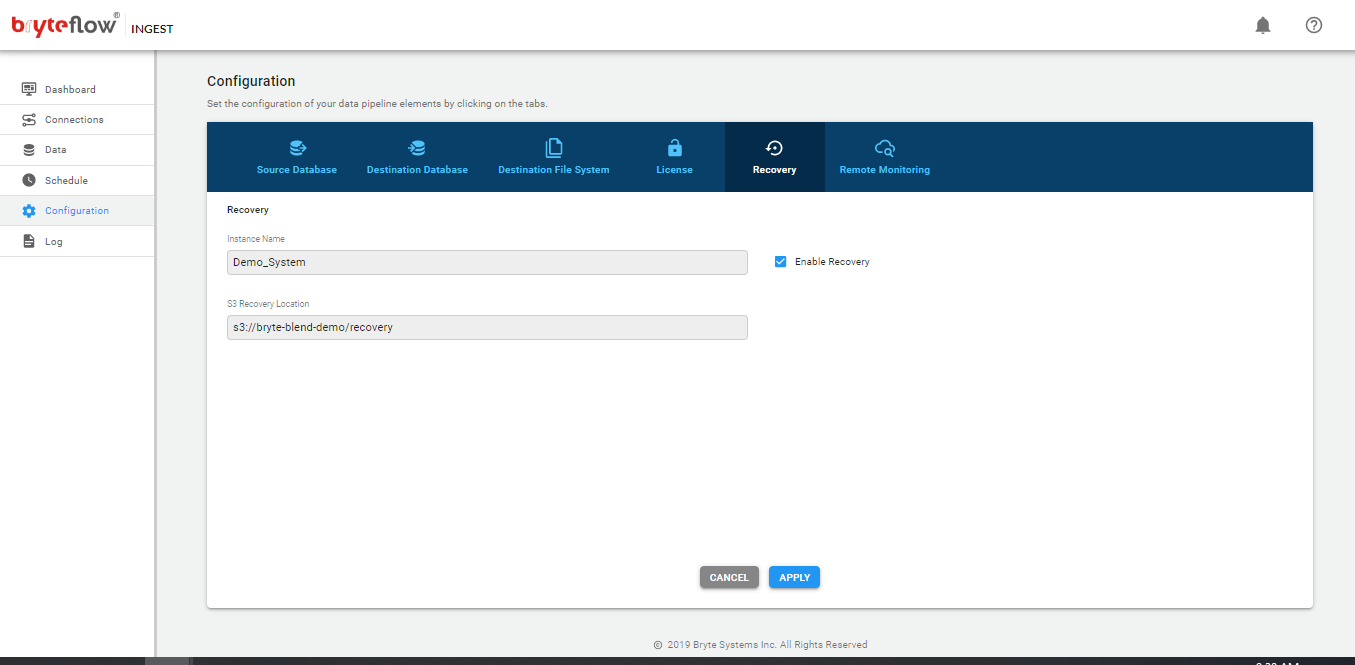
- Once the recovery is setup, you are good to turn the ‘Schedule to OFF’ of the current version and let it come to a complete pause.
- Go to product URL from AWS marketplace https://aws.amazon.com/marketplace/pp/B01MRLEJTK
- In the product configuration settings, choose the latest available version from the ‘software version’ dropdown.
- And, ‘Continue to Launch’ your new instance.
- Choose Action ‘Launch from Website’
- Select your EC2 instance type based on your data volume, recommendations available in the product detail page
- Choose your VPC from the dropdown or go by the default
- Please select the ‘Private Subnet’ under ‘Subnet Settings’. If none exists, its recommended to create one. Please follow detail AWS User Guide for Creating a Subnet.
- Update the ‘Security Group Settings’ or create one based on BryteFlow recommended steps as below:
- Assign a name for the security group, for eg: BryteFlowIngest
- Enter a description of your choice
- Add inbound rule(s) to RDP the EC2 with the Custom IP address
- Add outbound rule(s) to allow the EC2 instance access the source db. DB ports will vary based on the source database , please add rules to allow the instance access to specific source database ports.
- For more details, refer to BryteFlow recommendation on Network ACLs for your VPC in the section ‘Recommended network acl rules for ec2‘
- Provide the Key Pair Settings by choosing an EC2 key pair of your own or ‘Create a key pair in EC2‘
- Click ‘Launch’ to launch the EC2 instance.
- The endpoint will be an EC2 instance running BryteFlow Ingest (as a windows service) on port 8081

Steps to perform in your new install :
- Connect to the new instance using ‘Remote Desktop Connections’ to the EC2 launched via AMI.
- Once connected to the EC2 instance, Launch BryteFlow Ingest from the google chrome browser using bookmark ‘BryteFlow Ingest’
- Or type
localhost:8081into the Chrome browser to open the BryteFlow Ingest web console - This will bring up a page requesting either a ‘New Instance’ or an ‘Existing Instance’
- Click on the ‘Existing Instance’ button as we need to resume BryteFlow Ingest from the last saved
- Select the existing instance you wish to restore from the list displayed, in this example there is only one (it being ‘Your_Ingest_Name’), once the required instance has been selected click on the the ‘Select’ button
- Click on the ‘Existing Instance’ button as we need to resume BryteFlow Ingest from the last saved
- BryteFlow Ingest will collect the configuration and saved execution state of the instance selected (in this case ‘Your_Ingest_Name’) and restore accordingly.
- Go to the ‘Connections’ tab, and test the ‘Source’, Destination’ and ‘File System’ connections prior to turning the ‘Schedule On’.
- In case of any connection issues, please check the firewall settings of the EC2 and source systems.
- Once all connections are ‘Tested OK’, go to ‘Schedule’ tab and turn the schedule to ‘ON’.
- This completes the upgrade and resumes the Ingestion as per the specified schedule.
Once upgraded, its recommended to stop the AMI for previous install:
- Go to AWS Ec2 console
- Search for the tag for ‘BryteFlow Ingest’ or the one used to launch the application.
- Select the older EC2 instance
- Go to ‘Actions’ -> ‘Instance State’ and click ‘Terminate’
BryteFlow: Licencing Model
BryteFlow’s Licensing model is based on the data volumes at the source getting replicated across to destination.
Volume based licensing are classified into below groups:
- 100GB
- 300GB
- 1TB
- > 1TB (contact Bryte Support)
BryteFlow products are available to use from the AWS marketplace for data volumes upto 1TB. For source data volumes > 1TB its recommended to contact BryteFlow support(email: support@bryteflow.com) for detail information and inquiry.
BryteFlow Ingest : Pricing
BryteFlow products are available for use via AWS Marketplace. It comes in two different flavors:
- BryteFlow Standard Edition-Data Integration for S3, Redshift, Snowflake
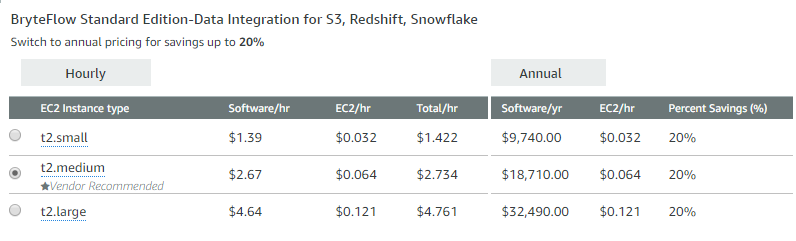
-
BryteFlow Enterprise Edition-Data Integration S3, Redshift, Snowflake
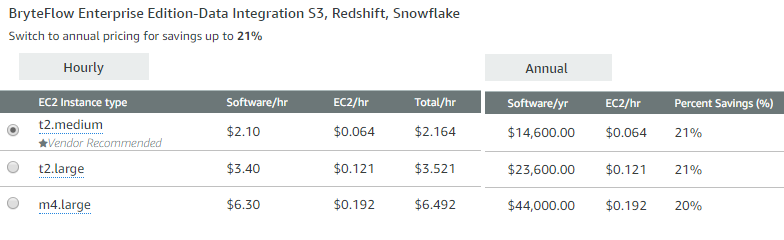
BryteFlow Support Information
Each of our products is backed by our responsive support team. Please allow for 24 hours for us to get back to you. To get in touch with our support team, shoot an email to support@bryteflow.com
BryteFlow provides Level 3 support to all its Customers.
| Tier 1 | Business hours |
| Tier 2 | 24×7 Support |
| Support Language | English(US&UK) |
| Maintenance And Support Level | Description |
| Business Hours Support | Support for suspected bugs, errors or material differences between the use of Software and the specifications of Software outlined in the Documentation (Incidents). The scope of the Maintenance and Support Service is outlined with additional terms and conditions at Appendix A. |
| Premium Support | § 24×7 Support
§ Email support § Access to customer portal § Software updates § Escalation management for critical issues § Severity 1 issues – 1 hour § Severity 2 issues – 2 hours § Severity 3 issues – 4 hours
|
Appendix: Understanding Extraction Process
Extraction Process
Understanding Extraction.
Extraction has two parts to it.
- Initial Extract.
- Delta Extract.
Initial Extract.
An initial extract is done for the first time when we are connecting a database to BryteFlow Ingest software. In this extract, the entire table is replicated from the source database to the destination (AWS S3 or AWS Redshift).
A typical extraction goes through the following processes. Below example shown is the extraction from MS SQL Server as source and Amazon S3 bucket and destination.
Extracting 1
Full Extract database_name:table_name
Info(ME188): Stage pre-bcp
Info(ME190): Stage post-bcp
Info(ME260): Stage post-process
Extracted 1
Full Extract database_name:table_name complete (4 records)
Load file 1
Loading table emr_database:dbo.names with 4 records(220 bytes)
Transferring null to S3
Transferred null 10,890 bytes in 8s to S3
Transferring database_name_table_name to S3
Delta Extract.
After the initial extract, when the database is replicated to the destination, we do a delta extract. In delta extracts, only the changes on the source database are extracted and merged with the destination.
After the initial extraction is done all the further extract are Delta Extracts (changes since the last extract.)
A typical delta extracts log file is shown below.
Extracting 2
Delta Extract database_name:table_name
Info(ME188): Stage pre-bcp
Info(ME190): Stage post-bcp
Info(ME260): Stage post-process
Delta Extract database_name complete (10 records)
Extracted 2
Load file 2
Loaded file 2
First Extract
Extracting Database for the first time.
Keep all defaults. Click on Full Extract.
The first extract always has to be a Full Extract. This gets the entire table across and then the delta’s are populated periodically with the desired frequency.
Schedule Extract
To configure extracts to run at a specific time perform the following steps.
- In case of Oracle Automatic is preselected and other options are disabled by default.
- For MS SQL Server you can choose the period in minutes.
- A daily extraction can be done at a specific time of the day by choosing hour and minutes in the drop-down.
- Extraction can also be scheduled on specific days of the week at a fixed time by checking the checkboxes next to the days and selecting hours and minutes in the drop-down.
- Click Apply to save the schedule.
Add a new table to existing Extracts
After database have been selected for extraction and they are replicating. If a need arises to add a new table to extraction process then it can be done by following steps.
- Click the Schedule ‘off’ (top right of screen under Schedule tab)
- Navigate to Data tab
- Select the new table(s) by navigating into database instance name, schema name and table name(s)
- Configure the table, considering the following
- Select transfer type
- Select partitioning folder (refer to Partitioning section for details)
- Select primary key column(s) where applicable
- Select columns to be masked (optional, these are excluded from extraction, for example salary data)
- Click on the ‘Apply’ button
- Click on the ‘Full Extract’ button
- Repeat process if more than one table is required
- Navigate to the Schedule Tab
- Click on ‘Sync New Tables’ button
This will include the new table(s) for a full extract and also resume with deltas for all the previously configured tables and the newly added table(s).
Resync data for Existing tables
If the Table transfer type is Primary Key with History, to resync all the data from source, perform the following steps
- Click the Schedule ‘off’ (top right of screen under Schedule tab)
- For Resync Data on ALL configured tables…
- Navigate to Schedule tab
- Click on the ‘Full Extract’ button
- For Resync Data on selected tables..
- Navigate to Data Sources tab
- Select the table(s) by navigating into database instance name, schema name and table name(s)
- Click on the ‘Full Extract’ button
- Repeat process if more than one table is required
- Navigate to the Schedule Tab
- Click on ‘Sync New Tables’ button
- Navigate to Data Sources tab
Appendix: Bryte Events for AWS CloudWatch Logs and SNS
BryteFlow Ingest supports connection to AWS Cloudwatch Logs, Cloudwatch Metrics and SNS. This can be used to monitor the operation of Bryteflow Ingest and integrate with other assets leveraging the AWS infrastructure.
AWS Cloudwatch Logs can be used to send logs of events like load completion or failure from Bryteflow Ingest. Cloudwatch Logs can be used to monitor error conditions and raise alarms.
Below are the list of Events that BryteFlow Ingest pushes to AWS CloudWatch Logs console and for AWS SNS :
| Bryte Events | Description |
|---|---|
| LogfileProcessed | Archive log file processed (Oracle only) |
| TableExtracted | Source table extract complete MS SQL Server and Oracle (initial extracts only) |
| ExtractCompleted | Source extraction batch is complete |
| TableLoaded | Destination table load is complete |
| LoadCompleted | All destination table loads in a batch is complete |
| HaltError | Unrecoverable error occurred and turned the Scheduler to OFF |
| RetryError | Error occurred but will retry |
Below is the detail for each of the Bryte Events :
| Event : LogfileProcessed
Attribute |
Is Metric(Y/N)? |
Description |
|||
|---|---|---|---|---|---|
| type | N | “LogfileProcessed” | |||
| generated | N | Timestamp of message | |||
| source | N | Instance name | |||
| sourceType | N | “CDC” | |||
| fileSeq | N | File sequence | |||
| file | N | File name | |||
| dictLoadMS | Y | Time taken to load dictionary in ms | |||
| CurrentDBDate | N | Current database date | |||
| CurrentServerDate | N | Current Bryte server date | |||
| parseMS | Y | Time taken to parse file in ms | |||
| parseComplete | N | Timestamp when parsing is complete | |||
| sourceDate | N | Source date |
| Event : TableExtracted
Attribute |
Is Metric(Y/N)? |
Description |
|||
|---|---|---|---|---|---|
| type | N | “TableLoaded” | |||
| subType | N | Table name | |||
| generated | N | Timestamp of message | |||
| source | N | Instance name | |||
| sourceType | N | “CDC” | |||
| tabName | N | Table name | |||
| success | N | true/false | |||
| message | N | Status message | |||
| sourceTS | N | Source date time | |||
| sourceInserts | Y | No. of Inserts in source | |||
| sourceUpdates | Y | No. of Updates in source | |||
| sourceDeletes | Y | No. of Deletes in source |
| Event : ExtractCompleted
Attribute |
Is Metric(Y/N)? |
Description |
|||
|---|---|---|---|---|---|
| type | N | “ExtractCompleted” | |||
| generated | N | Timestamp of message | |||
| source | N | Instance name | |||
| sourceType | N | “CDC” | |||
| jobType | N | “EXTRACT” | |||
| jobSubType | N | Extract type | |||
| success | N | Y/N | |||
| message | N | Status message | |||
| runId | N | Run Id | |||
| sourceDate | N | Source date | |||
| dbDate | N | Current database date | |||
| fromSeq | N | Start file sequence | |||
| toSeq | N | End file sequence | |||
| extractId | N | Run id for extract | |||
| tableErrors | Y | Count of table errors | |||
| tableTotals | Y | Count of total tables |
| Event:TableLoaded
Attribute |
Is Metric(Y/N)? |
Description |
|||
|---|---|---|---|---|---|
| type | N | “TableLoaded” | |||
| subType | N | Table name | |||
| generated | N | Timestamp of message | |||
| source | N | Instance name | |||
| sourceType | N | “CDC” | |||
| tabName | N | Table name | |||
| success | N | true/false | |||
| message | N | Status message | |||
| sourceTS | N | Source date time | |||
| sourceInserts | Y | No. of Inserts in source | |||
| sourceUpdates | Y | No. of Updates in source | |||
| sourceDeletes | Y | No. of Deletes in source | |||
| destInserts | Y | No. of Inserts in destination | |||
| destUpdates | Y | No. of Updates in destination | |||
| destDeletes | Y | No. of Deletes in destination |
| Event : LoadCompleted
Attribute |
Is Metric(Y/N)? |
Description |
|||
|---|---|---|---|---|---|
| type | N | “LoadCompleted” | |||
| generated | N | Timestamp of message | |||
| source | N | Instance name | |||
| sourceType | N | “CDC” | |||
| jobType | N | “LOAD” | |||
| jobSubType | N | Sub type of the “LOAD” | |||
| success | N | Y/N | |||
| message | N | Status message | |||
| runId | N | Run Id | |||
| sourceDate | N | Source date | |||
| dbDate | N | Current database date | |||
| fromSeq | N | Start file sequence | |||
| toSeq | N | End file sequence | |||
| extractId | N | Run id for extract | |||
| tableErrors | Y | Count of table errors | |||
| tableTotals | Y | Count of total tables |
| Event : HaltError
Attribute |
Is Metric (Y/N)? |
Description |
|||
|---|---|---|---|---|---|
| type | N | “HaltError” | |||
| generated | N | Timestamp of message | |||
| source | N | Instance name | |||
| sourceType | N | “CDC” | |||
| message | N | Error message | |||
| errorId | N | Short identifier |
| Event : RetryError
Attribute |
Is Metric (Y/N) ? |
Description |
|||
|---|---|---|---|---|---|
| type | N | “RetryError” | |||
| generated | N | Timestamp of message | |||
| source | N | Instance name | |||
| sourceType | N | “CDC” | |||
| message | N | Error message | |||
| errorId | N | Short identifier |
Appendix: Release Notes
Release details (by date descending, latest version first)
Bryteflow Ingest 3.11.4
Release Notes BryteFlow Ingest – v3.11.4
Released February 2022
New Features
- PostgreSQL DB as a new source connector.
- Oracle RAC as a new source connector.
- Oracle Pluggable DB as a new source connector.
- Access to views on Ingest UI for SAPHANA Full Extracts and Timestamps.
- Support for new destination – Load S3 Deltas.
- Support for new destination – Google BigQuery from all SAP sources.
- Support for new destination destination – ADLS2.
- Enhancements for Oracle Continuous Logminer sources
- Active directory (AD) support for MsSQL server destination.
- Enhancements in extracting BLOB/CLOB data from Oracle.
- Enhancements related to Log4j issue.
Known Issues
1. Sync Struct not supported for S3/EMR destination with CSV(Bzip2,Gzip,None) output format.
Only supported for Parquet (Snappy) and Orc (Snappy).
2. Athena table creation is supported for Parquet (Snappy) compression only from S3/EMR.
3. Source database type- JDBC Full Extract do not work for all databases.
BryteFlow Ingest 3.11
Release Notes BryteFlow Ingest – v3.11
Released April 2021
New Features
1. NEW UI on DATA page with tree and list view with filters for table.
2. Support for Oracle RAC source.
3. Timestamp Changes With Daylight Savings.
4. Fix for the tables having special characters in table-name like slash and underscore.
5. Fixes related to Type-Change tables.
6. Fixes for Postgres source.
Known Issues
1. Sync Struct not supported for S3/EMR destination with CSV(Bzip2,Gzip,None) output format.
Only supported for Parquet (Snappy) and Orc (Snappy).
2. Athena table creation is supported for Parquet (Snappy) compression only from S3/EMR.
3. Source database type- JDBC Full Extract do not work for all databases.
BryteFlow Ingest 3.10.1
Release Notes BryteFlow Ingest – v3.10.1
Released October 2020
New Features
- Auto-selection of primary key when you go to the ‘Data’ section and choose the table.
- Support for SAP HANA as a source.
- GUI performance improvement
- EMR cluster changeover logic.
- MsSQL – Partition for NULL values of DATE column in default value 1970-01-01 on S3.
Bug Fixes
- Timestamp Changes with Daylight savings
- Fix for the tables having special characters in table-name like slash and underscore.
- Fixes related to Type-Change tables
Limitations:
- Sync Struct feature is not supported for S3/emr destination with CSV(Bzip2,Gzip,None) output format.
Only supported for Parquet (Snappy) and Orc (Snappy). - Athena table creation is supported for Parquet (Snappy) compression only from S3/EMR.
BryteFlow Ingest 3.10
Release Notes BryteFlow Ingest – v3.10
Released June 2020
New Features
- Support for Direct Snowflake Multiload option in Destination DB
- Changes in fields of Destination Database connection page
BryteFlow Ingest 3.10
Release Notes BryteFlow Ingest – v3.10
Released May 2020
New Features
- Support for Oracle Redo Logs as a source
- Support for Salesforce as a source
- Support for Snowflake as a destination using Amazon S3
- Support for Snowflake as a destination without using Amazon S3 (Direct Load)
- IAM access available as an option instead of using AWS Credentials
- Automatic creation of tables in Athena for S3/EMR destination
- JDBC options can now be entered into the Source and Destination Database
details. These extend the JDBC URL used to access the databases. - Cloudwatch Logs are sent out if connections fail for an hour at a time
- Snowflake fields can now be entered separately as
Account/Warehouse/Database - The Log page now uses filters to set level of log messages displayed
- Supports conversion of UTF-8 characters to UTF-16 for MS SQL Server as a
destination - Support for Kinesis as a destination for event messages in addition to those
currently sent to Cloudwatch Logs - Support for Type Change of fields from native character (or numeric )format to
Integer, Long, Float, Date, Timestamp - Rollback files now shown with the latest file on top
- Cloudwatch Log message sent if EMR process runs too long. A message is sent
every hour. - SNS Topic Name can be entered instead of full ARN
- Backup/recovery of files uses instance name in addition to the provided S3
folder name. This should allow the same folder to be specified across all
instances.
Bug Fixes
- Scheduler is turned off on 3 unsuccessful attempts at loading the data. This is not including connection errors.
- Scheduler is turned off when a structure mismatch is detected
- Tables with special characters like / and $ are now handled correctly for an Oracle source
Known Issues
- A full extract will not close deleted records with an S3/EMR destination
- Change in table structure may not be detected on S3/EMR destination when using CSV (any compression). The workaround is to use the Parquet format.
- Connection to AWS Aurora may show a verbose warning even if connection is successful
BryteFlow Ingest 3.9.3
Release Notes BryteFlow Ingest – v3.9.3
Released March 2020
New Features
- MySQL is now supported as a source
- CloudWatch messages are sent with each log file processed in MySQL
- Ingest differentiates between null and zero length strings in MySQL
- Support for fail-over database for Oracle
Bug Fixes
- Some errors around Delta extracts for tables with Primary Key Only replication have been fixed
- Warnings on unknown types are now handled and do not appear
- Issues around table names with special characters like $ or / have now been fixed
- Communication link errors with Aurora database are now handled
- A number of MS SQL data types (BIGINT, NUMERIC, BINARY, SMALLDATETIME) are now handled correctly on S3/EMR destination
- Issue around @ character in Oracle passwords is now fixed
- Errors around handling timestamps in the parquet-snappy format are ow fixed
- Ingest no longer needs bucket level access when using S3/EMR+Snowflake as a destination – folder level access is sufficient
- Strings are correctly handled now in the parquet format instead of being shown as binary data.
BryteFlow Ingest 3.9
Release Notes BryteFlow Ingest – v3.9
Released December 2019
New Features
- New UI
- Redo Initial Extract and Skip Initial Extract functionality changed in the UI as
well as in implementation - CloudWatch Log Status message now includes free disk space
- Performance improvement in accessing database across the internet
- Support in the UI for offset time in periodic extract
- Support in the UI for offset time in Oracle Log catchup time
Bug Fixes
- Fixes to IAM Role used for Parquet and ORC format for S3 + Redshift destination
- Improved error message for expired Orcale archive logs
Known Issues
- Structure Sync operations in Snowflake do not work for a small number of cases
- Destination comparison may not work when file format is parquet.snappy
BryteFlow Ingest 3.8
Release Notes BryteFlow Ingest – v3.8
Released November 2019
New Features
- Optimization for access to on-premises Oracle from Bryteflow server on AWS
- Support for Parquet and ORC formats for S3/EMR + Redshift
- Process for loading large tables using Ingest and Ingest XL
- User defined namespace for Cloudwatch Metrics
- Exponential backoff on throttling of EMR access
- Support for Oracle log mining on a separate Oracle instance
- Cutoff date now has a cutoff offset as well
- Support for processing partitions in a specified order
- Support for Snowflake destination
Bug Fixes
- Support for UTF-8 characters in data
- String now appear correctly in Athena for files in Parquet format
Known Issues
- Some Sync operations may show structure differences in Snowflake where none exist
Release Notes BryteFlow Ingest – v3.7.3
Release Notes BryteFlow Ingest – v3.7.3
Released April 2019
New Features
- Notifications: A notification icon appears on the top bar. The number of issues appears as a bubble. The bubble is red if there are at least one error and orange for warnings. Hovering gives the count of errors and warnings in a tooltip. Clicking on the icon lists the issues in a dropdown list.
- Help: Clicking on the help icon takes you to the online documentation.
- Drivers: The supported source and destination drivers have been streamlined.
- EMR tags: EMR instance can be specified by Cluster ID or a tag value for the tag BryteFlowIngest or a tag and value expressed as “tag=value”.
- Port: Changing the web port is allowed for non-AMI installations.
Bug Fixes
- An issue with an error on no initial extract even when skip initial extract is done for a table is now fixed.
- Some attribute values in Cloudwatch Logs which were previously blank have now been fixed.
- An issue where all pending jobs were canceled on a failure in the current job is now fixed.
- A redundant field when “S3 Files using EMR” is selected as a destination has been removed.
- The Apply button is disabled if no changes have been made in Source/Destination/File screens. This gets around the problem of the connection being flagged with a warning on pressing apply even if no fields have been changed.
- Initial extract in Oracle now sets the effective date to the database date instead of the server date.
Known Issues
- Non-AMI EC2 may show some warning messages on startup.
BryteFlow Ingest 3.7
Release Notes BryteFlow Ingest – v3.7
Released: January 2019
- BryteFlow Ingest 3.7 available on AWS Marketplace as an AMI
- Pay as you go on AWS Marketplace
- Hourly/Annual billing options on AWS Marketplace
- No licence keys on AWS Marketplace
- 5 day trial on AMI (new customers only)
- Volume based licensing
- 100GB
- 300GB
- 1TB
- > 1TB (contact Bryte Support)
- High Availability
- Automatic backup of current state
- Automatic cut-over and recovery following EC2 failure
- IAM support
- Rollback to previous saved point in time
- Dependent upon source db logs
- Partitioning
- Built in to Interface
- Partition names configurable, wide range of formats
- AWS Athena friendly partition names
- New S3 compression options
- Parquet
- ORC(Snappy)
- ORC(Zlib)
- Remote Monitoring (integrated with AWS Services)
- Cloudwatch
- Logging
- Metrics
- SNS